Comparing compression commands with hyperfine

July 6, 2022
0 comments Bash, macOS, Linux

Today I stumbled across a neat CLI for benchmark comparing CLIs for speed: hyperfine. By David @sharkdp Peter.
It's a great tool in your arsenal for quick benchmarks in the terminal.

It's written in Rust and is easily installed with brew install hyperfine. For example, let's compare a couple of different commands for compressing a file into a new compressed file. I know it's comparing apples and oranges but it's just an example:

hyperfine usage example
(click to see full picture)

It basically executes the following commands over and over and then compares how long each one took on average:

  • apack log.log.apack.gz log.log
  • gzip -k log.log
  • zstd log.log
  • brotli -3 log.log

If you're curious about the ~results~ apples vs oranges, the final result is:

▶ ls -lSh log.log*
-rw-r--r--  1 peterbe  staff    25M Jul  3 10:39 log.log
-rw-r--r--  1 peterbe  staff   2.4M Jul  5 22:00 log.log.apack.gz
-rw-r--r--  1 peterbe  staff   2.4M Jul  3 10:39 log.log.gz
-rw-r--r--  1 peterbe  staff   2.2M Jul  3 10:39 log.log.zst
-rw-r--r--  1 peterbe  staff   2.1M Jul  3 10:39 log.log.br

The point is that you type hyperfine followed by each command in quotation marks. The --prepare is run for each command and you can also use --cleanup="{cleanup command here}.

It's versatile so it doesn't have to be different commands but it can be: hyperfine "python optimization1.py" "python optimization2.py" to compare to Python scripts.

🎵 You can also export the output to a Markdown file. Here, I used:

▶ hyperfine "apack log.log.apack.gz log.log" "gzip -k log.log" "zstd log.log" "brotli -3 log.log" --prepare="rm -fr log.log.*" --export-markdown log.compress.md
▶ cat log.compress.md | pbcopy

and it becomes this:

Command Mean [ms] Min [ms] Max [ms] Relative
apack log.log.apack.gz log.log 291.9 ± 7.2 283.8 304.1 4.90 ± 0.19
gzip -k log.log 240.4 ± 7.3 232.2 256.5 4.03 ± 0.18
zstd log.log 59.6 ± 1.8 55.8 65.5 1.00
brotli -3 log.log 122.8 ± 4.1 117.3 132.4 2.06 ± 0.09

How to know if a PR has auto-merge enabled in a GitHub Action workflow

May 24, 2022
0 comments GitHub

tl;dr


      - name: Only if auto-merge is enabled
        if: ${{ github.event.pull_request.auto_merge }}
        run: echo "Auto-merge IS ENABLED"

      - name: Only if auto-merge is NOT enabled
        if: ${{ !github.event.pull_request.auto_merge }}
        run: echo "Auto-merge is NOT enabled"

The use case that I needed was that I have a workflow that does a bunch of things that aren't really critical to test the PR, but they also take a long time. In particular, every pull request deploys a "preview environment" so you get a "staging" site for each pull request. Well, if you know with confidence that you're not going to be clicking around on that preview/staging site, why bother deploying it (again)?

Also, a lot of PRs get the "Auto-merge" enabled because whoever pressed that button knows that as long as it builds OK, it's ready to merge in.

What's cool about the if: statements above is that they will work in all of these cases too:


on:
  workflow_dispatch:
  pull_request:
  push:
     branches:
       - main

I.e. if this runs because it was a push to main the line ${{ !github.event.pull_request.auto_merge }} will resolve to truthy. Same if you use the workflow dispatch from workflow_dispatch.

Auto-merge GitHub pull requests based on "partial required checks"

May 3, 2022
0 comments GitHub

Auto-merge is a fantastic GitHub Actions feature. You first need to set up some branch protections and then, as soon as you've created the PR you can press the "Enable auto-merge (squash)". It will ("Squash and merge") merge the PR as soon as all branch protection checks succeeded. Neat.

But what if you have a workflow that is made up of half critical and half not-so-important stuff. In particular, what if there's stuff in the workflow that is really slow and you don't want to wait. One example is that you might have a build-and-deploy workflow where you've decided that the "build" part of that is a required check, but the (slow) deployment is just a nice-to-have. Here's an example of that:


name: Build and Deploy stuff

on:
  workflow_dispatch:
  pull_request:


permissions:
  contents: read

jobs:
  build-stuff:
    runs-on: ubuntu-latest
    steps:
      - name: Slight delay
        run: sleep 5

  deploy-stuff:
    needs: build-stuff
    runs-on: ubuntu-latest
    steps:
      - name: Do something
        run: sleep 26

It's a bit artificial but perhaps you can see beyond that. What you can do is set up a required status check, as a branch protection, just for the build-stuff job.

Note how the job is made up of build-stuff and deploy-stuff, where the latter depends on the first. Now set up branch protection purely based on the build-stuff. This option should appear as you start typing buil there in the "Status checks that are required." section of Branch protections.

Branch protection

Now, when the PR is created it immediately starts working on that build-stuff job. While that's running you press the "Enable auto-merge (squash)" button:

Checks started

What will happen is that as soon as the build-stuff job (technically the full name becomes "Build and Deploy stuff / build-stuff") goes green, the PR is auto-merged. But the next (dependent) job deploy-stuff now starts so even if the PR is merged you still have an ongoing workflow job running. Note the little orange dot (instead of the green checkmark).

Still working

It's quite an advanced pattern and perhaps you don't have the use case yet, but it's good to know it's possible. What our use case at work was, was that we use auto-merge a lot in automation and our complete workflow depended on a slow step that is actually conditional (and a bit slow). So we didn't want the auto-merge to be delayed because of something that might be slow and might also turn out to not be necessary.

How to sort case insensitively with empty strings last in Django

April 3, 2022
1 comment Django, Python, PostgreSQL

Imagine you have something like this in Django:


class MyModel(models.Models):
    last_name = models.CharField(max_length=255, blank=True)
    ...

The most basic sorting is either: queryset.order_by('last_name') or queryset.order_by('-last_name'). But what if you want entries with a blank string last? And, you want it to be case insensitive. Here's how you do it:


from django.db.models.functions import Lower, NullIf
from django.db.models import Value


if reverse:
    order_by = Lower("last_name").desc()
else:
    order_by = Lower(NullIf("last_name", Value("")), nulls_last=True)


ALL = list(queryset.values_list("last_name", flat=True))
print("FIRST 5:", ALL[:5])
# Will print either...
#   FIRST 5: ['Zuniga', 'Zukauskas', 'Zuccala', 'Zoller', 'ZM']
# or 
#   FIRST 5: ['A', 'aaa', 'Abrams', 'Abro', 'Absher']
print("LAST 5:", ALL[-5:])
# Will print...
#   LAST 5: ['', '', '', '', '']

This is only tested with PostgreSQL but it works nicely.
If you're curious about what the SQL becomes, it's:


SELECT "main_contact"."last_name" FROM "main_contact" 
ORDER BY LOWER(NULLIF("main_contact"."last_name", '')) ASC

or


SELECT "main_contact"."last_name" FROM "main_contact" 
ORDER BY LOWER("main_contact"."last_name") DESC

Note that if your table columns is either a string, an empty string, or null, the reverse needs to be: Lower("last_name", nulls_last=True).desc().

How to close a HTTP GET request in Python before the end

March 30, 2022
0 comments Python

Does you server barf if your clients close the connection before it's fully downloaded? Well, there's an easy way to find out. You can use this Python script:


import sys
import requests

url = sys.argv[1]
assert '://' in url, url
r = requests.get(url, stream=True)
if r.encoding is None:
    r.encoding = 'utf-8'
for chunk in r.iter_content(1024, decode_unicode=True):
    break

I use the xh CLI tool a lot. It's like curl but better in some things. By default, if you use --headers it will make a regular GET request but close the connection as soon as it has gotten all the headers. E.g.

▶ xh --headers https://www.peterbe.com
HTTP/2.0 200 OK
cache-control: public,max-age=3600
content-type: text/html; charset=utf-8
date: Wed, 30 Mar 2022 12:37:09 GMT
etag: "3f336-Rohm58s5+atf5Qvr04kmrx44iFs"
server: keycdn-engine
strict-transport-security: max-age=63072000; includeSubdomains; preload
vary: Accept-Encoding
x-cache: HIT
x-content-type-options: nosniff
x-edge-location: usat
x-frame-options: SAMEORIGIN
x-middleware-cache: hit
x-powered-by: Express
x-shield: active
x-xss-protection: 1; mode=block

That's not be confused with doing HEAD like curl -I ....

So either with xh or the Python script above, you can get that same effect. It's a useful trick when you want to make sure your (async) server doesn't attempt to do weird stuff with the "Response" object after the connection has closed.

Introducing docsQL

March 28, 2022
0 comments Web development, GitHub, JavaScript

tl;dr; docsQL is a web app for analyzing lots of Markdown content files with SQL queries.

Demo

Sample instance based on MDN's open source content.

Screenshots

Background/Introduction

When I worked on the code for MDN in 2019-2021 I often found that I needed to understand the content better to debug or test or just find a sample page that uses some feature. I ended up writing a lot of one-off Python scripts that would traverse the repository files just to do some quick lookup that was too complex for grep. Eventually, I built a prototype called "Traits DB" which was powered by an in-browser SQL engine called alasql. Then in 2021, I joined GitHub to work on GitHub Docs and here there are lots of Markdown files too that trigger different features based on various front-matter keys.

docsQL does two things:

  1. Analyze lots of .md files into a docs.json file which can be queried
  2. A static single-page-app for executing SQL against this database file

Plugins

The analyzing portion has a killer feature in that you can write your own plugins tailored specifically to your project. Your project might use some quirks that are unique. In GitHub Docs, for example, we use something called "LiquidJS" which is like a pre-Markdown processing to do things like versioning. So I can write a custom JavaScript plugin that extends data you get from reading in the front-matter.

Here's an example plugin:


const regex = /💩/g;
export default function countCocoIceMentions({ data, content }) {
  const inTitle = (data.title.match(regex) || []).length;
  const inBody = (content.match(regex) || []).length;
  return {
    chocolateIcecreamMentions: inTitle + inBody,
  };
}

Now, if you add that to your project, you'll be able to run:


SELECT title, chocolateIcecreamMentions FROM ? 
WHERE chocolateIcecreamMentions > 0 
ORDER BY 2 DESC LIMIT 15

How you're supposed to use it

It's up to you. One important fact to keep in mind is that not everyone speaks SQL fluently. And even if you're somewhat confident with SQL, it might not be obvious how this particular engine works or what the fields are. (Mind you, there's a "Help" which shows you all fields and a collection of sample queries).
But it's really intuitive to extend an already written SQL query. So if someone shares their query, it's easy to just extend it. For example, your colleague might share a URL with an SQL query in the query string, but you want to change the sort order so you just edit DESC for ASC.

I would recommend that any team that has a project with a bunch of Markdown files, add docsql as a dependency somewhere, have it build with your directory of Markdown files, and then publish the docsql/out/ directory as a static web page which you can host on Netlify or GitHub Pages.
This way, your team gets a centralized place where team members can share URLs with each other that has queries in it. When someone shares one of these, they get added to your "Saved queries" and you can extend them from there to add to your own list.

Behind the scenes

The project is here: github.com/peterbe/docsql and it's MIT licensed. The analyzing part is all Node. It's a CLI that is able to dynamically import other .mjs files based on scanning the directory at runtime.

The front-end is a NextJS static build which uses Mantine for the React UI components.

You can install it npx like this:


npx docsql /path/to/my/markdown/files

But if you want to control it a bit better you can simply add it to your own Node project with: npm save docsql or yarn add docsql.

Let's make it better

First of all, it's a very new project. My initial goal was to get the basics working. A lot of edges have been left rough. Especially in areas of installation, performance, and SQL editor. Please come and help out if you see something. In particular, if you tried to set it up but found it hard, we can work together to either improve the documentation to fix some scripts that would help the next person.

For feature requests and bug reports use: https://github.com/peterbe/docsql/issues/new
Or just comment here on the blog post.

Preemptive grocery shopping list item suggestions

February 25, 2022
0 comments That's Groce!

tl;dr; Preemptive suggestions are grocery shopping list item suggestions that appear before you have typed anything. It's like it can read your mind (based on AI).

In the next version of That's Groce! it will include a powerful feature I've long wanted to add but a lot of work and testing had to go into it: Preemptive suggestions.

Basically, That's Groce! knows which shopping list items you add often. It also knows when you last added it. It knows that you haven't added it to the list right now. And it knows which are more common than others. That's called the "Popularity contest".

The suggestions now appear underneath the add-new-item form. They appear where search suggestions usually appear. Before it used to be blank there until you typed something. For example, typing "b" would, in my household's case, show: "Blueberries", "Bananas", "Spreadable butter", etc.

Suggest-as-you-type suggestions

The way preemptive suggestion work is ultimately quite simple, but a mouthful:

  1. Exclude all items that are currently on your active list (to-shop and done).
  2. Exclude those that haven't been added at least 2 times in the last 90 days.
  3. Look at when it was last added. Look up its (rolling median) frequency. Exclude those that have been added more recently than their frequency.
  4. Sort by most popular (a.k.a. most frequently added)
  5. Show only the top 4 (for space on mobile devices)

As an example; we often buy "Bananas". Let's assume its history of adding it to the list is:

  1. Sunday, Jan 30
  2. Tuesday, Feb 8
  3. Monday, Feb 14
  4. Sunday, Feb 20

The difference between those days, on average is about 6 days (for the sake of example). Now, if today's date is Monday, Feb 28, that means it was 8 days since it was last added (Sunday, Feb 20). Therefore, you add to the list this more frequently than it was last added! Therefore, include it as a preemptive suggestion.

The idea, and hope, of this, is to remove the labor of having to type "co" to make the "Coffee ☕️" suggestion appear. How about just making it appear simply by thinking about coffee? Or better, even before you think of coffee, so you don't forget to buy some more!

The new feature has already been released but it might take a while to appear on your account. And if you're a new user don't expect this to show up at all until you've used the app for a while. It needs to learn from your shopping habits. But have patience! You'll love it!

Preview of that it can look like

Sample

Note that "Milk" was appearing because it's a frequent item in our household, but it's no longer one of the suggestions because it's already been added to the list. And "Eggs" is also a very common item, but it's not appearing either because it was added (and checked off) in the last shopping trip.

Tips and tricks to make you a GitHub Actions power-user

February 23, 2022
0 comments GitHub

Table of contents

Use actions/github-script when bash is too clunky

bash is impressively simple but sometimes you want a bit more scripting. Use actions/github-script to be able to express yourself with JavaScript and get a bunch of goodies built-in.


- name: Print something
  uses: actions/github-script@v5.1.0
  with:
    script: |
      const { owner, repo } = context.repo
      console.log(`The owner of ${repo} is ${owner}`)

Example code

This example obviously doesn't demonstrate the benefit because it's only 2 lines of actual business logic. But if you find yourself typing more and more complex bash that you, reaching for actions/github-script is a nifty alternative.

See the documentation on actions/github-script.

Use Action scripts instead of bash

In the above example on actions/github-script we saw a simple way to use JavaScript instead of bash and how it has access to useful stuff in the context. An immediate disadvantage, as you might have noticed, is that that JavaScript in the Yaml file isn't syntax highlighted in any way because it's treated as a blob string of code.
If your business logic needs to evolve to something more sophisticated, you can just create a regular Node script anywhere in your repo and do:


run: ./scripts/my-script.js

Thing is, it doesn't really matter what you call the script or where you put it. But my recommendation is, put your scripts in a directory called .github/actions-scripts/ because it reminds you that this script is all about complementing your GitHub Actions. If you put it in scripts/ or bin/ in the root of your project, it's not clear that those scripts are related to running Actions.

Note that if you do this, you'll need to make sure you use actions/checkout and actions/setup-node too if you haven't done so already. Example:


name: Using Action script

on:
  pull_request:

permissions:
  contents: read

jobs:
  action-scripts:
    runs-on: ubuntu-latest
    steps:

      - uses: actions/checkout@v2

      - uses: actions/setup-node@v2

      - name: Install Node dependencies
        run: npm install --no-save @actions/core @actions/github

      - name: Gets labels of this PR
        id: label-getter
        env:
          GITHUB_TOKEN: ${{ secrets.GITHUB_TOKEN }}
        run: .github/actions-scripts/get-labels.mjs

      - name: Debug what the step above did
        run: echo "${{ steps.label-getter.outputs.currentLabels }}"

And .github/actions-scripts/get-labels.mjs:


#!/usr/bin/env node

import { context, getOctokit } from "@actions/github";
import { setOutput } from "@actions/core";

console.assert(process.env.GITHUB_TOKEN, "GITHUB_TOKEN not present");

const octokit = getOctokit(process.env.GITHUB_TOKEN);

main();

async function getCurrentPRLabels() {
  const {
    repo: { owner, repo },
    payload: { number },
  } = context;
  console.assert(number, "number not present");
  const { data: currentLabels } = await octokit.rest.issues.listLabelsOnIssue({
    owner,
    repo,
    issue_number: number,
  });
  console.log({ currentLabels });
  return currentLabels.map((label) => label.name).join(", ");
}

async function main() {
  const labels = await getCurrentPRLabels();
  setOutput("currentLabels", labels);
}

Don't forget to chmox +x .github/actions-scripts/get-labels.mjs

You don't need to go into your repo's "Secrets" tab to make ${{ secrets.GITHUB_TOKEN }} available.
But imagine you want to hack on this script locally, you just need to create a personal access token, and type, in your terminal:

GITHUB_TOKEN=arealonefromyourdevelopersettings node .github/actions-scripts/get-labels.mjs

And working that way is more convenient than having to constantly edit the .github/workflows/*.yml file to see if the changes worked.

Example code

Use workflow_dispatch instead of running on pushes

The most common Actions are run on pull requests or on pushes. For actions that test stuff, it's not uncommon to see at the top of the .yml file, something like this:


name: Testing that the pull request is good

on:
  pull_request:

...

And perhaps you have something operational that runs when the pull requests have been merged:


name: Celebrate that the pull request landed

on:
  push:

...

That's nice but what if you're debugging something in that workflow and you don't want to trigger it by making a commit into main. What you can do is add this:


name: Celebrate that the pull request landed

on:
  push:
+ workflow_dispatch:

...

In fact, you don't have to use it with on.push: you can use it with on.schedule:.cron: too. Or even, on its on. At work, we have a workflow that is just:


name: Manually purge CDN

on:
  workflow_dispatch:

jobs:
  purge:
    runs-on: ubuntu-latest
    ...

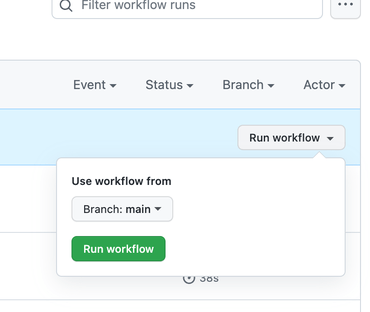
Now, to run it, you just need to find the workflow in your repository's "Actions" tab and press the "Run workflow" button.

Can't wait to run the workflow, start it manually

Example code.

Use pull_request_target with the code from a pull request

You might have heard of pull_request_target as an option so that you can do privileged things in the workflow that you would otherwise not allow in untrusted pull requests. In particular, you might need to use secrets when analyzing a new pull request. But you can't use secrets on a regular on.pull_request workflow. So you use on.pull_request_target. But now, how do you get the code that was being changed in the PR? Since pull_request_target runs on HEAD (the latest commit in the main (or master) branch).

To run a pull_request_target workflow, based on the code in a PR, use:


name: Analyze and report on PR code

on:
  pull_request_target:

permissions:
  contents: read

jobs:
  action-scripts:
    runs-on: ubuntu-latest
    steps:

      - name: Check out PR code
        uses: actions/checkout@v2
        with:
          # THIS is the magic
          ref: ${{ github.event.pull_request.head.sha }}

Word of warning, that will mix the pull requests code with your fully-loaded pull_request_target workflow. Even if that pull request comes with its own attempt to override your pull_request_target Actions workflow, it won't be run here. But, if your workflow depends on external scripts (e.g. run: node .github/actions-scripts/something.mjs) then that would be run from the pull request, with secrets potentially enabled and available.

Another option is to do two checkouts. One of your HEAD code and one of the pull request, but carefully mix the two. Example:


name: Analyze and report on PR code

on:
  pull_request_target:

permissions:
  contents: read

jobs:
  action-scripts:
    runs-on: ubuntu-latest
    steps:

      - name: Check out HEAD code
        uses: actions/checkout@v2

      - name: Check out *their* code
        uses: actions/checkout@v2
        with:
          path: ./pr-code
          ref: ${{ github.event.pull_request.head.sha }}

      - name: Analyze their code
        env:
           SECRET_TOKEN_NEEDED: ${{ secrets.SPECIAL_SECRET }}
        run: ./scripts/analyze.py --repo-root=./pr-code

Now, you can be certain that it's only code in the main branch HEAD that executes things but it safely has access to the pull requests suggested code.

Cache your NextJS cache

No denying, NextJS is massively popular and a lot of web apps depend on it and their Actions will test things like npm run build working.
The problem with NextJS, for any non-trivial app, is that it's slow. Even with its fancy SWC compiler simply because you probably have a lot of files. The fastest transpiler is one that doesn't need to do anything and that's where .next/cache comes in. To use it in your CI add this:


      - name: Setup node
        uses: actions/setup-node@v2
        with:
          cache: npm

      - name: Install dependencies
        run: npm ci

+     - name: Cache nextjs build
+       uses: actions/cache@v2
+       with:
+         path: .next/cache
+         key: ${{ runner.os }}-nextjs-${{ hashFiles('package*.json') }}

      - name: Run build script
        run: npm run build

If you use yarn add ${{ hashFiles('yarn.lock') }} there on the key line.

But here's the rub. If you run this workflow only on on.pull_request any caching made will only be reusable by other runs on the same pull request. I.e. if you commit some, make a pull request, commit some more and run the workflow again.

To make that cached asset become available to other pull requests, you need to do one of two things: Also run this on on.push or have a dedicated workflow that runs on on.push whose only job is to execute these lines that warm up the cache.

Matrices is not just for multiple versions

You might have experienced an Action that uses a matrix strategy to test once per version of Node, Python, or whatever. For example:


jobs:
  test:
    name: Node ${{ matrix.node }}
    runs-on: ubuntu-latest
    strategy:
      fail-fast: false
      matrix:
        node:
          - 12
          - 14
          - 16
          - 17

But, it doesn't have to be for just different versions of a language like that. It can be any array of strings. For example, if you have a slow set of tests you can break it up by your own things:


jobs:
  test:
    runs-on: ubuntu-latest
    strategy:
      fail-fast: false
      matrix:
        test-group:
          [
            content,
            graphql,
            meta,
            rendering,
            routing,
            unit,
            linting,
            translations,
          ]
    steps:
      - name: Check out repo
        uses: actions/checkout@v2.4.0

      - name: Setup node
        uses: actions/setup-node

      - name: Install dependencies
        run: npm ci

      - name: Run tests
        run: npm test -- tests/${{ matrix.test-group }}/

The name of the branch being tested (for PR or push)

You might have something like this at the top of your workflow:


on:
  push:
    branches:
      - main
  workflow_dispatch:
  pull_request:  

So your workflow might be doing some special scripts or something that depends on the branch name. I.e. if it's a PR that's running the workflow you (e.g. a PR to merge someone-fork:my-cool-branch to origin:main), you want the name my-cool-branch. But if it's run again after it's been merged into main, you want the name main.
When it's a pull request (or pull_request_target) you want to read ${{ github.head_ref }} and when it's a push you want to read ${{ github.ref_name }}. So, in a simple way, to get either my-cool-branch or main use:


- name: Name of the branch
  run: echo "${{ github.head_ref || github.ref_name }}"

Let Dependabot upgrade your third-party actions

For better reproducibility, it's good to use exact versions of third-party actions. That way it's less likely take you to surprise you when new versions come out and suddenly fail things.
But once you use more specific versions (or perhaps the exact SHA like uses: actions/checkout@ec3a7ce113134d7a93b817d10a8272cb61118579) then you'll want upgrades of these to be automated.

Create a file called .github/dependabot.yml and put this in it:


version: 2
updates:
  - package-ecosystem: 'github-actions'
    directory: '/'
    schedule:
      interval: monthly

Make your NextJS site 10-100x faster with Express caching

February 18, 2022
0 comments React, Node, Nginx, JavaScript

UPDATE: Feb 21, 2022: The original blog post didn't mention the caching of custom headers. So warm cache hits would lose Cache-Control from the cold cache misses. Code updated below.

I know I know. The title sounds ridiculous. But it's not untrue. I managed to make my NextJS 20x faster by allowing the Express server, which handles NextJS, to cache the output in memory. And cache invalidation is not a problem.

Layers

My personal blog is a stack of layers:

KeyCDN --> Nginx (on my server) -> Express (same server) -> NextJS (inside Express)

And inside the NextJS code, to get the actual data, it uses HTTP to talk to a local Django server to get JSON based on data stored in a PostgreSQL database.

The problems I have are as follows:

  • The CDN sometimes asks for the same URL more than once when in theory you'd think it should be cached by them for a week. And if the traffic is high, my backend might get a stamping herd of requests until the CDN has warmed up.
  • It's technically possible to bypass the CDN by going straight to the origin server.
  • NextJS is "slow" and the culprit is actually critters which computes the critical CSS inline and lazy-loads the rest.
  • Using Nginx to do in-memory caching (which is powerfully fast by the way) does not allow cache purging at all (unless you buy Nginx Plus)

I really like NextJS and it's a great developer experience. There are definitely many things I don't like about it, but that's more because my site isn't SPA'y enough to benefit from much of what NextJS has to offer. By the way, I blogged about rewriting my site in NextJS last year.

Quick detour about critters

If you're reading my blog right now in a desktop browser, right-click and view source and you'll find this:


<head>
  <style>
  *,:after,:before{box-sizing:inherit}html{box-sizing:border-box}inpu...
  ... about 19k of inline CSS...
  </style>
  <link rel="stylesheet" href="/_next/static/css/fdcd47c7ff7e10df.css" data-n-g="" media="print" onload="this.media='all'">
  <noscript><link rel="stylesheet" href="/_next/static/css/fdcd47c7ff7e10df.css"></noscript>  
  ...
</head>

It's great for web performance because a <link rel="stylesheet" href="css.css"> is a render-blocking thing and it makes the site feel slow on first load. I wish I didn't need this, but it comes from my lack of CSS styling skills to custom hand-code every bit of CSS and instead, I rely on a bloated CSS framework which comes as a massive kitchen sink.

To add critical CSS optimization in NextJS, you add:


experimental: { optimizeCss: true },

inside your next.config.js. Easy enough, but it slows down my site by a factor of ~80ms to ~230ms on my Intel Macbook per page rendered.
So see, if it wasn't for this need of critical CSS inlining, NextJS would be about ~80ms per page and that includes getting all the data via HTTP JSON for each page too.

Express caching middleware

My server.mjs looks like this (simplified):


import next from "next";

import renderCaching from "./middleware/render-caching.mjs";

const app = next({ dev });
const handle = app.getRequestHandler();

app
  .prepare()
  .then(() => {
    const server = express();

    // For Gzip and Brotli compression
    server.use(shrinkRay());

    server.use(renderCaching);

    server.use(handle);

    // Use the rollbar error handler to send exceptions to your rollbar account
    if (rollbar) server.use(rollbar.errorHandler());

    server.listen(port, (err) => {
      if (err) throw err;
      console.log(`> Ready on http://localhost:${port}`);
    });
  })

And the middleware/render-caching.mjs looks like this:


import express from "express";
import QuickLRU from "quick-lru";

const router = express.Router();

const cache = new QuickLRU({ maxSize: 1000 });

router.get("/*", async function renderCaching(req, res, next) {
  if (
    req.path.startsWith("/_next/image") ||
    req.path.startsWith("/_next/static") ||
    req.path.startsWith("/search")
  ) {
    return next();
  }

  const key = req.url;
  if (cache.has(key)) {
    res.setHeader("x-middleware-cache", "hit");
    const [body, headers] = cache.get(key);
    Object.entries(headers).forEach(([key, value]) => {
      if (key !== "x-middleware-cache") res.setHeader(key, value);
    });
    return res.status(200).send(body);
  } else {
    res.setHeader("x-middleware-cache", "miss");
  }

  const originalEndFunc = res.end.bind(res);
  res.end = function (body) {
    if (body && res.statusCode === 200) {
      cache.set(key, [body, res.getHeaders()]);
      // console.log(
      //   `HEAP AFTER CACHING ${(
      //     process.memoryUsage().heapUsed /
      //     1024 /
      //     1024
      //   ).toFixed(1)}MB`
      // );
    }
    return originalEndFunc(body);
  };

  next();
});

export default router;

It's far from perfect and I only just coded this yesterday afternoon. My server runs a single Node process so the max heap memory would theoretically be 1,000 x the average size of those response bodies. If you're worried about bloating your memory, just adjust the QuickLRU to something smaller.

Let's talk about your keys

In my basic version, I chose this cache key:


const key = req.url;

but that means that http://localhost:3000/foo?a=1 is different from http://localhost:3000/foo?b=2 which might be a mistake if you're certain that no rendering ever depends on a query string.

But this is totally up to you! For example, suppose that you know your site depends on the darkmode cookie, you can do something like this:


const key = `${req.path} ${req.cookies['darkmode']==='dark'} ${rec.headers['accept-language']}`

Or,


const key = req.path.startsWith('/search') ? req.url : req.path

Purging

As soon as I launched this code, I watched the log files, and voila!:

::ffff:127.0.0.1 [18/Feb/2022:12:59:36 +0000] GET /about HTTP/1.1 200 - - 422.356 ms
::ffff:127.0.0.1 [18/Feb/2022:12:59:43 +0000] GET /about HTTP/1.1 200 - - 1.133 ms

Cool. It works. But the problem with a simple LRU cache is that it's sticky. And it's stored inside a running process's memory. How is the Express server middleware supposed to know that the content has changed and needs a cache purge? It doesn't. It can't know. The only one that knows is my Django server which accepts the various write operations that I know are reasons to purge the cache. For example, if I approve a blog post comment or an edit to the page, it triggers the following (simplified) Python code:


import requests

def cache_purge(url):
    if settings.PURGE_URL:
        print(requests.get(settings.PURGE_URL, json={
           pathnames: [url]
        }, headers={
           "Authorization": f"Bearer {settings.PURGE_SECRET}"
        })

    if settings.KEYCDN_API_KEY:
        api = keycdn.Api(settings.KEYCDN_API_KEY)
        print(api.delete(
            f"zones/purgeurl/{settings.KEYCDN_ZONE_ID}.json", 
            {"urls": [url]}
        ))    

Now, let's go back to the simplified middleware/render-caching.mjs and look at how we can purge from the LRU over HTTP POST:


const cache = new QuickLRU({ maxSize: 1000 })

router.get("/*", async function renderCaching(req, res, next) {
// ... Same as above
});


router.post("/__purge__", async function purgeCache(req, res, next) {
  const { body } = req;
  const { pathnames } = body;
  try {
    validatePathnames(pathnames)
  } catch (err) {
    return res.status(400).send(err.toString());
  }

  const bearer = req.headers.authorization;
  const token = bearer.replace("Bearer", "").trim();
  if (token !== PURGE_SECRET) {
    return res.status(403).send("Forbidden");
  }

  const purged = [];

  for (const pathname of pathnames) {
    for (const key of cache.keys()) {
      if (
        key === pathname ||
        (key.startsWith("/_next/data/") && key.includes(`${pathname}.json`))
      ) {
        cache.delete(key);
        purged.push(key);
      }
    }
  }
  res.json({ purged });
});

What's cool about that is that it can purge both the regular HTML URL and it can also purge those _next/data/ URLs. Because when NextJS can hijack the <a> click, it can just request the data in JSON form and use existing React components to re-render the page with the different data. So, in a sense, GET /_next/data/RzG7kh1I6ZEmOAPWpdA7g/en/plog/nextjs-faster-with-express-caching.json?oid=nextjs-faster-with-express-caching is the same as GET /plog/nextjs-faster-with-express-caching because of how NextJS works. But in terms of content, they're the same. But worth pointing out that the same piece of content can be represented in different URLs.

Another thing to point out is that this caching is specifically about individual pages. In my blog, for example, the homepage is a mix of the 10 latest entries. But I know this within my Django server so when a particular blog post has been updated, for some reason, I actually send out a bunch of different URLs to the purge where I know its content will be included. It's not perfect but it works pretty well.

Conclusion

The hardest part about caching is cache invalidation. It's usually the inner core of a crux. Sometimes, you're so desperate to survive a stampeding herd problem that you don't care about cache invalidation but as a compromise, you just set the caching time-to-live short.

But I think the most important tenant of good caching is: have full control over it. I.e. don't take it lightly. Build something where you can fully understand and change how it works exactly to your specific business needs.

This idea of letting Express cache responses in memory isn't new but I didn't find any decent third-party solution on NPMJS that I liked or felt fully comfortable with. And I needed to tailor exactly to my specific setup.

Go forth and try it out on your own site! Not all sites or apps need this at all, but if you do, I hope I have inspired a foundation of a solution.

Command-Enter to submit a form when focus is inside textarea with React (TypeScript)

February 4, 2022
1 comment React

So common now. You have focus inside a <textarea> and you want to submit the form. By default, your only choice is to reach for the mouse and click the "Submit" button below, or use Tab to tab to the submit button with the keyboard.
Many sites these days support Command-Enter as an option. Here's how you implement that in React:


const textareaElement = textareaRef.current;
useEffect(() => {
  const listener = (event: KeyboardEvent) => {
    if (event.key === "Enter" && event.metaKey) {
      formSubmit();
    }
  };
  if (textareaElement) {
    textareaElement.addEventListener("keydown", listener);
  }
  return () => {
    if (textareaElement) {
      textareaElement.removeEventListener("keydown", listener);
    }
  };
}, [textareaElement, formSubmit]);

Demo here

The important bit is the event.key === "Enter" && event.metaKey statement. I hope it helps.