Why would you want to use Docker to do React app work? Isn't Docker for server-side stuff like Python and Golang etc? No, all the benefits of Docker apply to JavaScript client-side work too.
So there are three main things you want to do with create-react-app; dev server, running tests and creating build artifacts. Let's look at all three but using Docker.
Create-react-app first
If you haven't already, install create-react-app globally:
▶ yarn global add create-react-app
And, once installed, create a new project:
▶ create-react-app docker-create-react-app
...lots of output...

▶ cd docker-create-react-app
▶ ls
README.md    node_modules package.json public       src          yarn.lock
We won't need the node_modules here in the project directory. Instead, when building the image we're going let node_modules stay inside the image. So you can go ahead and... rm -fr node_modules.
Create the Dockerfile
Let's just dive in. This Dockerfile is the minimum:
FROM node:8

ADD yarn.lock /yarn.lock
ADD package.json /package.json

ENV NODE_PATH=/node_modules
ENV PATH=$PATH:/node_modules/.bin
RUN yarn

WORKDIR /app
ADD . /app

EXPOSE 3000
EXPOSE 35729

ENTRYPOINT ["/bin/bash", "/app/run.sh"]
CMD ["start"]
A couple of things to notice here.
First of all we're basing this on the official Node v8 repository on Docker Hub. That gives you a Node and Yarn by default.
Note how the NODE_PATH environment variable puts the node_modules in the root of the container. That's so that it doesn't get added in "here" (i.e. the current working directory). If you didn't do this, the node_modules directory would be part of the mounted volume which not only slows down Docker (since there are so many files) it also isn't necessary to see those files.
Note how the ENTRYPOINT points to run.sh. That's a file we need to create too, alongside the Dockerfile file.
#!/usr/bin/env bash
set -eo pipefail

case $1 in
  start)
    # The '| cat' is to trick Node that this is an non-TTY terminal
    # then react-scripts won't clear the console.
    yarn start | cat
    ;;
  build)
    yarn build
    ;;
  test)
    yarn test $@
    ;;
  *)
    exec "$@"
    ;;
esac
Lastly, as a point of convenience, note that the default CMD is "start". That's so that when you simply run the container the default thing it does is to run yarn start.
Build container
Now let's build it:
▶ docker image build -t react:app .
The -t react:app is up to you. It doesn't matter so much what it is unless you're going to upload your container the a registry. Then you probably want the repository to be something unique.
Let's check that the build is there:
▶ docker image ls react:app
REPOSITORY          TAG                 IMAGE ID            CREATED             SIZE
react               app                 3ee5c7596f57        13 minutes ago      996MB
996MB! The base Node image is about ~700MB and the node_modules directory (for a clean new create-react-app) is ~160MB (at the time of writing). What the remaining difference is, I'm not sure. But it's empty calories and easy to lose. When you blow away the built image (docker image rmi react:app) your hard drive gets all that back and no actual code is lost.
Before we run it, lets go inside and see what was created:
▶ docker container run -it react:app bash
root@996e708a30c4:/app# ls
Dockerfile  README.md  package.json  public  run.sh  src  yarn.lock
root@996e708a30c4:/app# du -sh /node_modules/
148M    /node_modules/
root@996e708a30c4:/app# sw-precache
Total precache size is about 355 kB for 14 resources.
service-worker.js has been generated with the service worker contents.
The last command (sw-precache) was just to show that executables in /node_modules/.bin are indeed on the $PATH and can be run.
Run container
Now to run it:
▶ docker container run -it -p 3000:3000 react:app
yarn run v1.3.2
$ react-scripts start
Starting the development server...

Compiled successfully!

You can now view docker-create-react-app in the browser.

  Local:            http://localhost:3000/
  On Your Network:  http://172.17.0.2:3000/

Note that the development build is not optimized.
To create a production build, use yarn build.
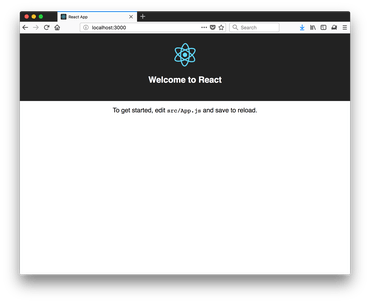
Pretty good. Open http://localhost:3000 in your browser and you should see the default create-react-app app.
Next step; Warm reloading
create-react-app does not support hot reloading of components. But it does support web page reloading. As soon as a local file is changed, it sends a signal to the browser (using WebSockets) to tell it to... document.location.reload().
To make this work, we need to do two things:
1) Mount the current working directory into the Docker container
2) Expose the WebSocket port
The WebSocket thing is set up by exposing port 35729 to the host (-p 35729:35729).
Below is an example running this with a volume mount and both ports exposed.
▶ docker container run -it -p 3000:3000 -p 35729:35729 -v $(pwd):/app react:app
yarn run v1.3.2
$ react-scripts start
Starting the development server...

Compiled successfully!

You can now view docker-create-react-app in the browser.

  Local:            http://localhost:3000/
  On Your Network:  http://172.17.0.2:3000/

Note that the development build is not optimized.
To create a production build, use yarn build.

Compiling...
Compiled successfully!
Compiling...
Compiled with warnings.

./src/App.js
  Line 7:  'neverused' is assigned a value but never used  no-unused-vars

Search for the keywords to learn more about each warning.
To ignore, add // eslint-disable-next-line to the line before.

Compiling...
Failed to compile.

./src/App.js
Module not found: Can't resolve './Apps.css' in '/app/src'
In the about example output. First I make a harmless save in the src/App.js file just to see that the dev server notices and that my browser reloads when I did that. That's where it says
Compiling...
Compiled successfully!
Secondly, I make an edit that triggers a warning. That's where it says:
Compiling...
Compiled with warnings.

./src/App.js
  Line 7:  'neverused' is assigned a value but never used  no-unused-vars

Search for the keywords to learn more about each warning.
To ignore, add // eslint-disable-next-line to the line before.
And lastly I make an edit by messing with the import line
Compiling...
Failed to compile.

./src/App.js
Module not found: Can't resolve './Apps.css' in '/app/src'
This is great! Isn't create-react-app wonderful?
Build build :)
There are many things you can do with the code you're building. Let's pretend that the intention is to build a single-page-app and then take the static assets (including the index.html) and upload them to a public CDN or something. To do that we need to generate the build directory.
The trick here is to run this with a volume mount so that when it creates /app/build (from the perspective) of the container, that directory effectively becomes visible in the host.
▶ docker container run -it -v $(pwd):/app react:app build
yarn run v1.3.2
$ react-scripts build
Creating an optimized production build...
Compiled successfully.

File sizes after gzip:

  35.59 KB  build/static/js/main.591fd843.js
  299 B     build/static/css/main.c17080f1.css

The project was built assuming it is hosted at the server root.
To override this, specify the homepage in your package.json.
For example, add this to build it for GitHub Pages:

  "homepage" : "http://myname.github.io/myapp",

The build folder is ready to be deployed.
You may serve it with a static server:

  yarn global add serve
  serve -s build

Done in 5.95s.
Now, on the host:
▶ tree build
build
├── asset-manifest.json
├── favicon.ico
├── index.html
├── manifest.json
├── service-worker.js
└── static
    ├── css
    │   ├── main.c17080f1.css
    │   └── main.c17080f1.css.map
    ├── js
    │   ├── main.591fd843.js
    │   └── main.591fd843.js.map
    └── media
        └── logo.5d5d9eef.svg

4 directories, 10 files
The contents of that file you can now upload to a CDN some public Nginx server that points to this as the root directory.
Running tests
This one is so easy and obvious now.
▶ docker container run -it -v $(pwd):/app react:app test
Note the that we're setting up a volume mount here again. Since the test runner is interactive it sits and waits for file changes and re-runs tests immediately, it's important to do the mount now.
All regular jest options work too. For example:
▶ docker container run -it -v $(pwd):/app react:app test --coverage
▶ docker container run -it -v $(pwd):/app react:app test --help
Debugging the node_modules
First of all, when I say "debugging the node_modules", in this context, I'm referring to messing with node_modules whilst running tests or running the dev server.
One way to debug the node_modules used is to enter a bash shell and literally mess with the files inside it. First, start the dev server (or start the test runner) and give the container a name:
▶ docker container run -it -p 3000:3000 -p 35729:35729 -v $(pwd):/app --name mydebugging react:app
Now, in a separate terminal start bash in the container:
▶ docker exec -it mydebugging bash
Once you're in you can install an editor and start editing files:
root@2bf8c877f788:/app# apt-get update && apt-get install jed
root@2bf8c877f788:/app# jed /node_modules/react/index.js
As soon as you make changes to any of the files, the dev server should notice and reload.
When you stop the container all your changes will be reset. So if you had to sprinkle the node_modules with console.log('WHAT THE HECK!') all of those disappear when the container is stopped.
NodeJS shell
This'll come as no surprise by now. You basically run bash and you're there:
▶ docker container run -it -v $(pwd):/app react:app bash
root@2a21e8206a1f:/app# node
> [] + 1
'1'
Conclusion
When I look back at all the commands above, I can definitely see how it's pretty intimidating and daunting. So many things to remember and it's got that nasty feeling where you feel like your controlling your development environment through unwieldy levers rather than your own hands.
But think of the fundamental advantages too! It's all encapsulated now. What you're working on will be based on the exact same version of everything as your teammate, your dev server and your production server are using.
Pros:
- All packaged up and all team members get the exact same versions of everything, including Node and Yarn.
- The
node_modules directory gets out of your hair.
- Perhaps some React code is just a small part of a large project. E.g. the frontend is React, the backend is Django. Then with some
docker-compose magic you can have it all running with one command without needing to run the frontend in a separate terminal.
Cons:
- Lack of color output in terminal.
- The initial (or infrequent) wait for building the docker image is brutal on a slow network.
- Lots of commands to remember. For example, How do you start a shell again?
In my (Mozilla Services) work, the projects I work on, I actually use docker-compose for all things. And I have a Makefile to help me remember all the various docker-compose commands (thanks Jannis & Will!). One definitely neat thing you can do with docker-compose is start multiple containers. Then you can, with one command, start a Django server and the create-react-app dev server with one command. Perhaps a blog post for another day.