The best and simplest way to parse an RSS feed in Node

February 13, 2021
0 comments Node, JavaScript

There are a lot of 'rss' related NPM packages but I think I've found a combination that is great for parsing RSS feeds. Something that takes up the minimal node_modules and works great. I think the killer combination is

The code impressively simple:


const got = require("got");
const parser = require("fast-xml-parser");

(async function main() {
  const buffer = await got("https://hacks.mozilla.org/feed/", {
    responseType: "buffer",
    resolveBodyOnly: true,
    timeout: 5000,
    retry: 5,
  });
  var feed = parser.parse(buffer.toString());
  for (const item of feed.rss.channel.item) {
    console.log({ title: item.title, url: item.link });
    break;
  }
})();


// Outputs...
// {
//   title: 'MDN localization update, February 2021',
//   url: 'https://hacks.mozilla.org/2021/02/mdn-localization-update-february-2021/'
// }

I like about fast-xml-parser is that it has no dependencies. And it's tiny:

▶ du -sh node_modules/fast-xml-parser
104K    node_modules/fast-xml-parser

The got package is quite a bit larger and has more dependencies. But I still love it. It's proven itself to be very reliable and very pleasant API. Both packages support TypeScript too.

A particular detail I like about fast-xml-parser is that it doesn't try to do the downloading part too. This way, I can use my own preferred library and I could potentially write my own caching code if I want to protect against flaky network.

Sneaky block-scoping variables in JavaScript that eslint can't even detect

February 3, 2021
0 comments JavaScript

What do you think this code will print out?


function validateURL(url) {
  if (url.includes("://")) {
    const url = new URL(url);
    return url.protocol === "https:";
  } else {
    return "dunno";
  }
}
console.log(validateURL("http://www.peterbe.com"));

I'll give you a clue that isn't helpful,


▶ eslint --version
v7.19.0

▶ eslint code.js

▶ echo $?
0

OK, the answer is that it crashes:

▶ node code.js
/Users/peterbe/dev/JAVASCRIPT/catching_consts/code.js:3
    const url = new URL(url);
                        ^

ReferenceError: Cannot access 'url' before initialization
    at validateURL (/Users/peterbe/dev/JAVASCRIPT/catching_consts/code.js:3:25)
    at Object.<anonymous> (/Users/peterbe/dev/JAVASCRIPT/catching_consts/code.js:9:13)
...

▶ node --version
v15.2.1

It's an honest and easy mistake to make. If the code was this:


function validateURL(url) {
  const url = new URL(url);
  return url.protocol === "https:";
}
// console.log(validateURL("http://www.peterbe.com"));

you'd get this error:

▶ node code2.js
/Users/peterbe/dev/JAVASCRIPT/catching_consts/code2.js:2
  const url = new URL(url);
        ^

SyntaxError: Identifier 'url' has already been declared

which means node refuses to even start it. But it can't with the original code because of the blocking scope that only happens in runtime.

Easiest solution


function validateURL(url) {
  if (url.includes("://")) {
-   const url = new URL(url);
+   const parsedURL = new URL(url);
-   return url.protocol === "https:";
+   return parsedURL.protocol === "https:";
  } else {
    return "dunno";
  }
}
console.log(validateURL("http://www.peterbe.com"));

Best solution

Switch to TypeScript.

▶ cat code.ts
function validateURL(url: string) {
  if (url.includes('://')) {
    const url = new URL(url);
    return url.protocol === 'https:';
  } else {
    return "dunno";
  }
}
console.log(validateURL('http://www.peterbe.com'));

▶ tsc --noEmit --lib es6,dom code.ts
code.ts:3:25 - error TS2448: Block-scoped variable 'url' used before its declaration.

3     const url = new URL(url);
                          ~~~

  code.ts:3:11
    3     const url = new URL(url);
                ~~~
    'url' is declared here.


Found 1 error.

useSearchParams as a React global state manager

February 1, 2021
0 comments React, JavaScript

tl;dr; The useSearchParams hook from react-router is great as a hybrid state manager in React.

The wonderful react-router has a v6 release coming soon. At the time of writing, 6.0.0-beta.0 is the release to play with. It comes with a React hook called useSearchParams and it's fantastic. It's not a global state manager, but it can be used as one. It's not persistent, but it's semi-persistent in that state can be recovered/retained in browser refreshes.

Basically, instead of component state (e.g. React.useState()) you use:


import React from "react";
import { createSearchParams, useSearchParams } from "react-router-dom";
import "./styles.css";

export default function App() {
  const [searchParams, setSearchParams] = useSearchParams();

  const favoriteFruit = searchParams.get("fruit");
  return (
    <div className="App">
      <h1>Favorite fruit</h1>
      {favoriteFruit ? (
        <p>
          Your favorite fruit is <b>{favoriteFruit}</b>
        </p>
      ) : (
        <i>No favorite fruit selected yet.</i>
      )}

      {["🍒", "🍑", "🍎", "🍌"].map((fruit) => {
        return (
          <p key={fruit}>
            <label htmlFor={`id_${fruit}`}>{fruit}</label>
            <input
              type="radio"
              value={fruit}
              checked={favoriteFruit === fruit}
              onChange={(event) => {
                setSearchParams(
                  createSearchParams({ fruit: event.target.value })
                );
              }}
            />
          </p>
        );
      })}
    </div>
  );
}

See Codesandbox demo here

To get a feel for it, try the demo page in Codesandbox and note has it basically sets ?fruit=🍌 in the URL and if you refresh the page, it just continues as if the state had been persistent.

Basically, that's it. You never have a local component state but instead, you use the current URL as your store, and useSearchParams is your conduit for it. The advantages are:

  1. It's dead simple to use
  2. You get "shared state" across components without needing to manually inform them through prop drilling
  3. At any time, the current URL is a shareable snapshot of the state

The disadvantages are:

  1. It needs to be realistic to serialize it through the URLSearchParams web API
  2. The keys used need to be globally reserved for each distinct component that uses it
  3. You might not want the URL to change

That's all you need to know to get started. But let's dig into some more advanced examples, with some abstractions, to "workaround" the limitations.

To append or to reset

Suppose you have many different components, it's very likely that they don't really know or care about each other. Suppose, the current URL is /page?food=🍔 and if one component does: setSearchParams(createSearchParams({fruit: "🍑"})) what will happen is that the URL will "start over" and become /page?fruit=🍑. In other words, the food=🍔 was lost. Well, this might be a desired effect, but let's assume it's not, so we'll have to make it "append" instead. Here's one such solution:


function appendSearchParams(obj) {
  const sp = createSearchParams(searchParams);
  Object.entries(obj).forEach(([key, value]) => {
    if (Array.isArray(value)) {
      sp.delete(key);
      value.forEach((v) => sp.append(key, v));
    } else if (value === undefined) {
      sp.delete(key);
    } else {
      sp.set(key, value);
    }
  });
  return sp;
}

Now, you can do things like this:


onChange={(event) => {
  setSearchParams(
-    createSearchParams({ fruit: event.target.value })
+    appendSearchParams({ fruit: event.target.value })
  );
}}

See Codesandbox demo here

Now, the two keys work independently of each other. It has a nice "just works feeling".

Note that this appendSearchParams() function implementation solves the case of arrays. You could now call it like this:


{/* Untested, but hopefully the point is demonstrated */}
<div>
  <ul>
    {(searchParams.getAll("languages") || []).map((language) => (
      <li key={language}>{language}</li>
    ))}
  </ul>
  <button
    type="button"
    onClick={() => {
      setSearchParams(
        appendSearchParams({ languages: ["en-US", "sv-SE"] })
      );
    }}
  >
    Select 'both'
  </button>
</div>

...and that will update the URL to become ?languages=en-US&languages=sv-SE.

Serialize it into links

The useSearchParams hook returns a callable setSearchParams() which is basically doing a redirect (uses the useNavigate() hook). But suppose you want to make a link that serializes a "future state". Here's a very basic example:


// Assumes 'import { Link } from "react-router-dom";'

<Link to={`?${appendSearchParams({fruit: "🍌"})}`}>Switch to 🍌</Link>

See Codesandbox demo here

Now, you get nice regular hyperlinks that uses can right-click and "Open in a new tab" and it'll just work.

Type conversion and protection

The above simple examples use strings and array of strings. But suppose you need to do more more advanced type conversions. For example: /tax-calculator?rate=3.14 where you might have something that needs to be deserialized and serialized as a floating point number. Basically, you have to wrap the deserializing in a more careful way. E.g.


function TaxYourImagination() {
  const [searchParams, setSearchParams] = useSearchParams();

  const taxRaw = searchParams.get("tax", DEFAULT_TAX_RATE);
  let tax;
  let taxError;
  try {
    tax = castAndCheck(taxRaw);
  } catch (err) {
    taxError = errl;
  }

  if (taxError) {
    return (
      <div className="error-alert">
        The provided tax rate is invalid: <code>{taxError.toString()}</code>
      </div>
    );
  }
  return <DisplayTax value={tax} onUpdate={(newValue) => { 
    setSearchParams(
      createSearchParams({ tax: newValue.toFixed(2) })
    );
   }}/>;
}
Fastest way to turn HTML into text in Python

January 8, 2021
4 comments Python

tl;dr; selectolax is best for stripping HTML down to plain text.

The problem is that I have 10,000+ HTML snippets that I need to index into Elasticsearch as plain text. (Before you ask, yes I know Elasticsearch has a html_strip text filter but it's not what I want/need to use in this context).
Turns out, stripping the HTML into plain text was actually quite expensive at that scale. So what's the most performant way?

PyQuery


from pyquery import PyQuery as pq

text = pq(html).text()

selectolax


from selectolax.parser import HTMLParser

text = HTMLParser(html).text()

regular expression


import re

regex = re.compile(r'<.*?>')
text = clean_regex.sub('', html)

Results

I wrote a script that iterated through 10,000 files that contains HTML snippets. Note! The snippets aren't complete <html> documents (with a <head> and <body> etc) Just blobs of HTML. The average size is 10,314 bytes (5,138 bytes median).

pyquery
  SUM:    18.61 seconds
  MEAN:   1.8633 ms
  MEDIAN: 1.0554 ms
selectolax
  SUM:    3.08 seconds
  MEAN:   0.3149 ms
  MEDIAN: 0.1621 ms
regex
  SUM:    1.64 seconds
  MEAN:   0.1613 ms
  MEDIAN: 0.0881 ms

I've run it a bunch of times. The results are pretty stable.

Point is: selectolax is ~7 times faster than PyQuery

Regex? Really?

No, I don't think I want to use that. It makes me nervous without even attempting to dig up some examples where it goes wrong. It might work just fine for the most basic blobs of HTML. Actually, if the HTML is <p>Foo &amp; Bar</p>, I expect the plain text transformation should be Foo & Bar, not Foo &amp; Bar.

More pressing, both PyQuery and selectolax supports something very specific but important to my use case. I need to remove certain tags (and its content) before I proceed. For example:


<h4 class="warning">This should get stripped.</h4>
<p>Please keep.</p>
<div style="display: none">This should also get stripped.</div>

That can never be done with a regex.

Version 2.0

So my requirement will probably change but basically, I want to delete certain tags. E.g. <div class="warning"> and <div class="hidden"> and <div style="display: none">. So let's implement that:

PyQuery


from pyquery import PyQuery as pq

_display_none_regex = re.compile(r'display:\s*none')

doc = pq(html)
doc.remove('div.warning, div.hidden')
for div in doc('div[style]').items():
    style_value = div.attr('style')
    if _display_none_regex.search(style_value):
        div.remove()
text = doc.text()

selectolax


from selectolax.parser import HTMLParser

_display_none_regex = re.compile(r'display:\s*none')

tree = HTMLParser(html)
for tag in tree.css('div.warning, div.hidden'):
    tag.decompose()
for tag in tree.css('div[style]'):
    style_value = tag.attributes['style']
    if style_value and _display_none_regex.search(style_value):
        tag.decompose()
text = tree.body.text()

This actually works. When I now run the same benchmark for 10,000 of these are the new results:

pyquery
  SUM:    21.70 seconds
  MEAN:   2.1701 ms
  MEDIAN: 1.3989 ms
selectolax
  SUM:    3.59 seconds
  MEAN:   0.3589 ms
  MEDIAN: 0.2184 ms
regex
  Skip

Again, selectolax beats PyQuery by a factor of ~6.

Conclusion

Regular expressions are fast but weak in power. Makes sense.

This selectolax is very impressive.
I got the inspiration from this blog post which sets out to do something very similar to what I'm doing.

I hope this helps someone. Thank you Artem Golubin of selectolax and @lexborisov for Modest which selectolax is built upon.

Gcm - git checkout master or main

December 21, 2020
1 comment Python

I love git on the command line and I actually never use a GUI to navigate git branches. But sometimes, I need scripting to make abstractions that make life more convenient. What often happens is that I need to go back to the "main" branch. I write main in quotation marks because it's not always called main. Sometimes it's called master. And it's tedious to have to remember which one is the default.

So I wrote a script called Gcm:


#!/usr/bin/env python3
import subprocess


def run(*args):
    default_branch = get_default_branch()
    current_branch = get_current_branch()
    if default_branch != current_branch:
        checkout_branch(default_branch)
    else:
        print(f"Already on {default_branch}")
        return 1


def checkout_branch(branch_name):
    subprocess.run(f"git checkout {branch_name}".split())


def get_default_branch():
    res = subprocess.run(
        "git config --worktree --get git-checkout-default.default-branch".split(),
        check=False,
        capture_output=True,
    )
    if res.returncode == 0:
        return res.stdout.decode("utf-8").strip()

    origin_name = "origin"
    res = subprocess.run(
        f"git remote show {origin_name}".split(),
        check=True,
        capture_output=True,
    )
    for line in res.stdout.decode("utf-8").splitlines():
        if line.strip().startswith("HEAD branch:"):
            default_branch = line.replace("HEAD branch:", "").strip()
            subprocess.run(
                f"git config --worktree git-checkout-default.default-branch "
                f"{default_branch}".split(),
                check=True,
            )
            return default_branch

    raise NotImplementedError(f"No remote called {origin_name!r}")


def get_current_branch():
    res = subprocess.run("git branch --show-current".split(), capture_output=True)
    for line in res.stdout.decode("utf-8").splitlines():
        return line.strip()

    res = subprocess.run("git show -s --pretty=%d HEAD".split(), capture_output=True)
    for line in res.stdout.decode("utf-8").splitlines():
        return line.strip()

    raise NotImplementedError("Don't know what to do!")


if __name__ == "__main__":
    import sys

    sys.exit(run(*sys.argv[1:]))

It ain't pretty or a spiffy one-liner, but it works. It assumes that the repo has a remote called origin which doesn't matter if it's the upstream or your fork. Put this script into a file called ~/bin/Gcm and run chmox +x ~/bin/Gcm.

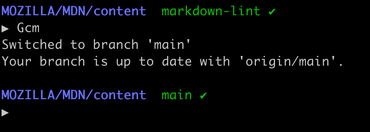
Now, whenever I want to go back to the main branch I type Gcm and it takes me there.

Gcm in action

It might seem silly, and it might not be for you, but I love it and use it many times per day. Perhaps by sharing this tip, it'll inspire someone else to set up something similar for themselves.

Why it's spelled with an uppercase G

I have a pattern (or rule?) that all scripts that I write myself are always capitalized like that. It avoids clashes with stuff I install with brew or other bash/zsh aliases.

For example:

ls -l ~/bin/RemoteVSCodePeterbecom.sh
ls -l ~/bin/Cleanupfiles
ls -l ~/bin/RandomString.py

UPDATE: July 2021

Jason @silverjam Mobarak on Twitter suggested an optimization. I've incorporated his suggestion into the original blog post above. See this twitter thread.
Essentially, it now uses git config --worktree to set and get the outcome of the default branch name so the next time it's needed it does not depend on network.
But watch out, if you, like me, change the default branch of some existing repos from master to main; then you'll need to run: git config --worktree --unset git-checkout-default.default-branch.

sharp vs. jimp - Node libraries to make thumbnail images

December 15, 2020
3 comments Node, JavaScript, Firebase

I recently wrote a Google Firebase Cloud function that resizes images on-the-fly and after having published that I discovered that sharp is "better" than jimp. And by better I mean better performance.

To reach this conclusion I wrote a simple trick that loops over a bunch of .png and .jpg files I had lying around and compare how long it took each implementation to do that. Here are the results:

Using jimp

▶ node index.js ~/Downloads
Sum size before: 41.1 MB (27 files)
...
Took: 28.278s
Sum size after: 337 KB

Using sharp

▶ node index.js ~/Downloads
Sum size before: 41.1 MB (27 files)
...
Took: 1.277s
Sum size after: 200 KB

The files are in the region of 100-500KB, a couple that are 1-3MB, and 1 that is 18MB.

So basically: 28 seconds for jimp and 1.3 seconds for sharp

Bonus, the code

Don't ridicule me for my benchmarking code. These are quick hacks. Let's focus on the point.

sharp


function f1(sourcePath, destination) {
  return readFile(sourcePath).then((buffer) => {
    console.log(sourcePath, "is", humanFileSize(buffer.length));
    return sharp(sourcePath)
      .rotate()
      .resize(100)
      .toBuffer()
      .then((data) => {
        const destPath = path.join(destination, path.basename(sourcePath));
        return writeFile(destPath, data).then(() => {
          return stat(destPath).then((s) => s.size);
        });
      });
  });
}

jimp


function f2(sourcePath, destination) {
  return readFile(sourcePath).then((buffer) => {
    console.log(sourcePath, "is", humanFileSize(buffer.length));
    return Jimp.read(sourcePath).then((img) => {
      const destPath = path.join(destination, path.basename(sourcePath));
      img.resize(100, Jimp.AUTO);
      return img.writeAsync(destPath).then(() => {
        return stat(destPath).then((s) => s.size);
      });
    });
  });
}

I test them like this:


console.time("Took");
const res = await Promise.all(files.map((file) => f1(file, destination)));
console.timeEnd("Took");

And just to be absolutely sure, I run them separately so the whole process is dedicated to one implementation.

downloadAndResize - Firebase Cloud Function to serve thumbnails

December 8, 2020
0 comments Web development, That's Groce!, Node, JavaScript

UPDATE 2020-12-30

With sharp after you've loaded the image (sharp(contents)) make sure to add .rotate() so it automatically rotates the image correctly based on EXIF data.

UPDATE 2020-12-13

I discovered that sharp is much better than jimp. It's order of maginitude faster. And it's actually what the Firebase Resize Images extension uses. Code updated below.

I have a Firebase app that uses the Firebase Cloud Storage to upload images. But now I need thumbnails. So I wrote a cloud function that can generate thumbnails on-the-fly.

There's a Firebase Extension called Resize Images which is nicely done but I just don't like that strategy. At least not for my app. Firstly, I'm forced to pick the right size(s) for thumbnails and I can't really go back on that. If I pick 50x50, 1000x1000 as my sizes, and depend on that in the app, and then realize that I actually want it to be 150x150, 500x500 then I'm quite stuck.

Instead, I want to pick any thumbnail sizes dynamically. One option would be a third-party service like imgix, CloudImage, or Cloudinary but these are not free and besides, I'll need to figure out how to upload the images there. There are other Open Source options like picfit which you install yourself but that's not an attractive option with its implicit complexity for a side-project. I want to stay in the Google Cloud. Another option would be this AppEngine function by Albert Chen which looks nice but then I need to figure out the access control between that and my Firebase Cloud Storage. Also, added complexity.

As part of your app initialization in Firebase, it automatically has access to the appropriate storage bucket. If I do:


const storageRef = storage.ref();
uploadTask = storageRef.child('images/photo.jpg').put(file, metadata);
...

...in the Firebase app, it means I can do:


 admin
      .storage()
      .bucket()
      .file('images/photo.jpg')
      .download()
      .then((downloadData) => {
        const contents = downloadData[0];

...in my cloud function and it just works!

And to do the resizing I use Jimp which is TypeScript aware and easy to use. Now, remember this isn't perfect or mature but it works. It solves my needs and perhaps it will solve your needs too. Or, at least it might be a good start for your application that you can build on. Here's the function (in functions/src/index.ts):


interface StorageErrorType extends Error {
  code: number;
}

const codeToErrorMap: Map<number, string> = new Map();
codeToErrorMap.set(404, "not found");
codeToErrorMap.set(403, "forbidden");
codeToErrorMap.set(401, "unauthenticated");

export const downloadAndResize = functions
  .runWith({ memory: "1GB" })
  .https.onRequest(async (req, res) => {
    const imagePath = req.query.image || "";
    if (!imagePath) {
      res.status(400).send("missing 'image'");
      return;
    }
    if (typeof imagePath !== "string") {
      res.status(400).send("can only be one 'image'");
      return;
    }
    const widthString = req.query.width || "";
    if (!widthString || typeof widthString !== "string") {
      res.status(400).send("missing 'width' or not a single string");
      return;
    }
    const extension = imagePath.toLowerCase().split(".").slice(-1)[0];
    if (!["jpg", "png", "jpeg"].includes(extension)) {
      res.status(400).send(`invalid extension (${extension})`);
      return;
    }
    let width = 0;
    try {
      width = parseInt(widthString);
      if (width < 0) {
        throw new Error("too small");
      }
      if (width > 1000) {
        throw new Error("too big");
      }
    } catch (error) {
      res.status(400).send(`width invalid (${error.toString()}`);
      return;
    }

    admin
      .storage()
      .bucket()
      .file(imagePath)
      .download()
      .then((downloadData) => {
        const contents = downloadData[0];
        console.log(
          `downloadAndResize (${JSON.stringify({
            width,
            imagePath,
          })}) downloadData.length=${humanFileSize(contents.length)}\n`
        );

        const contentType = extension === "png" ? "image/png" : "image/jpeg";
        sharp(contents)
          .rotate()
          .resize(width)
          .toBuffer()
          .then((buffer) => {
            res.setHeader("content-type", contentType);
            // TODO increase some day
            res.setHeader("cache-control", `public,max-age=${60 * 60 * 24}`);
            res.send(buffer);
          })
          .catch((error: Error) => {
            console.error(`Error reading in with sharp: ${error.toString()}`);
            res
              .status(500)
              .send(`Unable to read in image: ${error.toString()}`);
          });
      })
      .catch((error: StorageErrorType) => {
        if (error.code && codeToErrorMap.has(error.code)) {
          res.status(error.code).send(codeToErrorMap.get(error.code));
        } else {
          res.status(500).send(error.message);
        }
      });
  });

function humanFileSize(size: number): string {
  if (size < 1024) return `${size} B`;
  const i = Math.floor(Math.log(size) / Math.log(1024));
  const num = size / Math.pow(1024, i);
  const round = Math.round(num);
  const numStr: string | number =
    round < 10 ? num.toFixed(2) : round < 100 ? num.toFixed(1) : round;
  return `${numStr} ${"KMGTPEZY"[i - 1]}B`;
}

Here's what a sample URL looks like.

I hope it helps!

I think the next thing for me to consider is to extend this so it uploads the thumbnail back and uses the getDownloadURL() of the created thumbnail as a redirect instead. It would be transparent to the app but saves on repeated views. That'd be a good optimization.

Default food shopping items isn't for everyone

November 24, 2020
0 comments That's Groce!

An old friend of mine, from The Netherlands, contacted me about That's Groce! because the default food word suggestions simple don't make sense to him since they're all in English. American English too, I suspect.

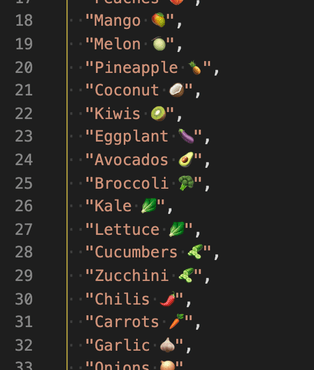
Let's back up a bit. Here's a picture of some of the ~100 default food words that are meant to help you when you start out:

Some of the default food word suggestions

The idea is that until you've started using That's Groce! it'll take a while to get your patterns settled. The assumption is that for most people it makes sense to have some sensible default suggestions. This way, as you start typing ch it can suggest: "Cherries 🍒", "Chilis 🌶", "Chicken 🍗", etc.

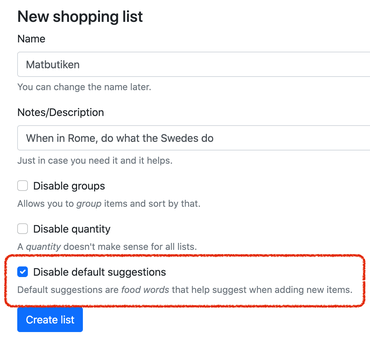
Now, you can turn this functionality off. The option looks like this:

Disable default suggestions

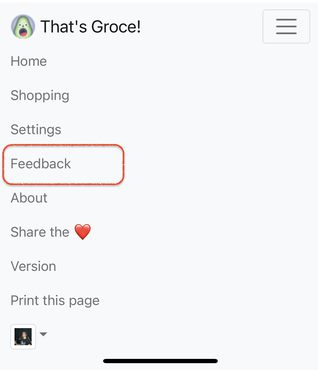
What's cool about this new feature is that the feature was borne from feedback. My friend used the "Feedback" form and is actually the first one to ever do so. Thanks Ivo!

Feedback option

Popularity contest for your grocery list

November 21, 2020
0 comments Web development, Mobile, That's Groce!

tl;dr; Up until recently, when you started to type a new entry in your That's Groce shopping list, the suggestions that would appear weren't sorted intelligently. Now they are. They're sorted by popularity.

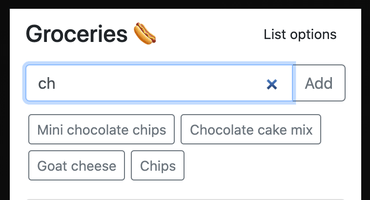
The whole point with the suggestions that appear is to make it easier for you to not have to type the rest. The first factor that decides which should appear is simply based on what you've typed so far. If you started typing ch we can suggest:

  • Cherry tomatoes
  • Chocolate chips
  • Mini chocolate chips
  • Rainbow chard
  • Goat cheese
  • Chickpeas
  • etc.

They all contain ch in some form (starting of words only). But space is limited and you can't show every suggestion. So, if you're going to cap it to only show, say, 4 suggestions; which ones should you show first?
I think the solution is to do it by frequency. I.e. items you often put onto the list.

How to calculate the frequency

The way That's Groce now does it is that it knows the exact times a certain item was added to the list. It then takes that list and applies the following algorithm:

For each item...

  1. Discard the dates older than 3 months
  2. Discard any duplicates from clusters (e.g. you accidentally added it and removed it and added it again within minutes)
  3. Calculate the distance (in seconds) between each add
  4. From the last 4 times it was added, take the median value of the distance between

So the frequency becomes a number of seconds. It should feel somewhat realistic. In my family, it actually checks out. We buy bananas every week but sometimes slightly more often than that and in our case, the number comes to ~6 days.

The results

Before sorting by popularity

After sorting by popularity

Great! The chances of appreciating and picking one of the suggestions is greater if it's more likely to be what you were looking for. And things that have been added frequently in the past are more likely to be added again.

How to debug this

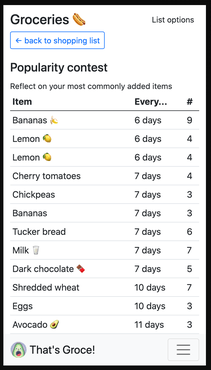
There's now a new page called the "Popularity contest". You get to it from the "List options" button in the upper right-hand corner. On its own, it's fairly "useless" because it just lists them. But it's nice to get a feeling for what your family most frequently add to the list. A lot more can probably be done to this page but for now, it really helps to back up the understanding of how the suggestions are sorted when you're adding new entries.

Popularity contest

If you look carefully at my screenshot here you'll notice two little bugs. There are actually two different entries for "Lemon 🍋" and that was from the early days when that could happen.
Also, another bug is that there's one entry called "Bananas" and one called "Bananas 🍌" which is also something that's being fixed in the latest release. My own family's list predates those fixes.

Hope it helps!

Generating random avatar images in Django/Python

October 28, 2020
1 comment Web development, Django, Python

tl;dr; <img src="/avatar.random.png" alt="Random avataaar"> generates this image:

Random avataaar
(try reloading to get a random new one. funny aren't they?)

When you use Gravatar you can convert people's email addresses to their mugshot.
It works like this:


<img src="https://www.gravatar.com/avatar/$(md5(user.email))">

But most people don't have their mugshot on Gravatar.com unfortunately. But you still want to display an avatar that is distinct per user. Your best option is to generate one and just use the user's name or email as a seed (so it's always random but always deterministic for the same user). And you can also supply a fallback image to Gravatar that they use if the email doesn't match any email they have. That's where this blog post comes in.

I needed that so I shopped around and found avataaars generator which is available as a React component. But I need it to be server-side and in Python. And thankfully there's a great port called: py-avataaars.

It depends on CairoSVG to convert an SVG to a PNG but it's easy to install. Anyway, here's my hack to generate random "avataaars" from Django:


import io
import random

import py_avataaars
from django import http
from django.utils.cache import add_never_cache_headers, patch_cache_control


def avatar_image(request, seed=None):
    if not seed:
        seed = request.GET.get("seed") or "random"

    if seed != "random":
        random.seed(seed)

    bytes = io.BytesIO()

    def r(enum_):
        return random.choice(list(enum_))

    avatar = py_avataaars.PyAvataaar(
        style=py_avataaars.AvatarStyle.CIRCLE,
        # style=py_avataaars.AvatarStyle.TRANSPARENT,
        skin_color=r(py_avataaars.SkinColor),
        hair_color=r(py_avataaars.HairColor),
        facial_hair_type=r(py_avataaars.FacialHairType),
        facial_hair_color=r(py_avataaars.FacialHairColor),
        top_type=r(py_avataaars.TopType),
        hat_color=r(py_avataaars.ClotheColor),
        mouth_type=r(py_avataaars.MouthType),
        eye_type=r(py_avataaars.EyesType),
        eyebrow_type=r(py_avataaars.EyebrowType),
        nose_type=r(py_avataaars.NoseType),
        accessories_type=r(py_avataaars.AccessoriesType),
        clothe_type=r(py_avataaars.ClotheType),
        clothe_color=r(py_avataaars.ClotheColor),
        clothe_graphic_type=r(py_avataaars.ClotheGraphicType),
    )
    avatar.render_png_file(bytes)

    response = http.HttpResponse(bytes.getvalue())
    response["content-type"] = "image/png"
    if seed == "random":
        add_never_cache_headers(response)
    else:
        patch_cache_control(response, max_age=60, public=True)

    return response

It's not perfect but it works. The URL to this endpoint is /avatar.<seed>.png and if you make the seed parameter random the response is always different.

To make the image not random, you replace the <seed> with any string. For example (use your imagination):


{% for comment in comments %}
  <img src="/avatar.{{ comment.user.id }}.png" alt="{{ comment.user.name }}">
  <blockquote>{{ comment.text }}</blockquote>
  <i>{{ comment.date }}</i>
{% endfor %}