Filtered by Python

Page 8

Reset

Conditional aggregation in Django 2.0

January 12, 2018
4 comments Python, Django, PostgreSQL

Django 2.0 came out a couple of weeks ago. It now supports "conditional aggregation" which is SQL standard I didn't even know about.

Before

So I have a Django app which has an endpoint that generates some human-friendly stats about the number of uploads (and their total size) in various different time intervals.

First of all, this is how it set up the time intervals:


today = timezone.now()
start_today = today.replace(hour=0, minute=0, second=0)
start_yesterday = start_today - datetime.timedelta(days=1)
start_this_month = today.replace(day=1)
start_this_year = start_this_month.replace(month=1)

And then, for each of these, there's a little function that returns a dict for each time interval:


def count_and_size(qs, start, end):
    sub_qs = qs.filter(created_at__gte=start, created_at__lt=end)
    return {
        'count': sub_qs.count(),
        'total_size': sub_qs.aggregate(size=Sum('size'))['size'],
}

numbers['uploads'] = {
    'today': count_and_size(upload_qs, start_today, today),
    'yesterday': count_and_size(upload_qs, start_yesterday, start_today),
    'this_month': count_and_size(upload_qs, start_this_month, today),
    'this_year': count_and_size(upload_qs, start_this_year, today),
}

What you get is exactly 2 x 4 = 8 queries. One COUNT and one SUM for each time interval. E.g.

SELECT SUM("upload_upload"."size") AS "size" 
FROM "upload_upload" 
WHERE ("upload_upload"."created_at" >= ...

SELECT COUNT(*) AS "__count" 
FROM "upload_upload" 
WHERE ("upload_upload"."created_at" >= ...

...6 more queries...

Middle

Oops. I think this code comes from a slightly rushed job. We can do the COUNT and the SUM at the same time for each query.


# New, improved count_and_size() function!
def count_and_size(qs, start, end):
    sub_qs = qs.filter(created_at__gte=start, created_at__lt=end)
    return sub_qs.aggregate(
        count=Count('id'),
        total_size=Sum('size'),
    )

numbers['uploads'] = {
    'today': count_and_size(upload_qs, start_today, today),
    'yesterday': count_and_size(upload_qs, start_yesterday, start_today),
    'this_month': count_and_size(upload_qs, start_this_month, today),
    'this_year': count_and_size(upload_qs, start_this_year, today),
}

Much better, now there's only one query per time bucket. So 4 queries in total. E.g.

SELECT COUNT("upload_upload"."id") AS "count", SUM("upload_upload"."size") AS "total_size" 
FROM "upload_upload" 
WHERE ("upload_upload"."created_at" >= ...

...3 more queries...

After

But we can do better than that! Instead, we use conditional aggregation. The syntax gets a bit hairy because there's so many keyword arguments, but I hope I've indented it nicely so it's easy to see how it works:


def make_q(start, end):
    return Q(created_at__gte=start, created_at__lt=end)

q_today = make_q(start_today, today)
q_yesterday = make_q(start_yesterday, start_today)
q_this_month = make_q(start_this_month, today)
q_this_year = make_q(start_this_year, today)

aggregates = upload_qs.aggregate(
    today_count=Count('pk', filter=q_today),
    today_total_size=Sum('size', filter=q_today),

    yesterday_count=Count('pk', filter=q_yesterday),
    yesterday_total_size=Sum('size', filter=q_yesterday),

    this_month_count=Count('pk', filter=q_this_month),
    this_month_total_size=Sum('size', filter=q_this_month),

    this_year_count=Count('pk', filter=q_this_year),
    this_year_total_size=Sum('size', filter=q_this_year),
)
numbers['uploads'] = {
    'today': {
        'count': aggregates['today_count'],
        'total_size': aggregates['today_total_size'],
    },
    'yesterday': {
        'count': aggregates['yesterday_count'],
        'total_size': aggregates['yesterday_total_size'],
    },
    'this_month': {
        'count': aggregates['this_month_count'],
        'total_size': aggregates['this_month_total_size'],
    },
    'this_year': {
        'count': aggregates['this_year_count'],
        'total_size': aggregates['this_year_total_size'],
    },
}

Voila! One single query to get all those pieces of data.
The SQL sent to PostgreSQL looks something like this:

SELECT 
  COUNT("upload_upload"."id") FILTER (WHERE ("upload_upload"."created_at" >= ...)) AS "today_count", 
  SUM("upload_upload"."size") FILTER (WHERE ("upload_upload"."created_at" >= ...)) AS "today_total_size", 

  COUNT("upload_upload"."id") FILTER (WHERE ("upload_upload"."created_at" >= ...)) AS "yesterday_count", 
  SUM("upload_upload"."size") FILTER (WHERE ("upload_upload"."created_at" >= ...)) AS "yesterday_total_size", 

  ...

FROM "upload_upload";

Is this the best thing to do? I'm starting to have my doubts.

Watch Out!

When I take this now 1 monster query for a spin with an EXPLAIN ANALYZE prefix I notice something worrying!

QUERY PLAN
-------------------------------------------------------------------------------------------------------------------
 Aggregate  (cost=74.33..74.34 rows=1 width=16) (actual time=0.587..0.587 rows=1 loops=1)
   ->  Seq Scan on upload_upload  (cost=0.00..62.13 rows=813 width=16) (actual time=0.012..0.210 rows=813 loops=1)
 Planning time: 0.427 ms
 Execution time: 0.674 ms
(4 rows)

A sequential scan! That's terrible. The created_at column is indexed in a BTREE so why can't it use the index.

The short answer is: I don't know!
I've uploaded a reduced, but still complete, example demonstrating this in a gist. It's very similar to the example in the stackoverflow question I asked.

So what did I do? I went back to the "middle" solution. One SELECT query per time bucket. So 4 queries in total, but at least all 4 is able to use an index.

Understanding Redis hash-max-ziplist-entries

January 8, 2018
2 comments Python, Redis

This is an advanced topic for people who do serious stuff in Redis. I need to do serious stuff in Redis so I'm trying to learn about the best way to store lots of keys with hash maps.

It seems that this article by Salvatore Sanfilippo (creator of Redis) himself seems to be a much cited article for this topic. If you haven't read it, the gist is that Redis can employ some clever optimizations for storing hash maps in a very memory efficient way instead of storing each key-value separately.

"Hashes, Lists, Sets composed of just integers, and Sorted Sets, when smaller than a given number of elements, and up to a maximum element size, are encoded in a very memory efficient way that uses up to 10 times less memory (with 5 time less memory used being the average saving)"

This efficient storage optimization is called a ziplist.

Truncated! Read the rest by clicking the link below.

Whatsdeployed facelift

January 5, 2018
0 comments Python, Web development, Mozilla, Docker

tl;dr; Whatsdeployed.io is an impressively simple web app to help web developers and web ops people quickly see what GitHub commits have made it into your Dev, Stage or Prod environment. Today it got a facelift.

The code is now more than 5 years old and has served me well. It's weird to talk too positively about the app because I actually wrote it but because it's so simple in terms of design and effort it feels less personal to talk about it.

Here's what's in the facelift

  • Upgraded to Bootstrap 4.
  • Instead of relying on downloading a heavy Glyphicon web font, just to display a single checkmark, that's now a simple image.
  • Ability to use a GitHub developer personal token to avoid rate limitations on GitHub's API.
  • The first lookup to get all commits is now done via the Flask app to use my auth token to avoid the rate limit.
  • Much better error handling if any of the underlying requests.get() that the Flask app does, fails. Also includes which URL it failed on.
  • Basic validation to prevent submitting the main form without typing anything in.
  • You can hack on it with Docker. Thanks @willkg.
  • Improved the code that extracts Bugzilla bug numbers out of commit messages. Thanks @edmorely.
  • Refreshed screenshots in the README.md
  • A brand new introduction text on the home page for people who end up on the site not knowing what it is.
  • If any XHR errors happen figuring out the "culprits", you now get a pretty error describing this instead of swallowing it all.

Please let me know if there's anything broken or missing.

Fastest way to uniquify a list in Python >=3.6

December 23, 2017
7 comments Python

This is an update to a old blog post from 2006 called Fastest way to uniquify a list in Python. But this, time for Python 3.6. Why, because Python 3.6 preserves the order when inserting keys to a dictionary. How, because the way dicts are implemented in 3.6, the way it does that is different and as an implementation detail the order gets preserved. Then, in Python 3.7, which isn't released at the time of writing, that order preserving is guaranteed.

Anyway, Raymond Hettinger just shared a neat little way to uniqify a list. I thought I'd update my old post from 2006 to add list(dict.fromkeys('abracadabra')).

Functions

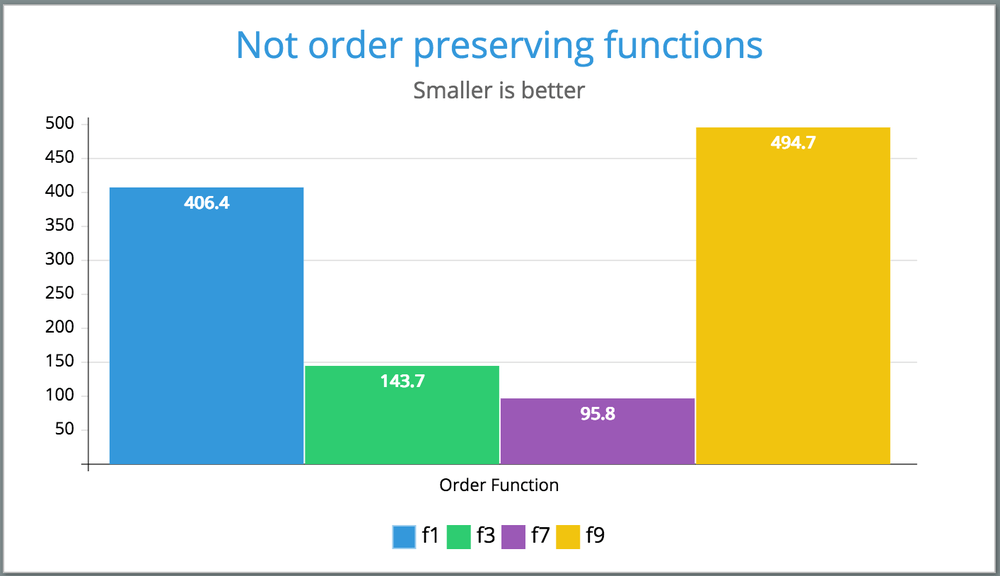
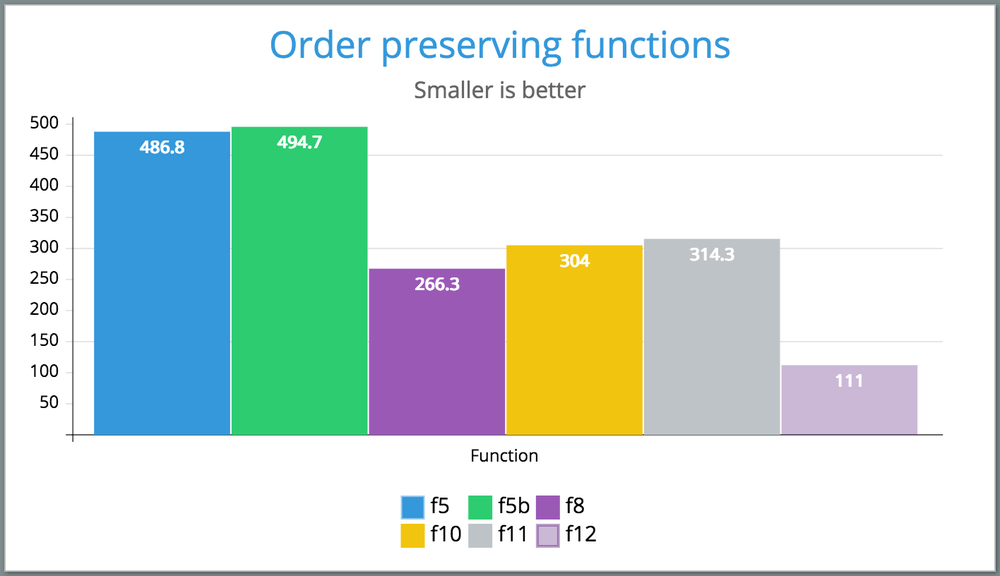
Reminder, there are two ways to uniqify a list. Order preserving and not order preserving. For example, the unique letters in peter is p, e, t, r in their "original order". As opposed to t, e, p, r.


def f1(seq):  # Raymond Hettinger
    hash_ = {}
    [hash_.__setitem__(x, 1) for x in seq]
    return hash_.keys()

def f3(seq):
    # Not order preserving
    keys = {}
    for e in seq:
        keys[e] = 1
    return keys.keys()

def f5(seq, idfun=None):  # Alex Martelli ******* order preserving
    if idfun is None:
        def idfun(x): return x
    seen = {}
    result = []
    for item in seq:
        marker = idfun(item)
        # in old Python versions:
        # if seen.has_key(marker)
        # but in new ones:
        if marker in seen:
            continue
        seen[marker] = 1
        result.append(item)
    return result

def f5b(seq, idfun=None):  # Alex Martelli ******* order preserving
    if idfun is None:
        def idfun(x): return x
    seen = {}
    result = []
    for item in seq:
        marker = idfun(item)
        # in old Python versions:
        # if seen.has_key(marker)
        # but in new ones:
        if marker not in seen:
            seen[marker] = 1
            result.append(item)

    return result

def f7(seq):
    # Not order preserving
    return list(set(seq))

def f8(seq):  # Dave Kirby
    # Order preserving
    seen = set()
    return [x for x in seq if x not in seen and not seen.add(x)]

def f9(seq):
    # Not order preserving, even in Py >=3.6
    return {}.fromkeys(seq).keys()

def f10(seq, idfun=None):  # Andrew Dalke
    # Order preserving
    return list(_f10(seq, idfun))

def _f10(seq, idfun=None):
    seen = set()
    if idfun is None:
        for x in seq:
            if x in seen:
                continue
            seen.add(x)
            yield x
    else:
        for x in seq:
            x = idfun(x)
            if x in seen:
                continue
            seen.add(x)
            yield x

def f11(seq):  # f10 but simpler
    # Order preserving
    return list(_f10(seq))

def f12(seq):
    # Raymond Hettinger
    # https://twitter.com/raymondh/status/944125570534621185
    return list(dict.fromkeys(seq))

Results

FUNCTION        ORDER PRESERVING     MEAN       MEDIAN
f12             yes                  111.0      112.2
f8              yes                  266.3      266.4
f10             yes                  304.0      299.1
f11             yes                  314.3      312.9
f5              yes                  486.8      479.7
f5b             yes                  494.7      498.0
f7              no                   95.8       95.1
f9              no                   100.8      100.9
f3              no                   143.7      142.2
f1              no                   406.4      408.4

Not order preserving

Order preserving

Conclusion

The fastest way to uniqify a list of hashable objects (basically immutable things) is:


list(set(seq))

And the fastest way, if the order is important is:


list(dict.fromkeys(seq))

Now we know.

Msgpack vs JSON (with gzip)

December 19, 2017
17 comments Python, Web development

tl;dr; I see no reason worth switching to Msgpack instead of good old JSON.

I was curious, how much more efficient is Msgpack at packing a bunch of data into a file I can emit from a web service.

In this experiment I take a massive JSON file that is used in a single-page-app I worked on. If I download the file locally as a .json file, the file is 2.1MB.

Converting it to Msgpack:


>>> import json, msgpack
>>> with open('events.json') as f:
...   events=json.load(f)
...
>>> len(events)
3
>>> events.keys()
dict_keys(['max_modified', 'events', 'urls'])
>>> with open('events.msgpack', 'wb') as f:
...   f.write(msgpack.packb(events))
...
1880266

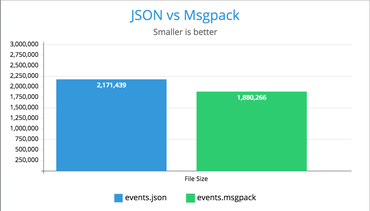
events.json vs events.msgpack
Now, let's compared the two file formats, as seen on disk:

▶ ls -lh events*
-rw-r--r--  1 peterbe  wheel   2.1M Dec 19 10:16 events.json
-rw-r--r--  1 peterbe  wheel   1.8M Dec 19 10:19 events.msgpack

But! How well does it compress?

More common than not your web server can return content encoded in Gzip as content-encoding: gzip. So, let's compare that:

▶ gzip events.json ; gzip events.msgpack
▶ ls -l events*
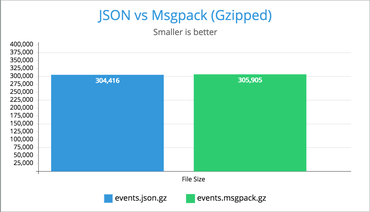
-rw-r--r--  1 peterbe  wheel  304416 Dec 19 10:16 events.json.gz
-rw-r--r--  1 peterbe  wheel  305905 Dec 19 10:19 events.msgpack.gz

Msgpack vs JSON (with gzip)

Oh my! When you gzip the files the .json file ultimately becomes smaller. By a whopping 0.5%!

What about speed?

First let's open the files a bunch of times and see how long it takes to unpack:


def f1():
    with open('events.json') as f:
        s = f.read()
    t0 = time.time()
    events = json.loads(s)
    t1 = time.time()
    assert len(events['events']) == 4365
    return t1 - t0


def f2():
    with open('events.msgpack', 'rb') as f:
        s = f.read()
    t0 = time.time()
    events = msgpack.unpackb(s, encoding='utf-8')
    t1 = time.time()
    assert len(events['events']) == 4365
    return t1 - t0


def f3():
    with open('events.json') as f:
        s = f.read()
    t0 = time.time()
    events = ujson.loads(s)
    t1 = time.time()
    assert len(events['events']) == 4365
    return t1 - t0

(Note that the timing is around the json.loads() etc without measuring how long it takes to get the files to strings)

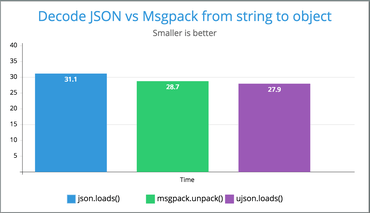
json.loads() vs msgpack.unpack() vs. ujson.loads()
Result (using Python 3.6.1): All about the same.

FUNCTION: f1 Used 56 times
    MEDIAN 30.509352684020996
    MEAN   31.09178798539298
    STDEV  3.5620914333233595
FUNCTION: f2 Used 68 times
    MEDIAN 27.882099151611328
    MEAN   28.704492484821994
    STDEV  3.353800228776872
FUNCTION: f3 Used 76 times
    MEDIAN 27.746915817260742
    MEAN   27.920340236864593
    STDEV  2.21554251130519

Same benchmark using PyPy 3.5.3, but skipping the f3() which uses ujson:

FUNCTION: f1 Used 99 times
    MEDIAN 20.905017852783203
    MEAN   22.13949386519615
    STDEV  5.142071370453135
FUNCTION: f2 Used 101 times
    MEDIAN 36.96393966674805
    MEAN   40.54664857316725
    STDEV  17.833577642246738

Dicussion and conclusion

One of the benefits of Msgpack is that it can used for streaming. "Streaming unpacking" as they call it. But, to be honest, I've never used it. That can useful when you have structured data trickling in and you don't want to wait for it all before using the data.

Another cool feature Msgpack has is ability to encode custom types. E.g. datetime.datetime. Like bson can do. With JSON you have to, for datetime objects do string conversions back and forth and the formats are never perfectly predictable so you kinda have to control both ends.

But beyond some feature differences, it seems that JSON compressed just as well as Msgpack when Gzipped. And unlike Msgpack JSON is not binary so it's easy to poke around with any tool. And decompressing JSON is just as fast. Almost. But if you need to squeeze out a couple of extra free milliseconds from your JSON files you can use ujson.

Conclusion; JSON is fine. It's bigger but if you're going to Gzip anyway, it's just as small as Msgpack.

Bonus! BSON

Another binary encoding format that supports custom types is BSON. This one is a pure Python implementation. BSON is used by MongoDB but this bson module is not what PyMongo uses.

Size comparison:

▶ ls -l events*son
-rw-r--r--  1 peterbe  wheel  2315798 Dec 19 11:07 events.bson
-rw-r--r--  1 peterbe  wheel  2171439 Dec 19 10:16 events.json

So it's 7% larger than JSON uncompressed.

▶ ls -l events*son.gz
-rw-r--r--  1 peterbe  wheel  341595 Dec 19 11:07 events.bson.gz
-rw-r--r--  1 peterbe  wheel  304416 Dec 19 10:16 events.json.gz

Meaning it's 12% fatter than JSON when Gzipped.

Doing a quick benchmark with this:


def f4():
    with open('events.bson', 'rb') as f:
        s = f.read()
    t0 = time.time()
    events = bson.loads(s)
    t1 = time.time()
    assert len(events['events']) == 4365
    return t1 - t0

Compared to the original f1() function:

FUNCTION: f1 Used 106 times
    MEDIAN 29.58393096923828
    MEAN   30.289863640407347
    STDEV  3.4766612593557173
FUNCTION: f4 Used 94 times
    MEDIAN 231.00042343139648
    MEAN   231.40889786659403
    STDEV  8.947746458066405

In other words, bson is about 600% slower than json.

This blog post was supposed to be about how well the individual formats size up against each other on disk but it certainly would be interesting to do a speed benchmark comparing Msgpack and JSON (and maybe BSON) where you have a bunch of datetimes or decimal.Decimal objects and see if the difference is favoring the binary formats.

Really simple Django view function timer decorator

December 8, 2017
2 comments Python, Django

I use this sometimes to get insight into how long some view functions take. Perhaps you find it useful too:


def view_function_timer(prefix='', writeto=print):

    def decorator(func):
        @functools.wraps(func)
        def inner(*args, **kwargs):
            try:
                t0 = time.time()
                return func(*args, **kwargs)
            finally:
                t1 = time.time()
                writeto(
                    'View Function',
                    '({})'.format(prefix) if prefix else '',
                    func.__name__,
                    args[1:],
                    'Took',
                    '{:.2f}ms'.format(1000 * (t1 - t0)),
                    args[0].build_absolute_uri(),
                )
        return inner

    return decorator

And to use it:


from wherever import view_function_timer


@view_function_timer()
def homepage(request, thing):
    ...
    return render(request, template, context)

And then it prints something like this:

View Function  homepage ('valueofthing',) Took 23.22ms http://localhost:8000/home/valueofthing

It's useful when you don't want a full-blown solution to measure all view functions with a middleware or something.
It can be useful also to see how a cache decorator might work:


from django.views.decorators.cache import cache_page
from wherever import view_function_timer


@view_function_timer('possibly cached')
@cache_page(60 * 60 * 2)  # two hours cache
@view_function_timer('not cached')
def homepage(request, thing):
    ...
    return render(request, template, context)

That way you can trace that, with tail -f or something, to see how/if the cacheing decorator works.

There are many better solutions that are more robust but might be a bigger investment. For example, I would recommend markus which, if you don't have a statsd server you can configure to logger.info call the timings.

Synonyms with elasticsearch-dsl

December 5, 2017
0 comments Python, Web development, PostgreSQL

The documentation about how to use synonyms in Elasticsearch is good but because it's such an advanced topic, even if you read the documentation carefully, you're still left with lots of questions. Let me show you some things I've learned about how to use synonyms in Python with elasticsearch-dsl.

What's the nature of your documents?

I'm originally from Sweden but moved to London, UK in 1999 and started blogging a few years after. So I wrote most of my English with British English spelling. E.g. "centre" instead of "center". Later I moved to California in the US and slowly started to change my own English over to American English. I kept blogging but now I would prefer to write "center" instead of "centre".

Another example... Certain technical words or namings are tricky. For example, is it "go" or is it "golang"? Is it "React" or is it "ReactJS"? Is it "PostgreSQL" or "Postgres". I never know. Not only is it sometimes hard to know which is right because people use them differently, but also sometimes "brands" like that change over time since inception, the creator might have preferred something but the masses of people call it something else.

So with all that in mind, not only has the nature of my documents (my blog post texts) changed in terminology over the years. My visitors are also coming both from British English and American English. Or, suppose that I knew the perfect way to phrase that relational database that starts with "Postg...". Even if my text is always spelled one particular way, perfectly, my visitors will most likely refer to it as "postgres" sometimes and "postgresql" sometimes.

The simple solution, match all!

Create a custom analyzer

Let's jump straight into the code. People who have used elasticsearch_dsl should be familiar with most of this:


from elasticsearch_dsl import (
    DocType,
    Text,
    Index,
    analyzer,
    Keyword,
    token_filter,
)
from django.conf import settings


index = Index(settings.ES_INDEX)
index.settings(**settings.ES_INDEX_SETTINGS)


synonym_tokenfilter = token_filter(
    'synonym_tokenfilter',
    'synonym',
    synonyms=[
        'reactjs, react',  # <-- important
    ],
)

text_analyzer = analyzer(
    'text_analyzer',
    tokenizer='standard',
    filter=[
        # The ORDER is important here.
        'standard',
        'lowercase',
        'stop',
        synonym_tokenfilter,
        # Note! 'snowball' comes after 'synonym_tokenfilter'
        'snowball',
    ],
    char_filter=['html_strip']
)

class BlogItemDoc(DocType):
    oid = Keyword(required=True)
    title = Text(
        required=True, 
        analyzer=text_analyzer
    )
    text = Text(analyzer=text_analyzer)

index.doc_type(BlogItemDoc)

This code above is copied from the "real code" but a lot of distracting things that aren't important to the point, have been removed.

The magic sauce here is that you create a token_filter and you can call it whatever you want. I called mine synonym_tokenfilter and that's also what the instance variable is called.

Notice the list of synonyms. It's a plain list of strings. Specifically, it's a list of 1 string reactjs, react.

Let's see how Elasticsearch analyzes this:
First with the text react.

$ curl -XGET 'http://127.0.0.1:9200/peterbecom/_analyze?analyzer=text_analyzer&text=react&pretty=1'
{
  "tokens" : [
    {
      "token" : "react",
      "start_offset" : 0,
      "end_offset" : 5,
      "type" : "<ALPHANUM>",
      "position" : 0
    },
    {
      "token" : "reactj",
      "start_offset" : 0,
      "end_offset" : 5,
      "type" : "SYNONYM",
      "position" : 0
    }
  ]
}

Note that the analyzer snowball, converted reactjs to reactj which is wrong in a sense, because there's not plural "reacts", but it ultimately doesn't matter much. At least not in this particular case.

Secondly, analyze it with the text reactjs:

$ curl -XGET 'http://127.0.0.1:9200/peterbecom/_analyze?analyzer=text_analyzer&text=reactjs&pretty=1'
{
  "tokens" : [
    {
      "token" : "reactj",
      "start_offset" : 0,
      "end_offset" : 7,
      "type" : "<ALPHANUM>",
      "position" : 0
    },
    {
      "token" : "react",
      "start_offset" : 0,
      "end_offset" : 7,
      "type" : "SYNONYM",
      "position" : 0
    }
  ]
}

Same tokens! Just different order.

Test it for reals

Now, the real proof is in actually doing a search on this. Look at these two screenshots:

Search for 'react'

Search for 'reactjs'

It worked! Different ways of phrasing your search but ultimately found all the documents that matched independent of different people or different authors might prefer to spell it.

Try it for yourself:

What it looked like before

Check out these two screenshots of how it would look like before, when synonyms for postgres and postgresql had not been set up yet:

Searching for 'postgresql'

Searching for 'postgres'

One immediate thought I have is what a mess I've been in blogging about that database. Clearly I struggled to pick one way to spell it consistently.

And here's what it would look like once that synonym has been set up:

Synonym set up for 'postgres' and 'postgresql'

"go" versus "golang"

Go is a programming language. That term, too, struggles with a name ambiguity. Granted, I rarely hear people say "golang", but it's definitely a written word that turns up a lot.

The problem with setting up a synonym for go == golang is that "go" is common English word. It's also the stem of the word "going" and such. So if you set up a synonym, like I did for react and reactjs above, this is what happens:

Search for 'golang'

This is now the exact search results as if I had searched for go. But look what it matched! It matched "Go" (good) but also "Going real simple..." (bad) and "...I should go" (bad).

If someone searches for the simple term "go" they probably intend to search for the Go programming language. All that snowball stemming is critical for a bunch of other non-computer-term searches so we can't remove the stemming.

The solution is to use what's called "Simple Contraction". And it looks like this:


all_synonyms = [
    'go => golang',
    'react => reactjs',
    'postgres => postgresql',
]

That basically means that a search for go is a search for golang. And a document that uses the word go (alone) is indexed as golang.

What happens is that the word go gets converted to golang which doesn't get stemming converted down to any other forms.

However, this is no silver bullet. Any search for the term go is ultimately a search for the word golang and the regular English word go. So the benefit of all of this was that we got rid of search results matching on going and gone.

What you have to decide...

The case for go is similar to the case for react. Both of these words are nouns but they're also verbs.

Should people find "reacting to events" when they search for "react"? If so, use react, reactjs in the synonyms list.

Should people only find documents related to noun "React" when they search for "event handing in react"? If so, use react => reactjs in the synonyms list.

It's up to you and your documents and what your users tend to search for.

Bonus! For American vs British English

AVKO.org publishes a list of all British to American English synonyms. You can download the whole list here. Unfortunately I can't find a license for this file but the compiled synonyms file is part of this repo which is licensed under MIT.

I download this list and keep it in the repo. Then when setting up the analyzer and token filters I load it in like this:


synonyms_root = os.path.join(
    settings.BASE_DIR, 'peterbecom/es-synonyms'
)
american_british_syns_fn = os.path.join(
    synonyms_root, 'be-ae.synonyms'
)

with open(american_british_syns_fn) as f:
    for line in f:
        if (
            '=>' not in line or 
             line.strip().startswith('#')
         ):
            continue
        all_synonyms.append(line.strip())

Now I can finally enjoy not having to worry about the fact that sometimes I spell it "license" and sometimes I spell it "licence". It's all the same now. Brits and Americans, rejoice on common ground!

Bonus! For terrible spellers

Although I don't have a big problem with this on my techy blog but you can use the Simple Contraction technique to list unambiguously bad spelling. Add dont => don't to the list of synonyms and a search for dont is a search for don't.

Last but not least, the official Elasticsearch documentation is the place to go. This blog post hopefully phrases it in more approachable terms. Especially for Python peeps.

Unzip benchmark on AWS EC2 c3.large vs c4.large

November 29, 2017
18 comments Python, Linux, Mozilla, Go

Datadog monitoring of time to dump and extract zip files in staging server
This web app I'm working on gets a blob of bytes from a HTTP POST. The nature of the blob is a 100MB to 1,100MB blob of a zip file. What my app currently does is that it takes this byte buffer, uses Python's built in zipfile to extract all its content to a temporary directory. A second function then loops over the files within this extracted tree and processes each file in multiple threads with concurrent.futures.ThreadPoolExecutor. Here's the core function itself:


@metrics.timer_decorator('upload_dump_and_extract')
def dump_and_extract(root_dir, file_buffer):
    zf = zipfile.ZipFile(file_buffer)
    zf.extractall(root_dir)

So far so good.

Speed Speed Speed

I quickly noticed that this is amounting to quite a lot of time spent doing the unzip and the writing to disk. What to do????

At first I thought I'd shell out to good old unzip. E.g. unzip -d /tmp/tempdirextract /tmp/input.zip but that has two flaws:

1) I'd first have to dump the blob of bytes to disk and do the overhead of shelling out (i.e. Python subprocess)
2) It's actually not faster. Did some experimenting and got the same results at Alex Martelli in this Stackoverflow post

Compute EC2 instance types
What about disk speed? Yeah, this is likely to be a part of the total time. The servers that run the symbols.mozilla.org service runs on AWS EC2 c4.large. This only has EBS (Elastic Block Storage). However, AWS EC2 c3.large looks interesting since it's using SSD disks. That's probably a lot faster. Right?

Note! For context, the kind of .zip files I'm dealing with contain many small files and often 1-2 really large ones.

EC2s Benchmarking

I create two EC2 nodes to experiment on. One c3.large and one c4.large. Both running Ubuntu 16.04.

Next, I have this little benchmarking script which loops over a directory full of .zip files between 200MB-600MB large. Roughly 10 of them. It then loads each one, one at a time, into memory and calls the dump_and_extract. Let's run it on each EC2 instance:

On c4.large

c4.large$ python3 fastest-dumper.py /tmp/massive-symbol-zips
138.2MB/s            291.1MB              2.107s
146.8MB/s            314.5MB              2.142s
144.8MB/s            288.2MB              1.990s
84.5MB/s             532.4MB              6.302s
146.6MB/s            314.2MB              2.144s
136.5MB/s            270.7MB              1.984s
85.9MB/s             518.9MB              6.041s
145.2MB/s            306.8MB              2.113s
127.8MB/s            138.7MB              1.085s
107.3MB/s            454.8MB              4.239s
141.6MB/s            251.2MB              1.774s


Average speed: 127.7MB/s
Median speed:  138.2MB/s

Average files created:       165
Average directories created: 129

On c3.large

c3.large$ python3 fastest-dumper.py -t /mnt/extracthere /tmp/massive-symbol-zips
105.4MB/s            290.9MB              2.761s
98.1MB/s             518.5MB              5.287s
108.1MB/s            251.2MB              2.324s
112.5MB/s            294.3MB              2.615s
113.7MB/s            314.5MB              2.767s
106.3MB/s            291.5MB              2.742s
104.8MB/s            291.1MB              2.778s
114.6MB/s            248.3MB              2.166s
114.2MB/s            248.2MB              2.173s
105.6MB/s            298.1MB              2.823s
106.2MB/s            297.6MB              2.801s
98.6MB/s             521.4MB              5.289s


Average speed: 107.3MB/s
Median speed:  106.3MB/s

Average files created:       165
Average directories created: 127

What the heck!? The SSD based instance is 23% slower!

I ran it a bunch of times and the average and median numbers are steady. c4.large is faster than c3.large at unzipping large blobs to disk. So much for that SSD!

Something Weird Is Going On

It's highly likely that the unzipping work is CPU bound and that most of those, for example, 5 seconds is spent unzipping and only a small margin is the time it takes to write to disk.

If the unzipping CPU work is the dominant "time consumer" why is there a difference at all?!

Or, is the "compute power" the difference between c3 and c4 and disk writes immaterial?

For the record, this test clearly demonstrates that the locally mounted SSD drive is 600% faster than ESB.

c3.large$ dd if=/dev/zero of=/tmp/1gbtest bs=16k count=65536
65536+0 records in
65536+0 records out
1073741824 bytes (1.1 GB, 1.0 GiB) copied, 16.093 s, 66.7 MB/s
c3.large$ sudo dd if=/dev/zero of=/mnt/1gbtest bs=16k count=65536
65536+0 records in
65536+0 records out
1073741824 bytes (1.1 GB, 1.0 GiB) copied, 2.62728 s, 409 MB/s

Let's try again. But instead of using c4.large and c3.large, let's use the beefier c4.4xlarge and c3.4xlarge. Both have 16 vCPUs.

c4.4xlarge

c4.4xlarge$ python3 fastest-dumper.py /tmp/massive-symbol-zips
130.6MB/s            553.6MB              4.238s
149.2MB/s            297.0MB              1.991s
129.1MB/s            529.8MB              4.103s
116.8MB/s            407.1MB              3.486s
147.3MB/s            306.1MB              2.077s
151.9MB/s            248.2MB              1.634s
140.8MB/s            292.3MB              2.076s
146.8MB/s            288.0MB              1.961s
142.2MB/s            321.0MB              2.257s


Average speed: 139.4MB/s
Median speed:  142.2MB/s

Average files created:       148
Average directories created: 117

c3.4xlarge

c3.4xlarge$ python3 fastest-dumper.py -t /mnt/extracthere /tmp/massive-symbol-zips
95.1MB/s             502.4MB              5.285s
104.1MB/s            303.5MB              2.916s
115.5MB/s            313.9MB              2.718s
105.5MB/s            517.4MB              4.904s
114.1MB/s            288.1MB              2.526s
103.3MB/s            555.9MB              5.383s
114.0MB/s            288.0MB              2.526s
109.2MB/s            251.2MB              2.300s
108.0MB/s            291.0MB              2.693s


Average speed: 107.6MB/s
Median speed:  108.0MB/s

Average files created:       150
Average directories created: 119

What's going on!? The time it takes to unzip and write to disk is, on average, the same for c3.large as c3.4xlarge!

Is Go Any Faster?

I need a break. As mentioned above, the unzip command line program is not any better than doing it in Python. But Go is faster right? Right?

Please first accept that I'm not a Go programmer even though I can use it to build stuff but really my experience level is quite shallow.

Here's the Go version. Critical function that does the unzipping and extraction to disk here:


func DumpAndExtract(dest string, buffer []byte, name string) {
    size := int64(len(buffer))
    zipReader, err := zip.NewReader(bytes.NewReader(buffer), size)
    if err != nil {
        log.Fatal(err)
    }
    for _, f := range zipReader.File {
        rc, err := f.Open()
        if err != nil {
            log.Fatal(err)
        }
        defer rc.Close()
        fpath := filepath.Join(dest, f.Name)
        if f.FileInfo().IsDir() {
            os.MkdirAll(fpath, os.ModePerm)
        } else {
            // Make File
            var fdir string
            if lastIndex := strings.LastIndex(fpath, string(os.PathSeparator)); lastIndex > -1 {
                fdir = fpath[:lastIndex]
            }
            err = os.MkdirAll(fdir, os.ModePerm)
            if err != nil {
                log.Fatal(err)
            }
            f, err := os.OpenFile(
                fpath, os.O_WRONLY|os.O_CREATE|os.O_TRUNC, f.Mode())
            if err != nil {
                log.Fatal(err)
            }
            defer f.Close()

            _, err = io.Copy(f, rc)
            if err != nil {
                log.Fatal(err)
            }
        }
    }
}

And the measurement is done like this:


size := int64(len(content))
t0 := time.Now()
DumpAndExtract(tmpdir, content, filename)
t1 := time.Now()
speed := float64(size) / t1.Sub(t0).Seconds()

It's not as sophisticated (since it's only able to use /tmp) but let's just run it see how it compares to Python:

c4.4xlarge$ mkdir ~/GO
c4.4xlarge$ export GOPATH=~/GO
c4.4xlarge$ go get github.com/pyk/byten
c4.4xlarge$ go build unzips.go
c4.4xlarge$ ./unzips /tmp/massive-symbol-zips
56MB/s         407MB          7.27804954
74MB/s         321MB          4.311504933
75MB/s         288MB          3.856798853
75MB/s         292MB          3.90972474
81MB/s         248MB          3.052652168
58MB/s         530MB          9.065985117
59MB/s         554MB          9.35237202
75MB/s         297MB          3.943132388
74MB/s         306MB          4.147176578

Average speed:    70MB/s
Median speed:     81MB/s

So... Go is, on average, 40% slower than Python in this scenario. Did not expect that.

In Conclusion

No conclusion. Only confusion.

I thought this would be a lot clearer and more obvious. Yeah, I know it's crazy to measure two things at the same time (unzip and disk write) but the whole thing started with a very realistic problem that I'm trying to solve. The ultimate question was; will the performance benefit from us moving the web servers from AWS EC2 c4.large to c3.large and I think the answer is no.

UPDATE (Nov 30, 2017)

Here's a horrible hack that causes the extraction to always go to /dev/null:


class DevNullZipFile(zipfile.ZipFile):
    def _extract_member(self, member, targetpath, pwd):
        # member.is_dir() only works in Python 3.6
        if member.filename[-1] == '/':
            return targetpath
        dest = '/dev/null'
        with self.open(member, pwd=pwd) as source, open(dest, "wb") as target:
            shutil.copyfileobj(source, target)
        return targetpath


def dump_and_extract(root_dir, file_buffer, klass):
    zf = klass(file_buffer)
    zf.extractall(root_dir)

And here's the outcome of running that:

c4.4xlarge$ python3 fastest-dumper.py --dev-null /tmp/massive-symbol-zips
170.1MB/s            297.0MB              1.746s
168.6MB/s            306.1MB              1.815s
147.1MB/s            553.6MB              3.765s
132.1MB/s            407.1MB              3.083s
145.6MB/s            529.8MB              3.639s
175.4MB/s            248.2MB              1.415s
163.3MB/s            321.0MB              1.965s
162.1MB/s            292.3MB              1.803s
168.5MB/s            288.0MB              1.709s


Average speed: 159.2MB/s
Median speed:  163.3MB/s

Average files created:       0
Average directories created: 0

I ran it a few times to make sure the numbers are stable. They are. This is on the c4.4xlarge.

So, the improvement of writing to /dev/null instead of the ESB /tmp is 15%. Kinda goes to show how much of the total time is spent reading the ZipInfo file object.

For the record, the same comparison on the c3.4xlarge was 30% improvement when using /dev/null.

Also for the record, if I replace that line shutil.copyfileobj(source, target) above with pass, the average speed goes from 159.2MB/s to 112.8GB/s but that's not a real value of any kind.

UPDATE (Nov 30, 2017)

Here's the same benchmark using c5.4xlarge instead. So, still EBS but...
"3.0 GHz Intel Xeon Platinum processors with new Intel Advanced Vector Extension 512 (AVX-512) instruction set"

Let's run it on this supposedly faster CPU:

c5.4xlarge$ python3 fastest-dumper.py /tmp/massive-symbol-zips
165.6MB/s            314.6MB              1.900s
163.3MB/s            287.7MB              1.762s
155.2MB/s            278.6MB              1.795s
140.9MB/s            513.2MB              3.643s
137.4MB/s            556.9MB              4.052s
134.6MB/s            531.0MB              3.946s
165.7MB/s            314.2MB              1.897s
158.1MB/s            301.5MB              1.907s
151.6MB/s            253.8MB              1.674s
146.9MB/s            502.7MB              3.422s
163.7MB/s            288.0MB              1.759s


Average speed: 153.0MB/s
Median speed:  155.2MB/s

Average files created:       150
Average directories created: 119

So that is, on average, 10% faster than c4.4xlarge.

Is it 10% more expensive? For a 1-year reserved instance, it's $0.796 versus $0.68 respectively. I.e. 15% more expensive. In other words, in this context it's 15% more $$$ for 10% more processing power.

UPDATE (Jan 24, 2018)

I can almost not believe it!

Thanks you Oliver who discovered (see comment below) a blaring mistake in my last conclusion. The for reserved instances (which is what we use on my Mozilla production servers) the c5.4xlarge is actually cheaper than c4.4xlarge. What?!

In my previous update I compared c4.4xlarge and c5.4xlarge and concluded that c5.4xlarge is 10% faster but 15% more expensive. That actually made sense. Fancier servers, more $$$. But it's not like that in the real world. See for yourself:

c4.4xlarge
c4.4xlarge

c5.4xlarge
c5.4xlarge

How to use django-cache-memoize

November 3, 2017
0 comments Python, Django

Last week I released django-memoize-function which is a library for Django developers to more conveniently use caching in function calls. This is a quick blog post to demonstrate that with an example.

The verbose traditional way to do it

Suppose you have a view function that takes in a request and returns a HttpResponse. Within, it does some expensive calculation that you know could be cached. Something like this:

No caching


def blog_post(request, slug):
    post = BlogPost.objects.get(slug=slug)

    related_posts = BlogPost.objects.exclude(
        id=post.id
    ).filter(
        # BlogPost.keywords is an ArrayField
        keywords__overlap=post.keywords
    ).order_by('-publish_date')

    context = {
        'post': post,
        'related_posts': related_posts,
    }
    return render(request, 'blogpost.html', context)

So far so good. Perhaps you know that lookup of related posts is slowish and can be cached for at least one hour. So you add this:

Caching


from django.core.cache import cache

def blog_post(request, slug):
    post = BlogPost.objects.get(slug=slug)

    cache_key = b'related_posts:{}'.format(post.id)
    related_posts = cache.get(cache_key)
    if related_posts is None:  # was not cached
        related_posts = BlogPost.objects.exclude(
            id=post.id
        ).filter(
            # BlogPost.keywords is an ArrayField
            keywords__overlap=post.keywords
        ).order_by('-publish_date')
        cache.set(cache_key, related_posts, 60 * 60)

    context = {
        'post': post,
        'related_posts': related_posts,
    }
    return render(request, 'blogpost.html', context)

Great progress. But now you want that cache to immediate reset as soon as the blog posts change.


@login_required
def update_blog_post(request, slug):
    post = BlogPost.objects.get(slug=slug)
    if request.method == 'POST':
        # BlogPostForm is a forms.ModelForm class for BlogPost
        form = BlogPostForm(request.POST, instance=post)
        if form.is_valid():
            form.save()
            cache_key = b'related_posts:{}'.format(post.id)
            cache.delete(cache_key)
            return redirect(reverse('blog_post', args=(post.id,))
    else:
        form = BlogPostForm(instance=post)

    context = {
        'post': post,
        'form': form,
    }
    return render(request, 'edit_blogpost.html', context)

Awesome. Now the cache is cleared as soon as the BlogPost is updated.

Problem; you have repeated the code generating the cache key in two places.

Use django-cache-memoize

First extract out the getting of related posts into its own function and then decorate it.


from cache_memoize import cache_memoize

@cache_memoize(60 * 60)
def get_related_posts(id):
    return BlogPost.objects.exclude(
        id=post.id
    ).filter(
        # BlogPost.keywords is an ArrayField
        keywords__overlap=post.keywords
    ).order_by('-publish_date')


def blog_post(request, slug):
    post = BlogPost.objects.get(slug=slug)

    related_posts = get_related_posts(post.id)

    context = {
        'post': post,
        'related_posts': related_posts,
    }
    return render(request, 'blogpost.html', context) 

Now, to do the cache invalidation you need to call that function get_related_posts one more time:


def update_blog_post(request, slug):
    post = BlogPost.objects.get(slug=slug)
    if request.method == 'POST':
        # BlogPostForm is a forms.ModelForm class for BlogPost
        form = BlogPostForm(request.POST, instance=post)
        if form.is_valid():
            form.save()

            # NOTE!
            get_related_posts.invalidate(post.id)

            return redirect(reverse('blog_post', args=(post.id,))
    else:
        form = BlogPostForm(instance=post)

    context = {
        'post': post,
        'form': form,
    }
    return render(request, 'edit_blogpost.html', context)

Now you're not repeating the code that constructs the cache key.

Getting fancy; hot cache

The above pattern, with or without django-cache-memoize, clears the cache when the blog post changes and then you basically wait till the next time the blog post is rendered, then the cache will be populated again.

A more "aggressive" pattern is to "heat the cache up" right after we've cleared it. A simple change is to call get_related_posts() again and let it cache. But to make sure it gets a fresh set of results we pass in the extra _refresh=True argument.


def update_blog_post(request, slug):
    post = BlogPost.objects.get(slug=slug)
    if request.method == 'POST':
        # BlogPostForm is a forms.ModelForm class for BlogPost
        form = BlogPostForm(request.POST, instance=post)
        if form.is_valid():
            form.save()

            # NOTE!
            # Refresh the cache here and now
            get_related_posts(post.id, _refresh=True)

            return redirect(reverse('blog_post', args=(post.id,))
    else:
        form = BlogPostForm(instance=post)

    context = {
        'post': post,
        'form': form,
    }
    return render(request, 'edit_blogpost.html', context)

What was the point of that?

The above example doesn't do a great job demonstrating how convenient it can be to use django-cache-memoize compared to "doing it manually". If your code base is peppered with lots of little blocks where you construct a cache key, check the cache, fall back on re-generation and write to cache again; then it can really add up to take away all of that mess and just use a decorator on anything that can be memoized.

Probably the biggest benefit with moving the cacheable functionality into its own function and decorating it is that all that hassle code with creating safe and unique cache keys is all in one place. You won't be violating the Don't Repeat Yourself principle. This becomes especially important once the cache keys that need to be constructed are getting complex and needs care.

Ultimately if you're able, your code will be free of various cache.set and cache.get code and yet a bunch of cacheable stuff gets cached nicely.

Why not use a regular @memoize or @functools.lru_cache?

The major difference between something like https://pypi.python.org/pypi/memoize/ and django-cache-memoize is that django-cache-memoize uses django.core.cache.cache which is a global state store (most likely backed by Redis or Memcached). If you use one of the other memoization solutions they'll be in-memory. Meaning, if your production code runs Gunicorn or uWSGI with, say, 8 workers then you'll have 8 copies of the same cache store. So if you're trying to protect an expensive function with @functools.lru_cache it will, worst case, be a cache miss 8 times on 8 different requests.

django-cache-memoize

October 27, 2017
3 comments Python, Django

Released a new package today: django-cache-memoize

It's actually quite simple; a Python memoize function that uses Django's cache plus the added trick that you can invalidate the cache my doing the same function call with the same parameters if you just add .invalidate to your function.

The history of it is from my recent Mozilla work on Symbols.

I originally copy and pasted the snippet out that in a blog post and today I extracted it out into its own project with tests, docs, CI and a setup.py.

I'm still amazed how long it takes to make a package with all the "fluff" around it. A lot of the bits in here (like setup.py and pytest.ini etc) are copied from other nicely maintained Python packages. For example, I straight up copied the tox.ini from Jannis Leidel's python-dockerflow. The ratio of actual code writing (including tests!) is far overpowered by the package sit-ups. But I "complain with a pinch of salt" because a lot of time spent was writing documentation and that's equally as important as the code probably.