Best Atom packages of 2015
January 22, 2016
7 comments Web development, macOS
tl;dr last-cursor-position, advanced-open-file and highlight-line
Sorry, for the sensationalist headline on this blog post. Almost all of Atom, including the core functionality, is based on packages. For example, the autocomplete thing that pops up whilst you're typing is a package with its own git repo and README. However, it's not a community package. Let's focus on those instead.
Number 1
If you're in the midst of typing and for some reason you need to scroll somewhere else in the code to type something or to select to copy to the clipboard, how do you get back? You can either memorize which line you were on. Or you can split the windows so that when you're done, elsewhere, you just kill the newly created split-window. Or; you install last-cursor-position.
At any time you can press alt-- (that's alt and the minus character) and it'll go back to where the cursor was last.
It works across open tabs too. So if you switch tabs to edit index.html and want to go back to that app.py you were working on you can alt-- yourself back there. And suppose that you want to go back to index.html again, you hit shift-alt--.
Number 2
This was written by a friend of mine called Michael "Osmose" Kelly and this was his first package he wrote. It's apparently very popular and Michael's most popular Open Source project to date.
What it does is introduce a command-line looking prompt for opening files. By default, you start it with Ctrl-x Ctrl-f which is the Emacs command for opening files/buffers.
Don't get me wrong, I love using Cmd-t to fuzzy-find files and that's awesome too, but sometimes when you have eleventeen files called models.py and you want the one in the "current directory" it's much easier to just go directly to that file. I type Cmd-x Cmd-f m [TAB] [ENTER] and I'm there. Had I typed m on the fuzzy-finder it would certainly have yielded too many files.
Another really really useful thing about this package is that I can easily go to any other file outside the current directory. Suppose my Atom window is rooted in ~/dev/PYTHON/premailer/ and I want to open /tmp/hack.js I easily can, thanks to this package without reaching for the mouse.
Number 3
The name well describes what it does. But why do I need it? The answer is simple; it's when I jump around. When I'm in the midst of typing a function or snippet or something I don't need to know which line I'm on because things are settled. No, it's when I go somewhere else, for example using the last-cursor-position package, then it's hard to see where the cursor is. Especially relevant when you have a big screen with high resolution.
Why isn't this a core package?!
In Summary
I bet I've forgotten some package that I love and use every day that isn't a core package. If so, it's probably something subtle or something that I almost take for granted. For example, who doesn't use react or atom-beautify?! Also, those packages are already so popular they don't need a blog post to raise their attention and fame :)
What was your favorites that you like so much that they just need to be highlighted? Leave a comment or discuss here.
Screenshot-sharing performance comparison
November 13, 2015
13 comments Web development, macOS
One tool that I use many times per day, at work, is to take a screenshot on my mac and then that gets uploaded to the clouds and a permalink to that picture gets put in my clipboard so I can quickly and easily share it.
First I was using CloudApp, which was awesome. I can't remember how much I paid but they started being very unreliable. Sometimes the upload just failed. Sometimes viewing the image failed. It was mostly working but unreliable enough that I just couldn't cope.
So I switched to Dropbox and they have been very reliable. I can't remember how much I pay them but the primary use for paying them is that they back up a folder on the hard drive and make it easy to share other files in a nice way.
But when I take a screenshot, and share that link, that page, that shows the screenshot, is horribly slow. It's just supposed to show an image! It's not supposed to load so slowly that it makes my browser tremble. Shame on you Dropbox!
So lastly, people have been saying great things about Jumpshare. It's free!! Their "plus upgrade", for $9.99/month gives you more options, more storage (1TB), possible password protection, custom branding, custom domain and analytics. That's nice but I'm not desperate so I might upgrade later.
Samples
But let's look at the difference in how these three perform in showing an image:
By the way, I'm sorry about the motif in the pictures but I encourage you to open each of these and notice that they all look different. I don't know if that's because those sites (CloudApp and Jumpshare) apply some CSS filters a la Instagram but they look different. Here's the original. That might be topic enough for a whole new blog post. But that's for another time.
Webpagetest.org
First, let's load these on Webpagetest.org:
Last but not least; a visual comparison of all three on Firefox, DSL from San Jose, CA, USA. Here's the video comparison.
Devtools
Here using the pure browser Firefox Devtools to measure the network requests needed:
-
Dropbox
-
CloudApp

-
Jumpshare


Things to note about these:
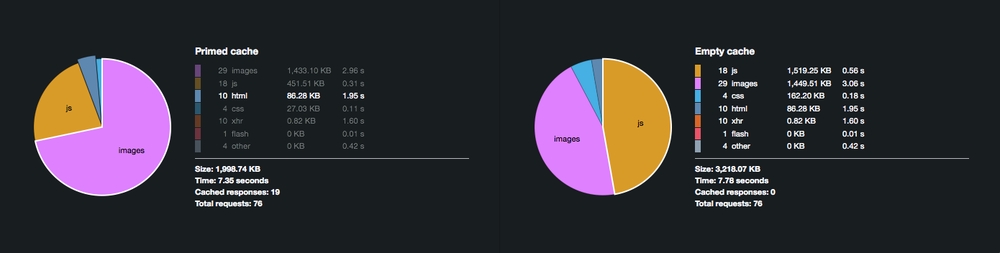
- Jumpshare has 636.18KB of CSS. That's way excessive. I wonder if you can even reach 636KB if you concatenate Bootstrap, SemanticUI, Foundation, PureCSS and Bootflat into one file? Perhaps that's a blog post on its own.
- Dropbox has 4,974.83KB of JavaScript spread over 85 files!!
- Of the 85 JavaScript files Dropbox force you to eat, roughly 20 of them are trackers that would get disabled if you enable tracking protection in your browser.
- CloudApp doess their CSS better, but it's still bigger than it needs to be.
- Dropbox is the only one that doesn't force you to load Flash.
In numbers
| Metric | Dropbox | CloudApp | Jumpshare |
|---|---|---|---|
| Length of URL | 85 | 17 | 44 |
| HTTPS | Yes | No | Yes |
| Fully loaded (time) | 21.216s | 12.420s | 13.839s |
| Fully loaded (bytes) | 2,747 KB | 1,772 KB | 1,910 KB |
| Fully loaded (requests) | 198 | 90 | 44 |
| Speed Index | 13065 | 8707 | 8685 |
| Upgrade price (per month) | $9.99 | $8.25 | $9.99 |
The winner?
As you can see, CloudApp loads marginally faster than Jumpshare (and Dropbox trails long long after). Also, CloudApp wins more rows in the "In numbers" section above. But lack of HTTPS I kinda sad.
But remember, the reason I ditched CloudApp was because it was unreliable to the point of serious frustration. They might win todays performance comparsion but I dare not go back. This new contender, Jumpshare, looks and feels great. The OSX app worked wonderfully and was really easy peasy to set up. Now I have a cute little kanguru in the OSX toolbar.
So, I think I'll stick with Jumpshare.com for now. I can't tell how much storage they give you for free but...
My money
So you get more features and more storage if you pay $X per month? What I really would pay for is a much faster web page. I know it would be possible. The image you view is 1,074.4KB and all you actually only need is a little bit of HTML around it and maybe some really basic CSS. It should be possible entirely without any JavaScripts. That, I would happily pay for.
UPDATE
On closer inspection, it seems Jumpshare's CSS is NOT 636.18KB. The requests analyzer in the Firefox Devtools most likely have a bug.
And bash basics
October 16, 2015
2 comments Linux, macOS
It's one of those things; not hard to understand and certainly not an advanced trick but I sometimes see people miss out on this.
In bash there are sort of two ways of saying "Do this and then do that". You can either say "Do this and no matter what happens then do that" or you can say "Do this and if that worked also do that".
Examples
Suppose you have two command executables you want to run. They can succeed or fail.
$ echo "Do this and no matter what happens then do that"
$ ./command1 ; ./command2
If you run that, ./command2 will run even if ./command1 failed.
The other one is...
$ echo "Do this and if that worked also do that"
$ ./command1 && ./command2
You might recognize the && thing from JavaScript or Java or C or one of those. If you recognize it you might quickly also conclude that you can do this too:
$ echo "Do this and only if it failed do that"
$ ./command1 || ./command2
In this latter case only one of those (or none!) will succeed.
So when does this come in handy?
Here are some examples that I often use:
Meaning, I know my code is good to push, iff the tests pass
$ nosetests && git commit -a -m "some feature" && git push peterbe mybranch
Or if you might want to be alerted if something failed after the first command slowly takes its time to finish:
$ nosetests && say "Tests finished" || say "Work harder"
(say is an OSX specific command and not a built-in in bash)
The ; is useful when you don't care if the first command finished and this is more rare. For example:
$ rm static/ ; ./manage.py collectstatic --noinput
Why bother?
Perhaps it goes without saying, the reason for doing all of these is generally when the first command takes a long time and you don't want to sit and wait till it's finished to run the second time. By "piping them together" like this, the second command will safely start as soon as possible whilst you go away and pay attention to something else.
How to log ALL PostgreSQL SQL happening
July 20, 2015
1 comment macOS, PostgreSQL
When you're using PostgreSQL for local development it's sometimes important to get an insight into ALL SQL that happens on the PostgreSQL server. Especially if you're trying to debug all the transaction action too.
To do this on OSX where you have PostgreSQL installed with Homebrew you have to do the following:
1. Locate the right postgresql.conf file. On my computer this is in /opt/boxen/homebrew/var/postgres/ but that might vary depending on how you set up Homebrew. Another easier way is to just start psql and ask there:
$ psql
psql (9.4.0)
Type "help" for help.

peterbe=# show config_file;
                   config_file
--------------------------------------------------
 /opt/boxen/homebrew/var/postgres/postgresql.conf
(1 row)

peterbe=#
Open that file in your favorite editor.
2. Look for a line that looks like this:
#log_statement = 'all' # none, ddl, mod, all
Uncomment that line.
3. Now if you can't remember how to restart PostgreSQL on your system you can ask brew:
$ brew info postgresql
Towards the end you'll see some files that look something like this:
$ launchctl unload ~/Library/LaunchAgents/homebrew.mxcl.postgresql.plist
$ launchctl load ~/Library/LaunchAgents/homebrew.mxcl.postgresql.plist
4. To locate where PostgreSQL dumps all logging, you have to look to how Homebrew set it up. You can do that by opening ~/Library/LaunchAgents/homebrew.mxcl.postgresql.plist. You'll find something like this:
<key>StandardErrorPath</key>
  <string>/opt/boxen/homebrew/var/postgres/server.log</string>
That's it. You can now see all SQL going on by running:
$ tail -f /opt/boxen/homebrew/var/postgres/server.log
Remember to reverse this config change when you're done debugging because that server.log file can quickly grow to an insane size since it's probably not log rotated.
Happy SQL debuggin'!
UPDATE Dec 2018
Another way to use Homebrew to restart PostgreSQL is with the command:
$ brew services restart postgresql
Highlighted code syntax in Keynote
August 30, 2014
0 comments macOS
Do you want to display some code in a Keynote presentation?
It's easy. All you need is Homebrew installed.
First you need to install the program highlight.
$ brew install highlight
So you have a piece of code. For example some Python code. The take that snippet of code and save it to a file like code.py. Now all you need to do is run this:
$ highlight -O rtf code.py | pbcopy
Then, switch back into Keynote and simply paste.
But if you don't want to create a file of the snippet, simply copy the snippet from within your editor and run this:
$ pbpaste | highlight -S py -O rtf | pbcopy
The -S py means "syntax is py (for python)".
You can use highlight for a bunch of other things like creating HTML. See man highlight for more tips.
Local jed settings
April 19, 2013
4 comments Linux, macOS
(if you're wondering what you're doing here, jed is a hardcore text based editor for programmers)
Thanks to fellow Jed user and hacker Ullrich Horlacher I can now have local settings per directory.
I personally prefer 2 spaces in my Javascript. And thankfully most projects I work on agrees with that standard. However, I have one Mozilla project I work on which uses 4 spaces for indentation. So, what I've had to get used to to is to edit my ~/.jedrc every time I switch to work on that particular project. I change: variable C_INDENT = 2; to variable C_INDENT = 4; and then back again when switching to another project.
No more of that. Now I just add a file into the project root like this:
$ cd dev/airmozilla
$ cat .jed.sl
variable C_INDENT = 4;
And whenever I work on any file in that tree it applies the local override setting.
Here's how you can do that too:
First, put this code into your <your jed lib>/defaults.sl: (on my OSX, the jed lib is /usr/local/Cellar/jed/0.99-19/jed/lib/)
% load .jed.sl from current or parent directories
% but only if the user is the same
define load_local_config() {
  variable dir = getcwd();
  variable uid = getuid;
  variable jsl,st;
  while (dir != "/" and strlen(dir) > 1) {
    st = stat_file(dir);
    if (st == NULL) return;
    if (st.st_uid != uid) return;
    jsl = dir + "/.jed.sl";
    st = stat_file(jsl);
    if (st != NULL) {
      if (st.st_uid == uid) {
        pop(evalfile(jsl));
        return;
      }
    }
    dir = path_dirname(dir);
  }
}
Then add this to the bottom of your ~/.jedrc:
define startup_hook() {
  load_local_config(); % .jed.sl
}
Now, go into a directory where you want to make local settings, create a file called .jed.sl and fill it to your hearts content!