Filtered by JavaScript

Page 10

Reset

To defer or to async JavaScript tags. That's the question.

June 29, 2018
0 comments Web development, JavaScript, Web Performance

tl;dr; async scores slightly better that defer (on script tags) in this experiment using Webpagetest.

Much has been written about the difference between <script defer src="..."> and <script async src="..."> but nothing beats seeing it visually in Webpagetest.

Here are some good articles/resources:

So I took a page off my own blog. Butchered it and cleaned up the 6 <script> tags. It uses HTTP/2 and some jQuery and some other vanilla JavaScript stuff. See the page here: neither.html
Then I copied that HTML file and replaced all <script src="..."> with <script defer src="...">: defer.html. And lastly, the same with: async.html.

First let's compare all three against each other:

Neither vs defer vs async
Neither vs defer vs async on Webpagetest.

Clearly, making the JavaScript non-blocking is critical for web performance. That's 1.7 seconds instead of 2.8 seconds.

Second, let's compare just defer vs. async on a 4G connection:

defer vs. async on 4G
defer vs. async on 4G Also, if you like here's defer vs. async on a desktop browser instead.

Conclusions

  1. Don't allow your JavaScript to block rendering unless it's OK to have your users staring at a white screen till everything has landed.

  2. There's not much difference between defer and async. async has a slight advantage as per these experiments. I'm only capable of guessing, but I suspect it's because it can "spread out" the work better and get some work done in parallel whilst defer has things that tell it to wait. In particular, since with defer the order of the <script> tags is respected. Suppose that the file some.jquery.plugin.js downloads before jquery.min.js, then that file has to be blocked and execution delayed whilst waiting for jquery.min.js to download, parse and execute. With async it's more of a wild west of executing whenever you can.

  3. The async.html is busted because of the unpredictable order of execution and these .js files depend on the order. Another reason to use defer if your scripts have that order-dependency problem.

  4. Consider using a mix of async and defer. async has the advantage that some parsing/execution can be done by the main thread whilst waiting for other blocking resources like images.

To CDN assets or just HTTP/2

May 17, 2018
3 comments Web development, JavaScript, Web Performance

tl;dr; I see little benefit in using a CDN at this point.

I took two random pages here on my blog. One and Another. Doesn't matter what they say but it's important to notice that they're extremely similar. No big pictures. Both have 1 banner ad each. Both served with HTTP/2. Neither have any blocking linked assets. I.e. there is no blocking <link ref="stylesheet" href="styles.css"> and the script tags are are either async or defer. Both pages reference one little .png that is not deliberately lazy loaded. That's the baseline.

The HTML document, in both URLs, is served with HTTP/2 but it references a the lazy loaded .css and (a bunch of) .js files, via a CDN. In other words, it looks like this:


▶ curl -v https://www.peterbe.com/plog/hashin-0.7.0
...
> GET /plog/hashin-0.7.0 HTTP/2
...
< HTTP/2 200
...
<
...
<link rel="preload" href="/static/css/base.min.e8df96d84663.css" 
 as="style" onload="this.onload=null;this.rel='stylesheet'">
...
<script defer src="/static/js/blogitem-post.min.f6c0be691e73.js"></script>
...

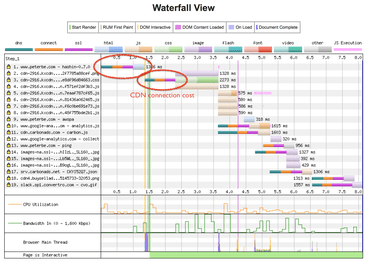
So, cdn-2916.kxcdn.com is a an awesome CDN, but to a first-time visitor, that is going to require a DNS lookup and the creation of a new TCP connection that can be kept alive. The alternative to this is to not put any of the of the .png, .css or .js assets on a CDN. Basically, instead of <script src="https://mycdn.example.com/foo.js">, just do <script src="/foo.js">.

CDNs are really important since latency is a killer to web performance and remember that "Use a CDN" is rule number 2 in the, now dated, YSlow ruleset. However, we're entering an era where HTTP/2 is becoming more and more available in mainstream browsers (hint: nearly 100% of visitors to my site are HTTP/2 support). Buuuuuut, the latency (DNS, connection and SSL negotiation) doesn't matter that much if you have already paid those costs to get to the origin web server (https://www.peterbe.com in this example).

The Experiment

What I'm interested in seeing if there is a way to gauge/measure when it's best to use a CDN and when it's best to use the origin web server to serve all assets. My friend @stereobooster suggested: "Webpagetest.org is all you need"

Ok. Let's measure that then with Webpagetest.org and see what we can learn.

Here's a visual comparison of the two URLs when they both use CDN for the static assets.

  • They load pretty equally.
  • The Waterfall View looks almost identical.
  • Confirmed, there are no render blocking resources as it starts to paint already at about 1.5s.

Here's a visual comparison of one using a CDN for static assets and one does not.

  • They load pretty equally (diff by 0.1s).
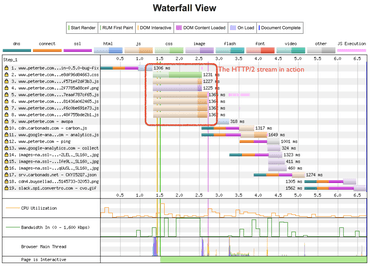
  • The Waterfall View looks very different.
  • The second one does not have a second "dns - connection - ssl - download" bar.
  • Almost all the .js are downloaded at about 1.8s when there's no CDN.
  • Almost all the .js are downloaded at about 3.0s when using a CDN.
  • Use the little "Waterfall opacity" widget to slide left and right to see the difference.

You can see their webpagetests individually here and here.

Assets over CDN
Two connection prices paid. Downloads individual assets faster but ultimately takes a longer time.

One HTTP/2 connection only
Only 1 connection price paid. ALL assets downloaded sooner, albeit individually slower.

Analysis

My web server is served from a highly optimized Nginx server in New York, USA. The two Webpagetest visual comparisons above are both done from Virgina, USA. But the killer feature of a CDN is that latency can be so much better thanks to edge locations of the CDN. In particular, KeyCDN have an edge location in Stockholm, Sweden. So what happens when you run the URLs from a Webpagetest machine in Stockholm, Sweden?

The both start to render at the same time (expected since the HTML document is still in New York, USA) but the (rougly) total time to download all the .css and .js is (about) 2.6 seconds when a CDN and 1.9 seconds without a CDN. In other words, despite the CDN geographically so much closer, the static assets are still available sooner without a CDN.

It's pretty clear at this point that it's not a good idea to use a CDN for static assets. Even if they're not critical. The "First Meaningful Paint" and "Time To Interactive" are about the same but when HTTP/2 can download all the .js files faster, their useful JavaScript can start being useful sooner with HTTP/2.

What Else

So in my site, it's easiest to host the whole site on an Nginx server in a Digital Ocean server. It's easy to invalidate its cache (just delete the file from disk and wait for Django to regenerate it). Another advantage with using plain Nginx is that I serve the HTML with Cache-Control headers and then do some post-processing of the .html file and since Nginx is disk-based, I don't have to update a CDN.

An alternative would be to put the whole site behind a CDN. That way, the initial HTML document can be served from a CDN edge location, using HTTP/2 and send the rest of the static assets on the same HTTP/2 connection. But this means that every single dynamic URL (e.g. HTTP POSTs or some per-user XHR requests) has to go via a CDN rather than going straight to the Nginx that is connected to the Django web server.

Last but not least, even though my Nginx server is on a decent machine and pretty well tuned, I very much doubt it's as fast and powerful as a KeyCDN or CloudFront or Akamai or Google Cloud CDN. Those servers are beasts! Mind you, the DNS + connection + SSL negotiation, when requesting from Stockholm, Sweden was about 0.75s to my Nginx in New York, USA. For the KeyCDN edge location the DNS + connection + SSL negotiation was about 0.52s. So not a huge difference actually.

Another important aspect is Service Workers. Perhaps I don't know how to hack it, but it doesn't work when you use differnet domains for the service worker .js file and the URIs it references.

In conclusion; I see little benefit in using a CDN at this point. Perhaps for larger assets like videos, GIFs or high-res images. HTTP/2 changes one of the major web performance rules. End of an era(?)

Webpack Bundle Analyzer for create-react-app

May 14, 2018
0 comments JavaScript, React

webpack-bundle-analyzer is an awesome little program for understanding why and which parts of your bundled .js files are so big. It's a lot more advanced (and pretty) than source-map-explorer.

Thanks to this tip by @trevorwhealy you can now use webpack-bundle-analyzer on a create-react-app bundle. Yay!

Check out the report I made for the client side code of Songsear.ch:

Webpack bundle analyzed for Songsear.ch

One thing I personally noticed from this is that the .png do take up quite a lot of kilobytes. And I'm quite that the whatwg-fetch polyfill uses 12KB before gzip.

Real minimal example of going from setState to MobX

May 4, 2018
0 comments JavaScript, React

This is not meant as a tutorial on MobX but hopefully it can be inspirational for people who have grokked how React's setState works but now feel they need to move the state management in their React app out of the components.

Store.js
To jump right in, here is a changeset that demonstrates how to replace setState with a MobX store:
https://github.com/peterbe/workon/commit/c1846ce782ce7c9da16f44b10c48f0be1337ae41

It's a really simple Todo list application based on create-react-app. Not much to read into at this point.

Here are some caveats to be aware if you look at the diff and wonder...

  • As part of this change, I moved the logic from the App component and created a new sub-component (that App renders) called TodoList. This was not necessary to add MobX.
  • There are a bunch of little unrelated edits in that such as deleting some commented out code.
  • store.items.sort((a, b) => b.id - a.id); doesn't actually work. You're supposed to do store.items.replace(store.items.sort((a, b) => b.id - a.id));.
  • Later I made the Item component also be an observer and not just the TodoList component.
  • The exported store is called store and, in this version, is an instance of the TodoStore class. The intention is to make store be an instance of combined different store classes, with TodoStore being just one of them.

Caveat last but not least... This diff does not much other than adding more library dependencies and fancy "observable arrays" that are hard to introspect with console.log debugging.
However, the intention is to...

  1. Add react-router to the mix so opening the Todo list is just one of many possible views.
  2. Now the Store.js file can be all about data. Data retrieval, storage, manipulation, mutation etc. The other components will be more simple since their only job is to render that's in the store and send events back to the store based on user actions.
  3. Note that the store is also put into window. That means I can open the web console and type store.items[2].text = "Test change" and simply by hitting enter the app re-renders to this change.

gtop is best

May 2, 2018
0 comments Linux, macOS, JavaScript

To me, using top inside a Linux server via SSH is all muscle-memory and it's definitely good enough. On my Macbook when working on some long-running code that is resource intensive the best tool I know of is: gtop

gtop in action
gtop in action

I like it because it has the graphs I want and need. It splits up the work of each CPU which is awesome. That's useful for understanding how well a program is able to leverage more than one CPU process.

And it's really nice to have the list of Processes there to be able to quickly compare which programs are running and how that might affect the use of the CPUs.

Instead of listing alternatives I've tried before, hopefully this Reddit discussion has good links to other alternatives

The impressive first-meaningful-paint improvement of using minimalcss

April 24, 2018
3 comments Web development, JavaScript

tl;dr; The critical CSS solution, using minimalcss, yields a 40% improvement in First Meaningful Paint and 90% improvement in the Time to Start Render.

About a month ago I enabled minimalcss here on my personal blog to properly test it in production. In that blog post I only looked at the difference in file size. This time, I'm testing the impact of it using Webpagetest.org. I picked two blog posts (that don't have images), but both have some syntax highlighting of code CSS. One and Two. Doesn't matter what's in those two pages but they're relatively similar in shape and size.

In three Webpagetest.org experiments I compare, on 4G Chome...

  1. both optimized
  2. first one optimized only
  3. second one optimized only
  4. both not optimized

Note! In the following screenshots from Webpagetest the "Thumbnail interval" is set to 0.5 seconds.

Note2! These pages used HTTP/2 and the CSS stylesheets are loaded from a CDN.

BOTH pages optimized

Both pages optimized

Timings both optimized

They are about 0.3 seconds apart in their first meaningful paint.

This is the baseline comparison. It's not perfectly the same first-meaningful-paint but close enough. The point is what difference it makes later.

Only FIRST page optimized

First page optimized

Timings first page optimized

The optimized page is 0.7 seconds faster.

Only SECOND page optimized

Second page optimized

Timings second page optimized

The optimized page is 1.4 seconds faster.

Bonus! Both pages NOT optimized

Just to check that it all holds up. Here, both pages are compared with out the critical CSS optimization.

Both pages NOT optimized

Timings both NOT optimized

If we roughly average out the first paint on the sample where both were optimized (2.1 seconds), this time it's 2.8 seconds. So the optimization of the critical CSS with minimalcss roughly makes the first paint makes it 40% faster.

Discussion

In Webpagetest.org the "First Meaningful Paint" is just one of many ways of measuring "success". I put that last word in quotation marks because this stuff is not trivial. Just because you manage to show anything to the user doesn't necessarily mean the user is happy if the user can't do what they want to do. And if you front-load a bunch of things with every trick in the book, you might have a lot of load in the background that might affect the scrolling with yank or flashing content.

I never really know which one to live by as a measure of success but the visual comparison timeline from Webpagetest definitely is fruitful and easy to understand. There is also "First Contentful Paint" which shows a slightly bigger difference between the optimized and the not-optimized pages.

For now, I'm going to call this a success. Adding minimalcss was a mixed bag of challenges. The execution of the script, on a server, requires the right amount of tooling and safeguards. After all, it depends on real web browser running inside a web server spawned from a background asynchronous message queue task with retries, logging, and metrics.

For one thing, if you just look at the visual comparisons and focus only on the rendered title the difference is not 40% faster. It's about 100% faster. That difference is explained by the word "meaningful" in First Meaningful Paint. The rest of the content is at the mercy of the banner ad and the remote loaded web fonts. For example, if you instead compare the "Time to Start Render" average timings of the optimized pages was 1.6 seconds vs 3.1 seconds for the not optimized pages. In other words, the improvement of First Meaningul Paint was 40% and the improvement of Time to Start Render was 93%.

Lastly, remember that what minimalcss (and other critical path CSS optimization tools) does is that it copies CSS from the .css files and includes it in the HTML document. That copying means the HTML document weighs 27KB more and still it wins.

filterToQueryString - JavaScript function to turn current filter into a query string

March 15, 2018
1 comment Web development, JavaScript, React

tl;dr; this function:


export const filterToQueryString = (filterObj, overrides) => {
  const copy = Object.assign(overrides || {}, filterObj)
  const searchParams = new URLSearchParams()
  Object.entries(copy).forEach(([key, value]) => {
    if (Array.isArray(value) && value.length) {
      value.forEach(v => searchParams.append(key, v))
    } else if (value) {
      searchParams.set(key, value)
    }
  })
  searchParams.sort()
  return searchParams.toString()
}

I have a React project that used to use query-string to serialize and deserialize objects between React state and URL query strings. Yesterday version 6.0.0 came out and now I'm getting this error during yarn run build:

yarn run v1.5.1
$ react-scripts build
Creating an optimized production build...
Failed to compile.

Failed to minify the code from this file: 

    ./node_modules/query-string/index.js:8 

Read more here: http://bit.ly/2tRViJ9

error An unexpected error occurred: "Command failed.
Exit code: 1

Perhaps this is the wake up call to switch to URLSearchParams (documentation here). Yes it is. Let's do it.

My use case is that I store a dictionary of filters in React this.state. The filter object is updated by submitting a form that looks like this:

Fitler form

Since the form inputs might be empty strings my filter dictionary in this.state might look like this:


{
  user: '@mozilla.com', 
  created_at: 'yesterday', 
  size: '>= 1m, <300G', 
  uploaded_at: ''
}

What I want that to become is: created_at=yesterday&size=>%3D+1m%2C+<300G&user=%40mozilla.com
So it's important to be able to skip falsy values (empty strings or possibly empty arrays).

Sometimes there are other key-values that needs to be added that isn't part of what the user chose. So it needs to be easy to squeeze in additional key-values. Here's the function:


export const filterToQueryString = (filterObj, overrides) => {
  const copy = Object.assign(overrides || {}, filterObj)
  const searchParams = new URLSearchParams()
  Object.entries(copy).forEach(([key, value]) => {
    if (Array.isArray(value) && value.length) {
      value.forEach(v => searchParams.append(key, v))
    } else if (value) {
      searchParams.set(key, value)
    }
  })
  searchParams.sort()
  return searchParams.toString()
}

I use it like this:


_fetchUploadsNewCountLoop = () => {
  const qs = filterToQueryString(this.state.filter, {
    created_at: '>' + this.state.latestUpload
  })
  const url = '/api/uploads?' + qs
  ...
  fetch(...)
}

UPDATE - May 2018

In the original blog post (now edited and corrected) I copied the wrong code and didn't discover the subtle mistake until now.
What was wrong as the order of the arguments to Object.assign().

Wrong


const copy = Object.assign(filterObj, overrides || {})

Correct


const copy = Object.assign(overrides || {}, filterObj)

The old version was dangerous because it mutated the filterObj passed in. So if you did something like


const qs = filterToQueryString(this.state.filter, {
  created_at: '>' + this.state.latestUpload
})

it would potentially mutate this.state.filter which isn't desirable.

Now using minimalcss

March 12, 2018
0 comments Python, Web development, JavaScript, Node

tl;dr; minimalcss is much better than mincss to slew out the minimal CSS your page needs to render. More accurate and more powerful features. This site now uses minimalcss in inline the minimum CSS needed to render the page.

I started minimalcss back in August 2017 and its goal was ultimately to replace mincss.

The major difference between minimalcss and mincss isn't that one is Node and one is Python, but that minimalcss is based on a full headless browser to handle all the CSS downloading and the proper rendering of the DOM. The other major difference is that mincss was based in regular expressions to analyze the CSS and minimalcss is based on proper abstract syntax tree ("AST") implemented by csso.

Because minimalcss is AST based, it can do a lot more. Smarter. For example, it's able to analyze the CSS to correctly and confidently figure out if any/which keyframe animations and font-face at-rules are actually needed.
Also, because minimalcss is based on csso, when it minifies the CSS it's able to restructure the CSS in a safe and smart way. I.e. p { color: blue; } h2 { color: blue; } becomes p,h2{color:blue}.

So, now I use minimalcss here on this blog. The pages are rendered in Django and a piece of middleware sniffs all outgoing HTML responses and depending on the right conditions it dumps the HTML as a file on disk as path/in/url/index.html. Then, that newly created file is sent to a background worker in Celery which starts post-processing it. Every index.html file is accompanied with the full absolute URL that it belongs to and that's the URL that gets sent to minimalcss which returns the absolute minimal CSS the page needs to load and lastly, a piece of Python script basically does something like this:

From...


<!-- before -->
<link rel="stylesheet" href="/file.css"/>

To...


<!-- after -->
<noscript><link rel="stylesheet" href="/file.css"/></noscript>
<style> ... /* minimal CSS selectors for rendering from /file.css */ ... </style>

There is also a new JavaScript dependency which is the cssrelpreload.js from the loadCSS project. So all the full (original) CSS is still downloaded and inserted into the CSSOM but it happens much later which ultimately means the page can be rendered and useful much sooner than if we'd have to wait to download and parse all of the .css URLs.

I can go into more details if there's interest and others want to do this too. Because this site is all Python and minimalcss is all Node, the integration is done over HTTP on localhost with minimalcss-server.

The results

Unfortunately, this change was mixed in with other smaller optimizations that makes the comparison unfair. (Hey! my personal blog is just a side-project after all). But I downloaded a file before and after the upgrade and compared:

ls -lh *.html
-rw-r--r--  1 peterbe  wheel    19K Mar  7 13:22 after.html
-rw-r--r--  1 peterbe  wheel    96K Mar  7 13:21 before.html

If I extract out the inline style block from both pages and compare it looks like this:
https://gist.github.com/peterbe/fc2fdddd5721fb35a99dc1a50c2b5311

So, downloading the initial HTML document is now 19KB instead of previous 96KB. And visually there's absolutely no difference.

Granted, in the after.html version, a piece of JavaScript kicks in and downloads /static/css/base.min.91f6fc577a60.css and /static/css/base-dynamic.min.e335b9bfa0b1.css from the CDN. So you have to download these too:

ls -lh *.css.gz
-rw-r--r--  1 peterbe  wheel   5.0K Mar  7 10:24 base-dynamic.min.e335b9bfa0b1.css.gz
-rw-r--r--  1 peterbe  wheel    95K Mar  7 10:24 base.min.91f6fc577a60.css.gz

The reason the difference appears to be huge is because I changed a couple of other things around the same time. Sorry. For example, certain DOM nodes were rendered as HTML but made hidden until some jQuery script made it not hidden anymore. For example, the "dimmer" effect over a comment textarea after you hit the submit button. Now, I've changed the jQuery code to build up the DOM when it needs it rather than relying on it being there (hidden). This means that certain base64 embedded font-faces are no longer needed in the minimal CSS payload.

Why this approach is better

So the old approach was to run mincss on the HTML and inject that as an inline style block and throw away the original (relevant) <link rel="stylesheet" href="..."> tags.
That had the annoying drawback that there was CSS in the stylesheets that I knew was going to be needed by some XHR or JavaScript later. For example, if you post a comment some jQuery code changes the DOM and that new DOM needs these CSS selectors later. So I had to do things like this:


.project a.perm { /* no mincss */
    font-size: 0.7em;
    padding-left: 8px;
}
.project a.perm:link { /* no mincss */
    color: rgb(151,151,151);
}
.project a.perm:hover { /* no mincss */
    color: rgb(51,51,51);
}

This was to inform mincss to leave those untouched even though no DOM node uses them right now. With minimalcss this is no longer needed.

What's next?

Keep working on minimalcss and make it even better.

Also, the scripting I used to modify the HTML file is a hack and should probably be put into the minimalcss project.

Last but not least, every time I put in some effort to web performance optimize my blog pages my Google ranking goes up and I usually see an increase in Google referrals in my Google Analytics because it's pretty obvious that Google loves fast sites. So I'm optimistically waiting for that effect.

How to throttle AND debounce an autocomplete input in React

March 1, 2018
18 comments Web development, JavaScript, React

Let's start with some best practices for a good autocomplete input:

'f' - most common search term on Google

  • You want to start suggesting something as soon user starts typing. Apparently the most common search term on Google is f because people type that and Google's autocomplete starts suggesting Facebook (www.facebook.com).

  • If your autocomplete depends on a list of suggestions that is huge, such that you can't have all possible options preloaded in memory in JavaScript, starting a XHR request for every single input is not feasible. You have to throttle the XHR network requests.

  • Since networks are unreliable and results come back asynchronously in a possible different order from when they started, you should only populate your autocomplete list based on the latest XHR request.

  • If people type a lot in and keep ignoring autocomplete suggestions, you can calm your suggestions.

  • Unless you're Google or Amazon.com it might not make sense to suggest new words to autocomplete if what's been typed previously is not going to yield any results anyway. I.e. User's typed "Xjhfgxx1m 8cxxvkaspty efx8cnxq45jn Pet", there's often little value in suggesting "Peter" for that later term you're typing.

  • Users don't necessarily type one character at a time. On mobile, you might have some sort of autocomplete functionality with the device's keyboard. Bear that in mind.

  • You should not have to make an XHR request for the same input as done before. I.e. user types "f" then types in "fa" then backspaces so it's back to "f" again. This should only be at most 2 lookups.

To demonstrate these best practises, I'm going to use React with a mocked-out network request and mocked out UI for actual drop-down of options that usually appears underneath the input widget.

The Most Basic Version

In this version we have an event listener on every onChange and send the value of the input to the autocomplete function (called _fetch in this example):


class App extends React.Component {
  state = { q: "" };

  changeQuery = event => {
    this.setState({ q: event.target.value }, () => {
      this.autocompleteSearch();
    });
  };

  autocompleteSearch = () => {
    this._fetch(this.state.q);
  };

  _fetch = q => {
    const _searches = this.state._searches || [];
    _searches.push(q);
    this.setState({ _searches });
  };

  render() {
    const _searches = this.state._searches || [];
    return (
      <div>
        <input
          placeholder="Type something here"
          type="text"
          value={this.state.q}
          onChange={this.changeQuery}
        />
        <hr />
        <ol>
          {_searches.map((s, i) => {
            return <li key={s + i}>{s}</li>;
          })}
        </ol>
      </div>
    );
  }
}

You can try it here: No Throttle or Debounce

Note, when use it that an autocomplete lookup is done for every single change to the input (characters typed in or whole words pasted in). Typing in "Alask" at a normal speed our make an autocomplete lookup for "a", "al", "ala", "alas", and "alask".

Also worth pointing out, if you're on a CPU limited device, even if the autocomplete lookups can be done without network requests (e.g. you have a local "database" in-memory) there's still expensive DOM updates for that needs to be done for every single character/word typed in.

Throttled

What a throttle does is that it triggers predictably after a certain time. Every time. Basically, it prevents excessive or repeated calling of another function but doesn't get reset.

So if you type "t h r o t t l e" at a speed of 1 key press per 500ms the whole thing will take 8x500ms=3s and if you have a throttle on that, with a delay of 1s, it will fire 4 times.

I highly recommend using throttle-debounce to actually do the debounce. Let's rewrite our demo to use debounce:


import { throttle } from "throttle-debounce";

class App extends React.Component {
  constructor(props) {
    super(props);
    this.state = { q: "" };
    this.autocompleteSearchThrottled = throttle(500, this.autocompleteSearch);
  }

  changeQuery = event => {
    this.setState({ q: event.target.value }, () => {
      this.autocompleteSearchThrottled(this.state.q);
    });
  };

  autocompleteSearch = q => {
    this._fetch(q);
  };

  _fetch = q => {
    const _searches = this.state._searches || [];
    _searches.push(q);
    this.setState({ _searches });
  };

  render() {
    const _searches = this.state._searches || [];
    return (
      <div>
        <h2>Throttle</h2>
        <p>½ second Throttle triggering the autocomplete on every input.</p>
        <input
          placeholder="Type something here"
          type="text"
          value={this.state.q}
          onChange={this.changeQuery}
        />
        <hr />
        {_searches.length ? (
          <button
            type="button"
            onClick={event => this.setState({ _searches: [] })}
          >
            Reset
          </button>
        ) : null}
        <ol>
          {_searches.map((s, i) => {
            return <li key={s + i}>{s}</li>;
          })}
        </ol>
      </div>
    );
  }
}

One thing to notice on the React side is that the autocompleteSearch method can no longer use this.state.q because the function gets executed by the throttle function so the this is different. That's why, in this version we pass the search term as an argument instead.

You can try it here: Throttle

If you type something reasonably fast you'll notice it fires a couple of times. It's quite possible that if you type a bunch of stuff, with your eyes on the keyboard, by the time you're done you'll see it made a bunch of (mocked) autocomplete lookups whilst you weren't paying attention. You should also notice that it fired on the very first character you typed.

A cool feature about this is that if you can afford the network lookups, the interface will feel snappy. Hopefully, if your server is fast to respond to the autocomplete lookups there are quickly some suggestions there. At least it's a great indicator that the autocomplete UX is a think the user can expect as she types more.

Debounce

An alternative approach is to use a debounce. From the documentation of throttle-debounce:

"Debouncing, unlike throttling, guarantees that a function is only executed a single time, either at the very beginning of a series of calls, or at the very end."

Basically, ever time you "pile something on" it discards all the other delayed executions. Changing to this version is easy. just change import { throttle } from "throttle-debounce"; to import { debounce } from "throttle-debounce"; and change this.autocompleteSearchThrottled = throttle(1000, this.autocompleteSearch); to this.autocompleteSearchDebounced = debounce(1000, this.autocompleteSearch);

Here is the debounce version:


import { debounce } from "throttle-debounce";

class App extends React.Component {
  constructor(props) {
    super(props);
    this.state = { q: "" };
    this.autocompleteSearchDebounced = debounce(500, this.autocompleteSearch);
  }

  changeQuery = event => {
    this.setState({ q: event.target.value }, () => {
      this.autocompleteSearchDebounced(this.state.q);
    });
  };

  autocompleteSearch = q => {
    this._fetch(q);
  };

  _fetch = q => {
    const _searches = this.state._searches || [];
    _searches.push(q);
    this.setState({ _searches });
  };

  render() {
    const _searches = this.state._searches || [];
    return (
      <div>
        <h2>Debounce</h2>
        <p>
          ½ second Debounce triggering the autocomplete on every input.
        </p>
        <input
          placeholder="Type something here"
          type="text"
          value={this.state.q}
          onChange={this.changeQuery}
        />
        <hr />
        {_searches.length ? (
          <button
            type="button"
            onClick={event => this.setState({ _searches: [] })}
          >
            Reset
          </button>
        ) : null}
        <ol>
          {_searches.map((s, i) => {
            return <li key={s + i}>{s}</li>;
          })}
        </ol>
      </div>
    );
  }
}

You can try it here: Throttle

If you try it you'll notice that if you type at a steady pace (under 1 second for each input), it won't really trigger any autocomplete lookups at all. It basically triggers when you take your hands off the keyboard. But the silver lining with this approach is that if you typed "This is my long search input" it didn't bother looking things up for "this i", "this is my l", "this is my long s", "this is my long sear", "this is my long search in" since they are probably not very useful.

Best of Both World; Throttle and Debounce

The throttle works great in the beginning when you want the autocomplete widget to seem eager but if the user starts typing in a lot, you'll want to be more patient. It's quite human. If a friend is trying to remember something you're probably at first really quick to try to help with suggestions, but once you friend starts to remember and can start reciting, you patiently wait a bit more till they have said what they're going to say.

In this version we're going to use throttle (the eager one) in the beginning when the input is short and debounce (the patient one) when user has ignored the first autocomplete inputs and starting typing something longer.

Here is the version that uses both:


import { throttle, debounce } from "throttle-debounce";

class App extends React.Component {
  constructor(props) {
    super(props);
    this.state = { q: ""};
    this.autocompleteSearchDebounced = debounce(500, this.autocompleteSearch);
    this.autocompleteSearchThrottled = throttle(500, this.autocompleteSearch);
  }

  changeQuery = event => {
    this.setState({ q: event.target.value }, () => {
      const q = this.state.q;
      if (q.length < 5) {
        this.autocompleteSearchThrottled(this.state.q);
      } else {
        this.autocompleteSearchDebounced(this.state.q);
      }
    });
  };

  autocompleteSearch = q => {
    this._fetch(q);
  };

  _fetch = q => {
    const _searches = this.state._searches || [];
    _searches.push(q);
    this.setState({ _searches });
  };

  render() {
    const _searches = this.state._searches || [];
    return (
      <div>
        <h2>Throttle and Debounce</h2>
        <p>
          ½ second Throttle when input is small and ½ second Debounce when
          the input is longer.
        </p>
        <input
          placeholder="Type something here"
          type="text"
          value={this.state.q}
          onChange={this.changeQuery}
        />
        <hr />
        {_searches.length ? (
          <button
            type="button"
            onClick={event => this.setState({ _searches: [] })}
          >
            Reset
          </button>
        ) : null}
        <ol>
          {_searches.map((s, i) => {
            return <li key={s + i}>{s}</li>;
          })}
        </ol>
      </div>
    );
  }
}

In this version I cheated a little bit. The delays are different. The throttle has a delay of 500ms and the debounce as a delay of 1000ms. That makes it feel little bit more snappy there in the beginning when you start typing but once you've typed more than 5 characters, it switches to the more patient debounce version.

You can try it here: Throttle and Debounce

With this version, if you, in a steady pace typed in "south carolina" you'd notice that it does autocomplete lookups for "s", "sout" and "south carolina".

Avoiding wrongly ordered async responses

Suppose the user slowly types in "p" then "pe" then "pet", it would trigger 3 XHR requests. I.e. something like this:


fetch('/autocomplete?q=p')

fetch('/autocomplete?q=pe')

fetch('/autocomplete?q=pet')

But because all of these are asynchronous and sometimes there's unpredictable slowdowns on the network, it's not guarantee that they'll all come back in the same exact order. The solution to this is to use a "global variable" of the latest search term and then compare that to the locally scoped search term in each fetch callback promise. That might sound harder than it is. The solution basically looks like this:


class App extends React.Component {

  makeAutocompleteLookup = q => {
    // Store the latest input here scoped in the App instance.
    this.waitingFor = q;
    fetch('/autocompletelookup?q=' + q)
    .then(response => {
      if (response.status === 200) {
        // Only bother with this XHR response
        // if this query term matches what we're waiting for.
        if (q === this.waitingFor) {
          response.json()
          .then(results => {
              this.setState({results: results});
          })
        }
      }
    })
  }
}

Bonus feature; Caching

For caching the XHR requests, to avoid unnecessary network requests if the user uses backspace, the simplest solution is to maintain a dictionary of previous results as a component level instance. Let's assume you do the XHR autocomplete lookup like this initially:


class App extends React.Component {

  makeAutocompleteLookup = q => {
    const url = '/autocompletelookup?q=' + q;
    fetch(url)
    .then(response => {
      if (response.status === 200) {
        response.json()
        .then(results => {
            this.setState({ results });
        })
      }
    })
  }

}

To add caching (also a form of memoization) you can simply do this:


class App extends React.Component {

  _autocompleteCache = {};

  makeAutocompleteLookup = q => {
    const url = '/autocompletelookup?q=' + q;

    const cached = this._autocompleteCache[url];
    if (cached) {
      return Promise.resolve(cached).then(results => {
        this.setState({ results });
        });
      });
    }

    fetch(url)
    .then(response => {
      if (response.status === 200) {
        response.json()
        .then(results => {
            this.setState({ results });
        })
      }
    })
  }

}

In a more real app you might want to make that whole method always return a promise. And you might want to do something slightly smarter when response.status !== 200.

Bonus feature; Watch out for spaces

So the general gist of these above versions is that you debounce the XHR autocomplete lookups to only trigger sometimes. For short strings we trigger every, say, 300ms. When the input is longer, we only trigger when it appears the user has stopped typing. A more "advanced" approach is to trigger after a space. If I type "south carolina is a state" it's hard for a computer to know if "is", "a", or "state" is a complete word. Humans know and some English words can easily be recognized as stop words. However, what you can do is take advantage of the fact that a space almost always means the previous word was complete. It would be nice to trigger an autocomplete lookup after "south carolina" and "south carolina is" and "south carolina is a". These are also easier to deal with on the server side because, depending on your back-end, it's easier to search your database if you don't include "broken" words like "south carolina is a sta". To do that, here's one such implementation:


class App extends React.Component {

  // Just overriding the changeQuery method in this example.

  changeQuery = event => {
    const q = event.target.value
    this.setState({ q }, () => {

      // If the query term is short or ends with a
      // space, trigger the more impatient version.
      if (q.length < 5 || q.endsWith(' ')) {
        this.autocompleteSearchThrottled(q);
      } else {
        this.autocompleteSearchDebounced(q);
      }
    });
  };

  // Just overriding the changeQuery method in this example.

}

You can try it here: Throttle and Debounce with throttle on ending spaces.

Next level stuff

There is so much more that you can do for that ideal user experience. A lot depends on the context.

For example, when the input is small instead of doing a search on titles or names or whatever, you instead return a list of possible full search terms. So, if I have typed "sou" the back-end could return things like:

{
  "matches": [
     {"term": "South Carolina", "count": 123},
     {"term": "Southern", "count": 469},
     {"term": "South Dakota", "count": 98},
  ]
}

If the user selects one of these autocomplete suggestions, instead of triggering a full search you just append the selected match back into the search input widget. This is what Google does.

And if the input is longer you go ahead and actually search for the full documents. So if the input was "south caro" you return something like this:

{
  "matches": [
     {
       "title": "South Carolina Is A State", 
       "url": "/permapage/x19v093d"
     },
     {
       "title": "Best of South Carolina Parks", 
       "url": "/permapage/9vqif3z"
     },
     {
       "title": "I Live In South Carolina", 
       "url": "/permapage/abc300a1y"
     },
  ]
}

And when the XHR completes you look at what the user clicked and do something like this:


  return (<ul className="autocomplete">
    {this.state.results.map(result => {
      return <li onClick={event => {
        if (result.url) {
          document.location.href = result.url;
        } else {
          this.setState({ q: result.term });
        }
      }}>
        {result.url ? (
          <p className="document">{result.title}</p>
        ) : (
            <p className="new-term">{result.term}</p>
          )}
      </li>
    })
    }
    </ul>
  )

This is an incomplete example and more pseudo-code than a real solution but the pattern is quite nice. You're either helping the user type the full search term or if it's already a good match you can go skip the actual searching and go to the result directly.

This is how SongSearch works for example:

Suggestions for full search terms

Suggestions for actual documents

csso and django-pipeline

February 28, 2018
0 comments Python, Django, JavaScript

This is a quick-and-dirty how-to on how to use csso to handle the minification/compression of CSS in django-pipeline.

First create a file called compressors.py somewhere in your project. Make it something like this:


import subprocess
from pipeline.compressors import CompressorBase
from django.conf import settings


class CSSOCompressor(CompressorBase):

    def compress_css(self, css):
        proc = subprocess.Popen(
            [
                settings.PIPELINE['CSSO_BINARY'], 
                '--restructure-off'
            ],
            stdin=subprocess.PIPE,
            stdout=subprocess.PIPE,
        )
        css_out = proc.communicate(
            input=css.encode('utf-8')
        )[0].decode('utf-8')
        # was_size = len(css)
        # new_size = len(css_out)
        # print('FROM {} to {} Saved {}  ({!r})'.format(
        #     was_size,
        #     new_size,
        #     was_size - new_size,
        #     css_out[:50]
        # ))
        return css_out

In your settings.py where you configure django-pipeline make it something like this:


PIPELINE = {
    'STYLESHEETS': PIPELINE_CSS,
    'JAVASCRIPT': PIPELINE_JS,

    # These two important lines. 
    'CSSO_BINARY': path('node_modules/.bin/csso'),
    # Adjust the dotted path name to where you put your compressors.py
    'CSS_COMPRESSOR': 'peterbecom.compressors.CSSOCompressor',

    'JS_COMPRESSOR': ...

Next, install csso-cli in your project root (where you have the package.json). It's a bit confusing. The main package is called csso but to have a command line app you need to install csso-cli and when that's been installed you'll have a command line app called csso.

$ yarn add csso-cli

or

$ npm i --save csso-cli

Check that it installed:

$ ./node_modules/.bin/csso --version
3.5.0

And that's it!

--restructure-off

So csso has an advanced feature to restructure the CSS and not just remove whitespace and not needed semicolons. It costs a bit of time to do that so if you want to squeeze the extra milliseconds out, enable it. Trading time for space.
See this benchmark for a comparison with and without --restructure-off in csso.

Why csso you might ask

Check out the latest result from css-minification-benchmark. It's not super easy to read by it seems the best performing one in terms of space (bytes) is crass written by my friend and former colleague @mattbasta. However, by far the fastest is csso when using --restructre-off. Minifiying font-awesome.css with crass takes 326.52 ms versus 3.84 ms in csso.

But what's great about csso is Roman @lahmatiy Dvornov. I call him a friend too for all the help and work he's done on minimalcss (not a CSS minification tool by the way). Roman really understands CSS and csso is actively maintained by him and other smart people who actually get into the scary weeds of CSS browser hacks. That gives me more confidence to recommend csso. Also, squeezing a couple bytes extra out of your .min.css files isn't important when gzip comes into play. It's better that the minification tool is solid and stable.

Check out Roman's slides which, even if you don't read it all, goes to show that CSS minification is so much more than just regex replacing whitespace.
Also crass admits as one of its disadvantages: "Certain "CSS hacks" that use invalid syntax are unsupported".