Filtered by React

Page 5

Reset

Component, component function or plain function in React

February 6, 2018
1 comment React

tl;dr; Use React.PureComponent (or React.Component) if your component contains, or might contain, non-trivial logic that might affect it rendering or not. For all other cases, use a function, especially if it's not React specific.

Your choices

When you have state, especially good old this.state and this.setState you have to use React.PureComponent (or React.Component if you must).

For stateless functions, where you're just getting some props in, perhaps massaging them and rendering some JSX, you have choices.
You can write a React component in these three different ways:

Component


class MyComponent extends React.PureComponent {
  render() {
    return <h1>Hello {this.props.name}</h1>
  }
}

Component function


const MyComponent = ({ name }) => {
  return <h1>Hello {name}</h1>
}

Plain function


const MyComponent = name => {
  return <h1>Hello {name}</h1>
}

The first two can be used like this:


return (
  <div>
    <MyComponent name="Peter"/>
  </div>
)

The last one can be called directly:


return (
  <div>
    {MyComponent("Peter")}/>
  </div>
)

To be exact, you can actually call the second, component function, like this too:


return (
  <div>
    {MyComponent({name: "Peter"})}
  </div>
)

Example CodeSandbox here.

Each one has its strength and weaknesses.

Pros & cons for class MyComponent extends React.PureComponent

  • You have access to life-cycle hooks such as componentDidMount.
  • It's easy to add class-level public field functions, e.g. onButtonClick = event => {...} if inlining isn't convenient.
  • It has a shouldComponentUpdate method which means it can avoid a potentially expensive render execution when the props (or state) haven't changed.
  • If you decide you want to add some state, you just need to add a constructor that sets up this.state = {...}
  • If you use prop-types you can, depending on your babel transforms, set it as a static class member inside the class without having to repeat the name of the component outside (e.g. not having to do MyComponent.propTypes = {...} outside)
  • Maybe slower. I heard this rumor. Let's see later if it checks out.
  • Doesn't feel as simple because it's not a regular old function.
  • Might make you feel uncertain that it might have side-effects that aren't obvious.

Pros & cons for const MyComponent = (...) =>

  • Clearly it's just doing one thing. Rendering. No buts, ifs, or maybes.
  • Doesn't say React all over and thus should be easy to reason about outside React, such as in a unit test.
  • If it doesn't have to do all the mounting life-cycle hooks, perhaps that's valuable time saved.
  • There's something hip about writing functions and feeling "functional" without all that verbosity and boilerplate like class and extends and render etc.
  • Maybe faster. We'll see.

Benchmarking the difference

I don't know with confidence if this is the right way to test this but I really wanted to avoid process.env.NODE_ENV==='development' and I wanted to run each variant a bunch of times, because it feels more realistic, so as to avoid the slowness of the initial mounting.

So I made an app that looks like this:


class Components extends React.Component {
  render() {
    return <Component100 count={this.props.count} />;
  }
}

export default Components;

class Component100 extends React.PureComponent {
  render() {
    return <Component99 count={this.props.count} />;
  }
}
class Component99 extends React.PureComponent {
  render() {
    return <Component98 count={this.props.count} />;
  }
}

//...
//...you can imagine...
//...

class Component1 extends React.PureComponent {
  render() {
    return <Component0 count={this.props.count} />;
  }
}

class Component0 extends React.PureComponent {
  render() {
    collect('Components', performance.now());
    return <h1>Component0: {this.props.count}</h1>;
  }
}

This long chain of components calling "sub-components" starts right after the prop at the top changes. In the App that parents all of the variants, when the state changes the props change and it trickles down to that final last component. By taking a timestamp right before changing the state and during that last render you get a rough timeline for how long the whole chain took to render.

See the variants here:

Perhaps it's best to skim the code of the App.js too. It's a bit messy and there's a bunch of whacky code that uses global window to log all the timestamps but the gist is that it measures the few milliseconds it takes before a re-render is triggered until the final components render function gets called.

The app has a little hacky interval function that randomly switches between the different variants every 2 seconds and every 300 milliseconds it clicks a button, which changes the state which triggers a re-render.

Benchmark results

Results

Component style Median Comparison
Components 3.46ms 100%
ComponentFunctions 3.04ms 14% faster
Functions 2.02ms 71% faster

This was done using React 16.2.0 with process.env.NODE_ENV === 'production' in Firefox 60.

Sample app
You can try for yourself here: https://peterbe.github.io/function-or-component/

It might break when you click Reset. If it doesn't work very well in github.io, just download it and test locally.

Discussion

Here's my rule of thumb, the life-cycle hooks are awesome. I often write a component, using ...extends React.PureComponent even though it could be a plain function. But over time, eventually you expand it and realize you need some life cycle hook. Or you might find that writing inline functions is getting messy. Or, you realize that this component is sometimes unnecessarily called by a more complicated parent, with the same props as last time!

The performance penalty, for using full React components, is small. It exists, but it's probably dwarfed by other costs such as mounting not to mention actual DOM updating. It's also very likely that your components could benefit more from avoiding render (which only shouldComponentUpdate really can do) than the cost of calling it. Meaning, if the slower component only has to render 500 times, marginally slower, than the function component rendering 1,000 times, then the slower sometimes-not-needing-to-render will eventually win the performance battle.

There is still value in the functional stateless component. See the pros & cons above. But one rule of thumb I have is that if the component is really simple and contains no fancy logic that might affect its rendering or not rendering, then use components as functions. They're "sending a message" (to the code reader) by being brief and simple. For example, I have this little snippet in my Common.js module:


export const formatFileSize = (bytes, decimals = 0) => {
  if (!bytes) return '0 bytes'
  const k = 1024
  const dm = decimals + 1 || 3
  const sizes = ['bytes', 'KB', 'MB', 'GB', 'TB', 'PB', 'EB', 'ZB', 'YB']
  const i = Math.floor(Math.log(bytes) / Math.log(k))
  return parseFloat((bytes / Math.pow(k, i)).toFixed(dm)) + ' ' + sizes[i]
}

It's got nothing to do with React and that becomes extra obvious simply my looking at it. It's cleary got just one job. It's used a lot and often by more complicated components.

Last but not least; I'm very aware that the much more experienced React gurus of the world have already said something similar but with more accuracy. But I didn't want to just blurt out my opinion without adding some meat and some numbers to it. And I've always disliked the confusion that there's a choice at all so hopefully this blog post will help someone else who still suffers from having to wonder when to use which.

This tweet sums it up well:
Craig Kerstiens tweet

Display current React version

January 7, 2018
1 comment JavaScript, React

Usually you know what version of React your app is using by opening the package.json, or poking around in node_modules/react/index.js. But perhaps there are many packaging abstractions in between your command line and the server. Especially if you have a continous integration server that builds your static assets and if that CI uses caching. It might get scary.

If you really want to print out what version of React is rendering your app here's one way to do that:


import React from 'react'

class Introspection extends React.Component {
  render() {
    return <div>
      Currently using React {React.version}
    </div>
  }
}

Suppose that you want this display to depend on the app being in dev or prod mode:


import React from 'react'

class Introspection extends React.Component {
  render() {
    return <div>
      {
        process.env.NODE_ENV === 'development' ?
        <p>Currently using React {React.version}</p> : null
      }
    </div>
  }
}

Note that there's no need to import process.

See this CodeSandbox snippet for a live example.

How to create-react-app with Docker

November 17, 2017
31 comments Linux, Web development, JavaScript, React, Docker

Why would you want to use Docker to do React app work? Isn't Docker for server-side stuff like Python and Golang etc? No, all the benefits of Docker apply to JavaScript client-side work too.

So there are three main things you want to do with create-react-app; dev server, running tests and creating build artifacts. Let's look at all three but using Docker.

Create-react-app first

If you haven't already, install create-react-app globally:

▶ yarn global add create-react-app

And, once installed, create a new project:

▶ create-react-app docker-create-react-app
...lots of output...

▶ cd docker-create-react-app
▶ ls
README.md    node_modules package.json public       src          yarn.lock

We won't need the node_modules here in the project directory. Instead, when building the image we're going let node_modules stay inside the image. So you can go ahead and... rm -fr node_modules.

Create the Dockerfile

Let's just dive in. This Dockerfile is the minimum:

FROM node:8

ADD yarn.lock /yarn.lock
ADD package.json /package.json

ENV NODE_PATH=/node_modules
ENV PATH=$PATH:/node_modules/.bin
RUN yarn

WORKDIR /app
ADD . /app

EXPOSE 3000
EXPOSE 35729

ENTRYPOINT ["/bin/bash", "/app/run.sh"]
CMD ["start"]

A couple of things to notice here.
First of all we're basing this on the official Node v8 repository on Docker Hub. That gives you a Node and Yarn by default.

Note how the NODE_PATH environment variable puts the node_modules in the root of the container. That's so that it doesn't get added in "here" (i.e. the current working directory). If you didn't do this, the node_modules directory would be part of the mounted volume which not only slows down Docker (since there are so many files) it also isn't necessary to see those files.

Note how the ENTRYPOINT points to run.sh. That's a file we need to create too, alongside the Dockerfile file.

#!/usr/bin/env bash
set -eo pipefail

case $1 in
  start)
    # The '| cat' is to trick Node that this is an non-TTY terminal
    # then react-scripts won't clear the console.
    yarn start | cat
    ;;
  build)
    yarn build
    ;;
  test)
    yarn test $@
    ;;
  *)
    exec "$@"
    ;;
esac

Lastly, as a point of convenience, note that the default CMD is "start". That's so that when you simply run the container the default thing it does is to run yarn start.

Build container

Now let's build it:

▶ docker image build -t react:app .

The -t react:app is up to you. It doesn't matter so much what it is unless you're going to upload your container the a registry. Then you probably want the repository to be something unique.

Let's check that the build is there:

▶ docker image ls react:app
REPOSITORY          TAG                 IMAGE ID            CREATED             SIZE
react               app                 3ee5c7596f57        13 minutes ago      996MB

996MB! The base Node image is about ~700MB and the node_modules directory (for a clean new create-react-app) is ~160MB (at the time of writing). What the remaining difference is, I'm not sure. But it's empty calories and easy to lose. When you blow away the built image (docker image rmi react:app) your hard drive gets all that back and no actual code is lost.

Before we run it, lets go inside and see what was created:

▶ docker container run -it react:app bash
root@996e708a30c4:/app# ls
Dockerfile  README.md  package.json  public  run.sh  src  yarn.lock
root@996e708a30c4:/app# du -sh /node_modules/
148M    /node_modules/
root@996e708a30c4:/app# sw-precache
Total precache size is about 355 kB for 14 resources.
service-worker.js has been generated with the service worker contents.

The last command (sw-precache) was just to show that executables in /node_modules/.bin are indeed on the $PATH and can be run.

Run container

Now to run it:

▶ docker container run -it -p 3000:3000 react:app
yarn run v1.3.2
$ react-scripts start
Starting the development server...

Compiled successfully!

You can now view docker-create-react-app in the browser.

  Local:            http://localhost:3000/
  On Your Network:  http://172.17.0.2:3000/

Note that the development build is not optimized.
To create a production build, use yarn build.

Default app running

Pretty good. Open http://localhost:3000 in your browser and you should see the default create-react-app app.

Next step; Warm reloading

create-react-app does not support hot reloading of components. But it does support web page reloading. As soon as a local file is changed, it sends a signal to the browser (using WebSockets) to tell it to... document.location.reload().

To make this work, we need to do two things:
1) Mount the current working directory into the Docker container
2) Expose the WebSocket port

The WebSocket thing is set up by exposing port 35729 to the host (-p 35729:35729).

Below is an example running this with a volume mount and both ports exposed.

▶ docker container run -it -p 3000:3000 -p 35729:35729 -v $(pwd):/app react:app
yarn run v1.3.2
$ react-scripts start
Starting the development server...

Compiled successfully!

You can now view docker-create-react-app in the browser.

  Local:            http://localhost:3000/
  On Your Network:  http://172.17.0.2:3000/

Note that the development build is not optimized.
To create a production build, use yarn build.

Compiling...
Compiled successfully!
Compiling...
Compiled with warnings.

./src/App.js
  Line 7:  'neverused' is assigned a value but never used  no-unused-vars

Search for the keywords to learn more about each warning.
To ignore, add // eslint-disable-next-line to the line before.

Compiling...
Failed to compile.

./src/App.js
Module not found: Can't resolve './Apps.css' in '/app/src'

In the about example output. First I make a harmless save in the src/App.js file just to see that the dev server notices and that my browser reloads when I did that. That's where it says

Compiling...
Compiled successfully!

Secondly, I make an edit that triggers a warning. That's where it says:

Compiling...
Compiled with warnings.

./src/App.js
  Line 7:  'neverused' is assigned a value but never used  no-unused-vars

Search for the keywords to learn more about each warning.
To ignore, add // eslint-disable-next-line to the line before.

And lastly I make an edit by messing with the import line

Compiling...
Failed to compile.

./src/App.js
Module not found: Can't resolve './Apps.css' in '/app/src'

This is great! Isn't create-react-app wonderful?

Build build :)

There are many things you can do with the code you're building. Let's pretend that the intention is to build a single-page-app and then take the static assets (including the index.html) and upload them to a public CDN or something. To do that we need to generate the build directory.

The trick here is to run this with a volume mount so that when it creates /app/build (from the perspective) of the container, that directory effectively becomes visible in the host.

▶ docker container run -it -v $(pwd):/app react:app build
yarn run v1.3.2
$ react-scripts build
Creating an optimized production build...
Compiled successfully.

File sizes after gzip:

  35.59 KB  build/static/js/main.591fd843.js
  299 B     build/static/css/main.c17080f1.css

The project was built assuming it is hosted at the server root.
To override this, specify the homepage in your package.json.
For example, add this to build it for GitHub Pages:

  "homepage" : "http://myname.github.io/myapp",

The build folder is ready to be deployed.
You may serve it with a static server:

  yarn global add serve
  serve -s build

Done in 5.95s.

Now, on the host:

▶ tree build
build
├── asset-manifest.json
├── favicon.ico
├── index.html
├── manifest.json
├── service-worker.js
└── static
    ├── css
    │   ├── main.c17080f1.css
    │   └── main.c17080f1.css.map
    ├── js
    │   ├── main.591fd843.js
    │   └── main.591fd843.js.map
    └── media
        └── logo.5d5d9eef.svg

4 directories, 10 files

The contents of that file you can now upload to a CDN some public Nginx server that points to this as the root directory.

Running tests

This one is so easy and obvious now.

▶ docker container run -it -v $(pwd):/app react:app test

Note the that we're setting up a volume mount here again. Since the test runner is interactive it sits and waits for file changes and re-runs tests immediately, it's important to do the mount now.

All regular jest options work too. For example:

▶ docker container run -it -v $(pwd):/app react:app test --coverage
▶ docker container run -it -v $(pwd):/app react:app test --help

Debugging the node_modules

First of all, when I say "debugging the node_modules", in this context, I'm referring to messing with node_modules whilst running tests or running the dev server.

One way to debug the node_modules used is to enter a bash shell and literally mess with the files inside it. First, start the dev server (or start the test runner) and give the container a name:

▶ docker container run -it -p 3000:3000 -p 35729:35729 -v $(pwd):/app --name mydebugging react:app

Now, in a separate terminal start bash in the container:

▶ docker exec -it mydebugging bash

Once you're in you can install an editor and start editing files:

root@2bf8c877f788:/app# apt-get update && apt-get install jed
root@2bf8c877f788:/app# jed /node_modules/react/index.js

As soon as you make changes to any of the files, the dev server should notice and reload.

When you stop the container all your changes will be reset. So if you had to sprinkle the node_modules with console.log('WHAT THE HECK!') all of those disappear when the container is stopped.

NodeJS shell

This'll come as no surprise by now. You basically run bash and you're there:

▶ docker container run -it -v $(pwd):/app react:app bash
root@2a21e8206a1f:/app# node
> [] + 1
'1'

Conclusion

When I look back at all the commands above, I can definitely see how it's pretty intimidating and daunting. So many things to remember and it's got that nasty feeling where you feel like your controlling your development environment through unwieldy levers rather than your own hands.

But think of the fundamental advantages too! It's all encapsulated now. What you're working on will be based on the exact same version of everything as your teammate, your dev server and your production server are using.

Pros:

  • All packaged up and all team members get the exact same versions of everything, including Node and Yarn.
  • The node_modules directory gets out of your hair.
  • Perhaps some React code is just a small part of a large project. E.g. the frontend is React, the backend is Django. Then with some docker-compose magic you can have it all running with one command without needing to run the frontend in a separate terminal.

Cons:

  • Lack of color output in terminal.
  • The initial (or infrequent) wait for building the docker image is brutal on a slow network.
  • Lots of commands to remember. For example, How do you start a shell again?

In my (Mozilla Services) work, the projects I work on, I actually use docker-compose for all things. And I have a Makefile to help me remember all the various docker-compose commands (thanks Jannis & Will!). One definitely neat thing you can do with docker-compose is start multiple containers. Then you can, with one command, start a Django server and the create-react-app dev server with one command. Perhaps a blog post for another day.

React lifecycle hooks must-have

August 13, 2017
1 comment Web development, JavaScript, React

I don't know who made this flowchart originally, but whoever you are: Thank you!

At this point, in my React learning I think I've memorized much of this but it's taken me a lot of time and having to dig up the documentation again. (Also, not to mention the number of times I've typo'ed componentWillReciveProps and componentWillRecevieProps etc.)

Remember this; You don't need to know all of these by heart to be good at React. In fact, there's several of these that I almost never use.

React lifecycle hooks flowchart

UPDATE

The above link is dead. Use this blog post instead.

UPDATE April 2018

Here's an even better one from @dan_abramov:

React life-cycle hooks

Public Class Fields saves sooo many keystrokes in React code

April 14, 2017
1 comment JavaScript, React

tl;dr; I'm not a TC39 member and I barely understand half of what those heros are working on but there is one feature they're working on that really stands out, in my view, for React coders; Public Class Fields.

The Problem?

Very common pattern in React code is that have a component that has methods that are tied to DOM events (e.g. onClick) and often these methods need acess to this. The component's this. So you can reach things like this.state or this.setState().

You might have this in your code:


class App extends Component {
  state = {counter: 0}

  constructor() {
    super()

    // Like homework or situps; something you have to do :(
    this.incrementCounter = this.incrementCounter.bind(this) 
  }

  incrementCounter() {
    this.setState(ps => {
      return {counter: ps.counter + 1}
    })
  }

  render() {
    return (
      <div>
        <p>
          <button onClick={this.incrementCounter}>Increment</button>
        </p>
        <h1>{this.state.counter}</h1>
      </div>
    )
  }
}

Demo

If you don't bind the class method to this in the constructor, this will be undefined inside the class instance field incrementCounter. Buu!

Suppose you don't like having the word incrementCounter written in 4 placecs, you might opt for this shorthand notation where you create a new unnamed function inside the render function:


class App extends Component {
  state = {counter: 0}

  render() {
    return (
      <div>
        <p>
          <button onClick={() => {
            this.setState(ps => {
              return {counter: ps.counter + 1}
            })
          }}>Increment</button>
        </p>
        <h1>{this.state.counter}</h1>
      </div>
    )
  }
}

Demo

Sooo much shorter and kinda nice that the code can be so close in proximity to the actual onClick event definition.

But this notation has a horrible side-effect. It creates a new function on every render. If instead of a regular DOM jsx object <button> it might be a sub-component like <CoolButton/> then that sub-component would be forced to re-render every time (unless you write your own shouldComponentUpdate.

Also, this notation works when the code is small and light but it might get messy quickly if you need that functionality on other element's onClick. Or it might become mess with really deep indentation.

The Solution?

Public Class Fields.

That new feature is currently in the "Draft" stage at TC39. Aka. stage 1.

However, I discovered that you can use stage-2 in Babel to use this particular feature.

Note! I don't understand why you only have to put on your stage-2-brave socks for this feature when it's part of a definition that is stage 1.

Anyway, what it means is that you can define your field (aka method) like this instead:


class App extends Component {
  state = {counter: 0}

  incrementCounter = () => {
    this.setState(ps => {
      return {counter: ps.counter + 1}
    })
  }

  render() {
    return (
      <div>
        <p>
          <button onClick={this.incrementCounter}>Increment</button>
        </p>
        <h1>{this.state.counter}</h1>
      </div>
    )
  }
}

Demo

Now it's only mentioned by name incrementCounter twice. And no need for that manual binding in a constructor.
And since it's automatically bound, the function isn't recreated and those can easily make sub-components be pure.

So, let's always write our React methods this way from now on.

Oh, and in case you wonder. Inheritence works the same with these public class fields as the regular class instance fields.

More CSS load performance experiments (of a React app)

March 25, 2017
0 comments Web development, JavaScript, React

tl;dr; More experiments with different ways to lazy load CSS with and without web fonts. Keeping it simple is almost best but not good enough.

Background

Last week I blogged about Web Performance Optimization of a Single-Page-App and web fonts in which I experimented with tricks to delay the loading of some massive CSS file. The app is one of those newfangled single-page-app where JavaScript (React in this case) does ALL the DOM rendering, which is practical but suffers the first-load experience.

Again, let's iterate that single-page-apps built with fully fledged JavaScript frameworks isn't the enemy. The hope is that your visitors will load more than just one page. If users load it once, any further click within the app might involve some "blocking" AJAX but generally the app feels great since a click doesn't require a new page load.

Again, let's iterate what the ideal is. Ideally the page should load and be visually useful by the server sending all the DOM you almost need and once loaded, some JavaScript can turn the app "alive" so that further clicks just update the DOM instead of reloading. But that's not trivial. Things like react-router (especially version 4) makes it a lot easier but you now need a NodeJS server to render the pages server-side and you can't just easily take your "build" directory and put into a CDN like Firebase or CloudFront.

When I first started these experiements I was actually looking at what I can do with the JavaScript side to make first loads faster. Turns out fixing your CSS render blocking load and assessing use of web fonts has a bigger "bang for the buck".

Go Straight to the Results

Visual comparison on WebPagetest.org
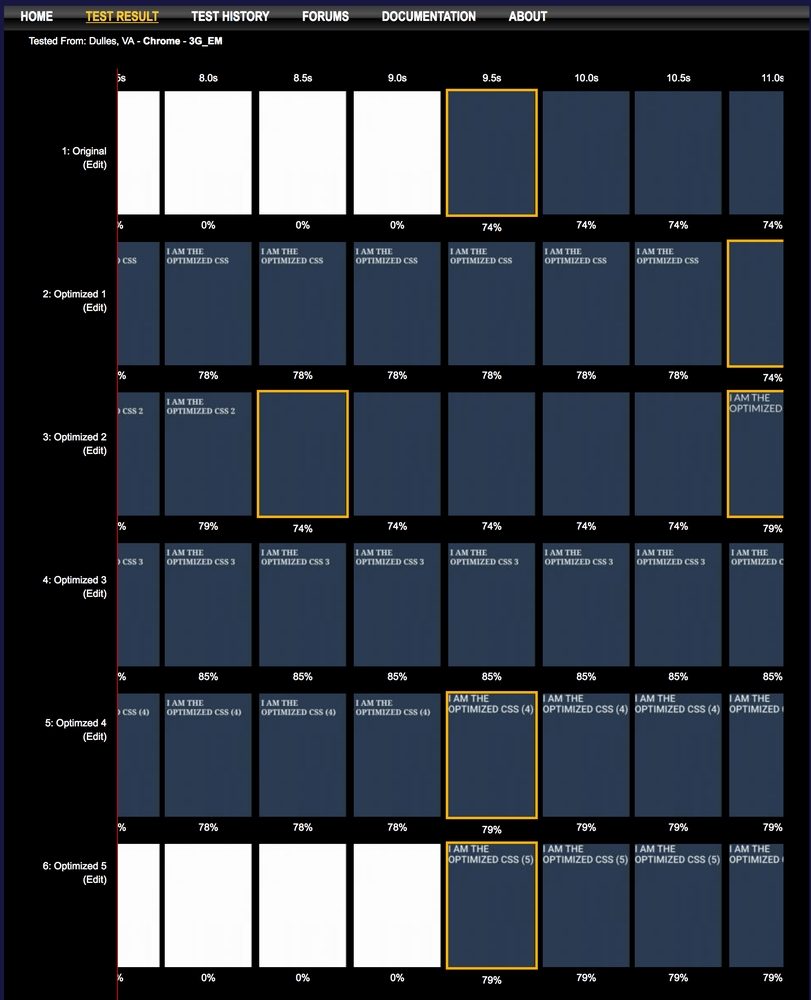
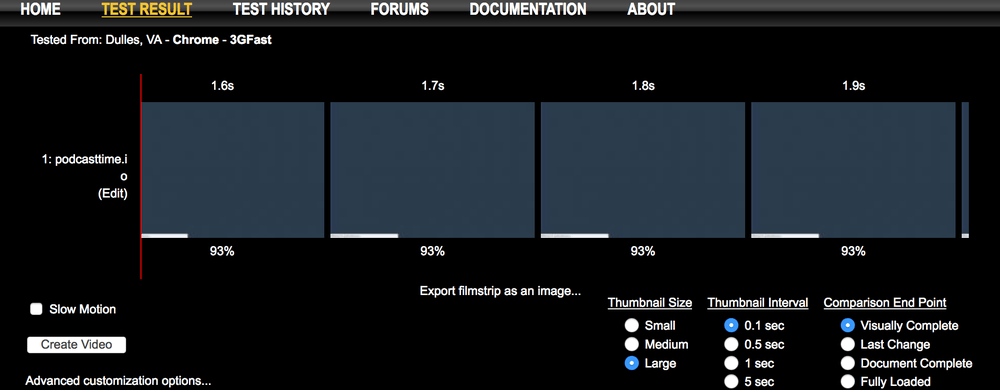
Visual comparison of 6 different solutions

Same visual but as a comparative video

Stare at that for a second or two. Note that some versions start rendering something earlier than others. Some lose some of their rendered content and goes blank. Some change look significantly more than once before the final rendered result. As expected they almost all take the same total time till the final thing is fully rendered with DOM and all CSS loaded.

What Each Experimental Version Does

Original

A regular webapp straight out of the ./build directory built with Create React App. Blocking CSS, blocking JS and no attempts to show any minimal DOM stuff first.

Optimized Version 1

Inline CSS with basic stuff like background color and font color. CSS links are lazy loaded using tricks from loadCSS.

Optimized Version 2

Same as Optimized version 1 but both the JavaScript that lazy loads the CSS and the React JavaScript has a defer on it to prevent render blockage.

Optimized Version 3

Not much of an optimization. More of a test. Takes the original version but moves the <link rel="stylesheet" ... tags to just above the </body> tag. So below the <script src="..."> tags. Note how, around the 15 second mark, this renders the DOM (by the JavaScript code) before the CSS has loaded and it gets ugly. Note also how much longer this one takes because it has to context switch and go back to CSS loading and re-rendering after the DOM is built by the JavaScript.

Optimized Version 4

All custom web font loading removed. Bye bye "Lato" font-family. Yes you could argue that it looks worse but I still believe performance makes users more happy ultimately than prettiness (not true for all sites, e.g. a fashion web app).
Actually this version is copied from the Optimized version 1 but with the web fonts removed. The final winner in my opinion.

Optimized Version 5

Out of curiousity, let's remove the web fonts one more time but do it based on the Original. So no web fonts but CSS still render blocking.

So, Which Is Best?

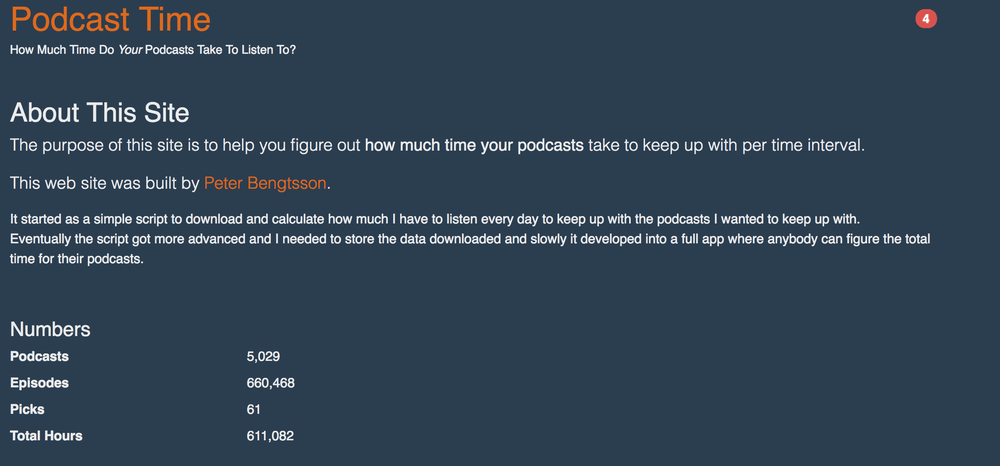
I would say Optimized version 4. Remove the web font and do the loadCSS trick of loading the CSS after some really basic rendering but do that before loading the JavaScript. This is what I did to Podcast Time except slightly improved the initial server HTML so that it says "Loading..." immediately and I made the header nav look exactly like the one you get when everything is fully loaded.

Also, Chrome is quite a popular browser after all and the first browser that supports <link rel="preload" ...>. That means that when Chrome (and Opera 43 and Android Browser) parses the initial HTML and sees <link rel="preload" href="foo.css"> it can immediately start downloading that file and probably start parsing it too (in parallel). The visual comparison I did here on WebPagetest used Chrome (on 3G Emerging Markets) so that gives the optimized versions above a slight advantage only for Chrome.

What's Next?

To really make your fancy single-page-app fly like greased lightning you should probably do two things:

  1. Server-side render the HTML but perhaps do it in such a way that if your app depends on a lot of database data, skip that so you at least send a decent amount of HTML so when React/Angular/YouNameIt starts executing it doesn't have to do much DOM rendering and can just go straight to a loading message whilst it starts fetching the actual AJAX data that needs to be displayed. Or if it's a news article or blog post, include that in the server rendered HTML but let the client-side load other things like comments or a sidebar with related links.

  2. Tools like critical that figures out the critical above-the-fold CSS don't work great with single-page-apps where the DOM is generated by loaded JavaScript but you can probably hack around that by writing some scripts that generate a DOM as a HTML string by first loading the app in PhantomJS in various ways. That way you can inline all the CSS needed even after the JavaScript has built the DOM. And once that's loaded, then you can lazy load in the remaining CSS (e.g. bootstrap.min.css) to have all styles ready when the user starts clicking around on stuff.

Most important is the sites' functionality and value but hopefully these experiments have shown that you can get pretty good mileage from your standard build of a single-page-app without having to do too much tooling.