Filtered by Python

Page 17

Reset

mincss "Clears the junk out of your CSS"

January 21, 2013
30 comments Python, Web development

A project I started before Christmas (i.e. about a month ago) is now production ready.

mincss (code on github) is a tool that when given a URL (or multiple URLs) downloads that page and all its CSS and compares each and every selector in the CSS and finds out which ones aren't used. The outcome is a copy of the original CSS but with the selectors not found in the document(s) removed. It goes something like this:


>>> from mincss.processor import Processor
>>> p = Processor()
>>> p.process_url('https://www.peterbe.com')
>>> p.process()
>>> p.inlines
[]
>>> p.links
[<mincss.processor.LinkResult object at 0x10a3bbe50>, <mincss.processor.LinkResult object at 0x10a4d4e90>]
>>> one = p.links[0]
>>> one.href
'//d1ac1bzf3lrf3c.cloudfront.net/static/CACHE/css/c98c3dfc8525.css'
>>> len(one.before)
83108
>>> len(one.after)
10062
>>> one.after[:70]
u'header {display:block}html{font-size:100%;-webkit-text-size-adjust:100'

To whet your appetite, running it on any one of my pages here on my blog it goes from: 82Kb down to 7Kb. Before you say anything; yes I know its because I using a massive (uncustomized) Twitter Bootstrap file that contains all sorts of useful CSS that I'm not using more than 10% of. And yes, those 10% on one page might be different from the 10% on another page and between them it's something like 15%. Add a third page and it's 20% etc. But, because I'm just doing one page at a time, I can be certain it will be enough.

One way of using mincss is to run it on the command line and look at the ouput, then audit it and give yourself an idea of selectors that aren't used. A safer way is to just do one page at a time. It's safer.

The way it works is that it parses the CSS payload (from inline blocks or link tags) with a relatively advanced regular expression and then loops over each selector one at a time and runs it with cssselect (which uses lxml) to see if the selector is used anywhere. If the selector isn't used the selector is removed.

I know I'm not explaining it well so I put together a little example implementation which you can download and run locally just to see how it works.

Now, regarding Javascript and DOM manipulations and stuff; there's not a lot you can do about that. If you know exactly what your Javascript does, for example, creating a div with class loggedin-footer you can prepare your CSS to tell mincss to leave it alone by adding /* no mincss */ somewhere in the block. Again, look at the example implementation for how this can work.

An alternative is to instead of using urllib.urlopen() you could use a headless browser like PhantomJS which will run it with some Javascript rendering but you'll never cover all bases. For example, your page might have something like this:


$(function() {
  $.getJSON('/is-logged-in', function(res) {
    if (res.logged_in) {
      $('<div class="loggedin-footer">').appendTo($('#footer'));
    }
  });
});

But let's not focus on what it can not do.

I think this can be a great tool for all of us who either just download a bloated CSS framework or you have a legacy CSS that hasn't been updated as new HTML is added and removed.

The code is Open Source (of course) and patiently awaiting your pull requests. There's almost full test coverage and there's still work to be done to improve the code such as finding more bugs and optimizing.

Using the proxy with '?MINCSS_STATS=1'
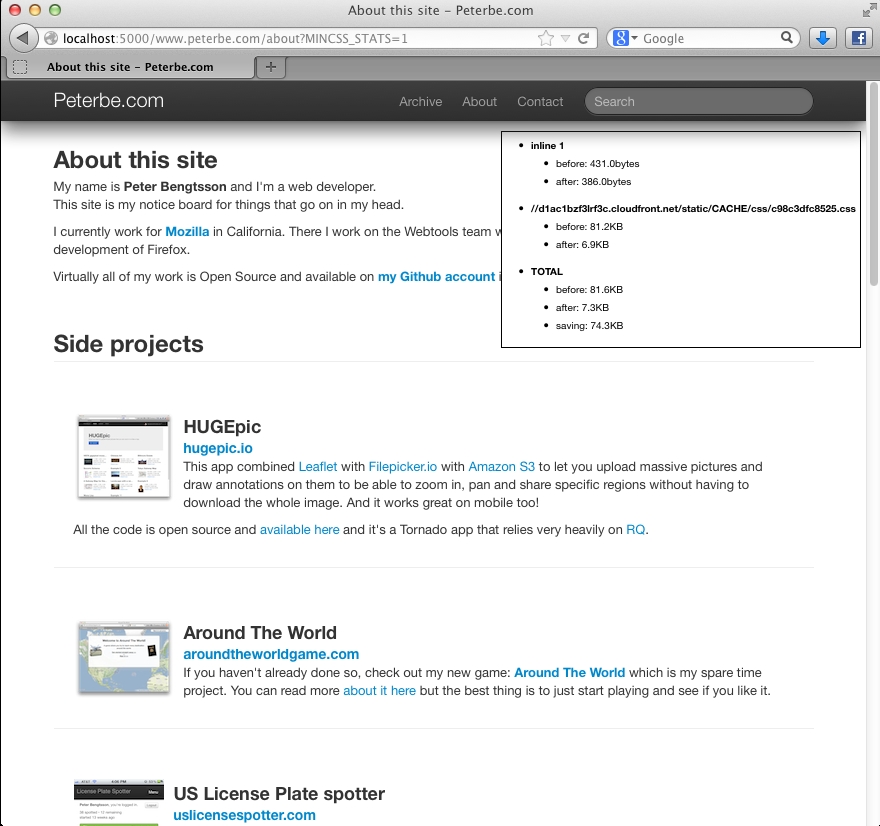
Also, there's a rough proxy server you can start that attempts to run it on any URL. You start it like this:

pip install Flask
cd mincss/proxy
python app.py

and then you just visit something like http://localhost:5000/www.peterbe.com/about and you can see it in action. That script needs some love since it's using lxml to render the processed output which does weird things to some DOM elements.

I hope it's of use to you.

UPDATE

Published a blog post about using mincss in action

UPDATE 2

cssmin now supports downloading using PhantomJS which means that Javascript rendering will work. See this announcement

UPDATE 3

Version 0.8 is 500% faster now for large documents. Make sure you upgrade!

Introducing: HUGEpic - a web app for showing massive pictures

November 3, 2012
19 comments Python

So here's my latest little fun side-project: HUGEpic.io http://hugepic.io

Zoomed in on Mona Lisa
It's a web app for uploading massive pictures and looking at them like maps.

The advantages with showing pictures like this are:

  • you only download what you need
  • you can send a permanent link to a picture at a particular location with a particular zoom level
  • you can draw annotations on a layer on top of the image

All the code is here on Github and as you can see it's a Tornado that uses two databases: MongoDB and Redis and when it connects to MongoDB it uses the new Tornado specific driver called Motor which is great.

Truncated! Read the rest by clicking the link below.

Fastest way to thousands-commafy large numbers in Python/PyPy

October 13, 2012
15 comments Python

Here are two perfectly good ways to turn 123456789 into "123,456,789":


import locale

def f1(n):
    locale.setlocale(locale.LC_ALL, 'en_US.UTF-8')
    return locale.format('%d', n, True)

def f2(n):
    r = []
    for i, c in enumerate(reversed(str(n))):
        if i and (not (i % 3)):
            r.insert(0, ',')
        r.insert(0, c)
    return ''.join(r)

assert f1(123456789) == '123,456,789'
assert f2(123456789) == '123,456,789'    

Which one do you think is the fastest?

Truncated! Read the rest by clicking the link below.

hastebinit - quickly paste snippets into hastebin.com

October 11, 2012
9 comments Python, Linux

I'm quite fond of hastebin.com. It's fast. It's reliable. And it's got nice keyboard shortcuts that work for my taste.

So, I created a little program to quickly throw things into hastebin. You can have one too:

First create ~/bin/hastebinit and paste in:


#!/usr/bin/python

import urllib2
import os
import json

URL = 'http://hastebin.com/documents'

def run(*args):
    if args:
        content = [open(x).read() for x in args]
        extensions = [os.path.splitext(x)[1] for x in args]
    else:
        content = [sys.stdin.read()]
        extensions = [None]

    for i, each in enumerate(content):
        req = urllib2.Request(URL, each)
        response = urllib2.urlopen(req)
        the_page = response.read()
        key = json.loads(the_page)['key']
        url = "http://hastebin.com/%s" % key
        if extensions[i]:
            url += extensions[i]
        print url


if __name__ == '__main__':
    import sys
    sys.exit(run(*sys.argv[1:]))

Then run: chmod +x ~/bin/hastebinit

Now you can do things like:

$ cat ~/myfile | hastebinit
$ hastebinit < ~/myfile
$ hastebinit ~/myfile myotherfile

Hopefully it'll one day help at least one more soul out there!

django-mongokit now compatible with Django 1.4

August 11, 2012
0 comments Python

I've finally had time to sort out the django-mongokit code so it's now fully compatible with Django 1.4.

Because I don't personally use the project I've sort of got myself lost in various patches from some awesome contributors who keep it in check.

Also, thanks to Marc Abramowitz who added a tox.ini which I've now updated to also test python 2.7 and Django 1.4

Go forth and build awesome Django apps with MongoKit which is still think is the best wrapper available on PyMongo out there.

How to use premailer as a command line script

July 13, 2012
5 comments Python

(This post is a response to Richard Patchet's request for tips on how to actually use premailer)

First of all, premailer is a Python library that converts a document of HTML and tranforms its <style> tags into inline style attributes on the HTML itself. This comes very handy when you need to take a nicely formatted HTML newletter template and prepare it before sending because when you send HTML emails you can't reference an external .css file.

So, here's how to turn it into a command line script.

First, install, then write the script:

$ pip install premailer
$ touch ~/bin/run-premailer.py
$ chmod +x ~/bin/run-premailer.py

Now, you might want to do this differently but this should get you places:


#!/usr/bin/env python

from premailer import transform

def run(files):
    try:
        base_url = [x for x in files if x.count('://')][0]
        files.remove(base_url)
    except IndexError:
        base_url = None

    for file_ in files:
        html = open(file_).read()
        print transform(html, base_url=base_url)

if __name__ == '__main__':
    import sys
    run(sys.argv[1:])

To test it, I've made a sample HTML page that looks like this:


<html>
    <head>
        <title>Test</title>
        <style>
        h1, h2 { color:red; }
        strong {
          text-decoration:none
          }
        p { font-size:2px }
        p.footer { font-size: 1px}
        p a:link { color: blue; }
        </style>
    </head>
    <body>
        <h1>Hi!</h1>
        <p><strong>Yes!</strong></p>
        <p class="footer" style="color:red">Feetnuts</p>
        <p><a href="page2/">Go to page 2</a></p>
    </body>
</html>

Cool. So let's run it: $ run-premailer.py test.html


<html>
  <head>
    <title>Test</title>
  </head>
  <body>
        <h1 style="color:red">Hi!</h1>
        <p style="font-size:2px"><strong style="text-decoration:none">Yes!</strong></p>
        <p style="{color:red; font-size:1px} :link{color:red}">Feetnuts</p>
    <p style="font-size:2px"><a href="page2/" style=":link{color:blue}">Go to page 2</a></p>
    </body>
</html>

Note that premailer supports converting relative URLs, so let's actually using that:
$ run-premailer.py test.html https://www.peterbe.com


<html>
  <head>
    <title>Test</title>
  </head>
  <body>
        <h1 style="color:red">Hi!</h1>
        <p style="font-size:2px"><strong style="text-decoration:none">Yes!</strong></p>
        <p style="{color:red; font-size:1px} :link{color:red}">Feetnuts</p>
    <p style="font-size:2px"><a href="https://www.peterbe.com/page2/" 
     style=":link{color:blue}">Go to page 2</a></p>
    </body>
</html>

I'm sure you can think of many many ways to improve that. Mayhaps use argparse or something fancy to allow for more options. Mayhaps make it so that you can supply named .css files on the command line that get automagically inserted on the fly.

Newfound love of @staticmethod in Python

July 2, 2012
6 comments Python

The @staticmethod decorator is nothing new. In fact, it was added in version 2.2. However, it's not till now in 2012 that I have genuinely fallen in love with it.

First a quick recap to remind you how @staticmethod works.


class Printer(object):

    def __init__(self, text):
        self.text = text

    @staticmethod
    def newlines(s):
        return s.replace('\n','\r')

    def printer(self):
        return self.newlines(self.text)

p = Printer('\n\r')
assert p.printer() == '\r\r'

So, it's a function that has nothing to do with the instance but still belongs to the class. It belongs to the class from an structural point of view of the observer. Like, clearly the newlines function is related to the Printer class. The alternative is:


def newlines(s):
    return s.replace('\n','\r')

class Printer(object):

    def __init__(self, text):
        self.text = text

    def printer(self):
        return newlines(self.text)

p = Printer('\n\r')
assert p.printer() == '\r\r'

It's the exact same thing and one could argue that the function has nothing to do with the Printer class. But ask yourself (by looking at your code); how many times do you have classes with methods on them that take self as a parameter but never actually use it?

So, now for the trump card that makes it worth the effort of making it a staticmethod: object orientation. How would you do this neatly without OO?


class UNIXPrinter(Printer):

    @staticmethod
    def newlines(s):
        return s.replace('\n\r', '\n')

p = UNIXPrinter('\n\r')
assert p.printer() == '\n'  

Can you see it? It's ideal for little functions that should be domesticated by the class but have nothing to do with the instance (e.g. self). I used to think it looked like it's making a pure looking thing like something more complex that it needs to be. But now, I think it looks great!

Secs sell! How I cache my entire pages (server-side)

May 10, 2012
1 comment Python, Django

I've blogged before about how this site can easily push out over 2,000 requests/second using only 6 WSGI workers excluding latency. The reason that's possible is because the whole page(s) can be cached server-side. What actually happens is that the whole rendered HTML blob is stored in the cache server (Redis in my case) so that no database queries are needed at all.

I wanted my site to still "feel" dynamic in the sense that once you post a comment (and it's published), the page automatically invalidates the cache and thus, the user doesn't have to refresh his browser when he knows it should have changed. To accomplish this I used a hacked cache_page decorator that makes the cache key depend on the content it depends on. Here's the code I actually use today for the home page:


def _home_key_prefixer(request):
    if request.method != 'GET':
        return None
    prefix = urllib.urlencode(request.GET)
    cache_key = 'latest_comment_add_date'
    latest_date = cache.get(cache_key)
    if latest_date is None:
        # when a blog comment is posted, the blog modify_date is incremented
        latest, = (BlogItem.objects
                   .order_by('-modify_date')
                   .values('modify_date')[:1])
        latest_date = latest['modify_date'].strftime('%f')
        cache.set(cache_key, latest_date, 60 * 60)
    prefix += str(latest_date)

    try:
        redis_increment('homepage:hits', request)
    except Exception:
        logging.error('Unable to redis.zincrby', exc_info=True)

    return prefix


@cache_page_with_prefix(60 * 60, _home_key_prefixer)
def home(request, oc=None):
    ...
    try:
        redis_increment('homepage:misses', request)
    except Exception:
        logging.error('Unable to redis.zincrby', exc_info=True)
    ...

And in the models I then have this:


@receiver(post_save, sender=BlogComment)
@receiver(post_save, sender=BlogItem)
def invalidate_latest_comment_add_dates(sender, instance, **kwargs):
    cache_key = 'latest_comment_add_date'
    cache.delete(cache_key)

So this means:

  • whole pages are cached for long time for fast access
  • updates immediately invalidates the cache for best user experience
  • no need to mess with ANY SQL caching

So, the next question is, if posting a comment means that the cache is invalidated and needs to be populated, what's the ratio of hits versus hits where the cache is cleared? Glad you asked. That's why I made this page:

www.peterbe.com/stats/

It allows me to monitor how often a new blog comment or general time-out means poor django needs to re-create the HTML using SQL.

At the time of writing, one in every 25 hits to the homepage requires the server to re-generate the page. And still the content is always fresh and relevant.

The next level of optimization would be to figure out whether a particular page update (e.g. a blog comment posting on a page that isn't featured on the home page) should or should not invalidate the home page. esp

String length truncation optimization difference in Python

March 19, 2012
8 comments Python

We have a piece of code that is going to be run A LOT on a server infrastructure that needs to be fast. I know that I/O is much more important but because I had the time I wanted to figure out which is fastest:


def a(s, m):
    if len(s) > m:
        s = s[:m]
    return s

...or...


def b(s, m):
    return s[:m]

Truncated! Read the rest by clicking the link below.

When to __deepcopy__ classes in Python

March 14, 2012
9 comments Python

When using mutables in Python you have to be careful:


>>> a = {'value': 1}
>>> b = a
>>> a['value'] = 2
>>> b
{'value': 2}

So, you use the copy module from the standard library:


>>> import copy
>>> a = {'value': 1}
>>> b = copy.copy(a)
>>> a['value'] = 2
>>> b
{'value': 1}

That's nice but it's limited. It doesn't deal with the nested mutables as you can see here:


>>> a = {'value': {'name': 'Something'}}
>>> b = copy.copy(a)
>>> a['value']['name'] = 'else'
>>> b
{'value': {'name': 'else'}}

That's when you need the copy.deepcopy function:


>>> a = {'value': {'name': 'Something'}}
>>> b = copy.deepcopy(a)
>>> a['value']['name'] = 'else'
>>> b
{'value': {'name': 'Something'}}

Now, suppose we have a custom class that overrides the dict type. That's a very common thing to do. Let's demonstrate:


>>> class ORM(dict):
...     pass
... 
>>> a = ORM(name='Value')
>>> b = copy.copy(a)
>>> a['name'] = 'Other'
>>> b
{'name': 'Value'}

And again, if you have a nested mutable object you need copy.deepcopy:


>>> class ORM(dict):
...     pass
... 
>>> a = ORM(data={'name': 'Something'})
>>> b = copy.deepcopy(a)
>>> a['data']['name'] = 'else'
>>> b
{'data': {'name': 'Something'}}

But oftentimes you'll want to make your dict subclass behave like a regular class so you can access data with dot notation. Like this:


>>> class ORM(dict):
...     def __getattr__(self, key):
...         return self[key]
... 
>>> a = ORM(data={'name': 'Something'})
>>> a.data['name']
'Something'

Now here's a problem. If you do that, you loose the ability to use copy.deepcopy since the class has now been slightly "abused".


>>> a = ORM(data={'name': 'Something'})
>>> a.data['name']
'Something'
>>> b = copy.deepcopy(a)
Traceback (most recent call last):
  File "<stdin>", line 1, in <module>
  File "/usr/local/Cellar/python/2.7.2/lib/python2.7/copy.py", line 172, in deepcopy
    copier = getattr(x, "__deepcopy__", None)
  File "<stdin>", line 3, in __getattr__
KeyError: '__deepcopy__'

Hmm... now you're in trouble and to get yourself out of it you have to define a __deepcopy__ method as well. Let's just do it:


>>> class ORM(dict):
...     def __getattr__(self, key):
...         return self[key]
...     def __deepcopy__(self, memo):
...         return ORM(copy.deepcopy(dict(self)))
... 
>>> a = ORM(data={'name': 'Something'})
>>> a.data['name']
'Something'
>>> b = copy.deepcopy(a)
>>> a.data['name'] = 'else'
>>> b
{'data': {'name': 'Something'}}

Yeah!!! Now we get what we want. Messing around with the __getattr__ like this is, as far as I know, the only time you have to go in and write your own __deepcopy__ method.

I'm sure hardcore Python language experts can point out lots of intricacies about __deepcopy__ but since I only learned about this today, having it here might help someone else too.